🧶 Beautiful ✨ Detailed 💝 Adorable

Tulip Shell Pattern

Tulip Shell Pattern
4.0★ Rating
2-4 Hours Time Needed
3.3K Made This
✂️

Intermediate Level

Ideal for those with basic crochet experience, featuring slightly more advanced stitches and techniques to expand your skills.

⏱️

Bite-Sized Project

Finishes in 2-4 hours—perfect for an afternoon of creative relaxation.

🏡

Cozy Accent

A warm touch for your space that transforms ordinary corners into inviting nooks filled with handmade charm.

About This Tulip Shell Pattern

This pattern creates a small, decorative tulip-shaped crochet shell worked from the tip and shaped into a realistic shell form. It uses 100% cotton yarn and tight stitches to achieve clean definition and structure. The pattern includes a delicate trim and a border worked with thinner thread for crisp edges. Shaping instructions explain how to stiffen the shell using a glue-and-water mixture for a lasting form.

Tulip Shell Pattern crochet pattern - detailed view of completed project

You will work rounds for the tip, then turn to rows for shaping the body, and finish with a refined trim and border. Detailed shaping and drying steps are included so your shell keeps its elegant spiral shape.

Why You'll Love This Tulip Shell Pattern

I absolutely love this pattern because it turns simple stitches into a sculptural, sea-inspired piece that feels like a miniature work of art. The process of shaping with a glue-and-water mix is satisfying and gives you real control over the final silhouette. I enjoy how a tiny change in hook size or yarn creates a different personality for each shell. Making the trim and border with thin thread adds a crisp finish that always makes me proud of the result.

Tulip Shell Pattern step 1 - construction progress Tulip Shell Pattern step 2 - assembly progress Tulip Shell Pattern step 3 - details and accessories Tulip Shell Pattern step 4 - final assembly and finishing

Switch Things Up

I love to experiment with color to change the mood of the shell; try variegated yarns like Alize Bahar Batik for natural gradient effects.

If you want a chunkier, more sculptural piece, use a thicker yarn and a larger hook — the shell will be bigger and softer.

For a tiny pocket version, use a thinner thread and a 0.75–1.0 mm hook to create a miniature shell ideal for jewelry or ornaments.

I often add diluted acrylic paint or watercolors after shaping to give subtle highlights and a realistic finish to the ridges of the shell.

Consider sewing tiny seed beads along the trim before shaping for a sparkly accent — stitch them on while the piece is still flat.

To make a set, vary the stiffness by changing the glue ratio: use 1:1 for very stiff shells and 2:1 water-to-glue for a softer, more natural feel.

I sometimes skip glue and simply wet-shape the shell for a flexible decorative piece that can be gently squashed into different poses.

Try different border stitches — crab stitch for a twisted edge or a picot row for delicate points — to customize the final look.

Use contrasting thread for the trim to make the opening pop, or match the body color for a seamless, elegant finish.

I recommend stuffing the shell lightly with plastic bags while drying to preserve the internal cavity; this makes it easier to display and keeps the shape intact.

Common Mistakes & How to Fix Them

✗ Not using a small enough hook will make stitches loose and the shell lose shape; use the recommended 1.5 mm or 1.0 mm hooks for trim and a tighter fabric. ✗ Skipping front-loop-only rounds for the trim can hide the decorative edge; attach yarn to the front loop and work the specified 2 sc in one stitch for a neat trim. ✗ Failing to shape with the glue-water mix while the shell is wet can give a floppy result; immerse fully, squeeze out excess, shape, and let it dry with internal supports for best stiffness. ✗ Forgetting to switch to working in rows after the tip will ruin the shell profile; follow the exact row instructions from Row 1 onward to keep the intended shaping. ✗ Not weaving in ends before shaping can leave loose tails trapped under glue; fasten off and weave in ends before you dip the shell into the glue mixture.

Tulip Shell Pattern

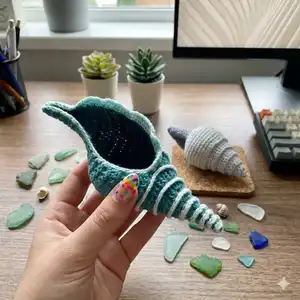
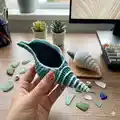
Make a delicate crocheted tulip shell that doubles as charming home decor or a small gift. This pattern walks you through tight stitches, shaping with a glue-and-water mix, and a crisp trim for a professional finish. You'll enjoy the textured spiral and the satisfaction of shaping the shell to life. Perfect for crafters who love small, detailed projects.

Intermediate 2-4 Hours

Materials Needed for Tulip Shell Pattern

— Main Fabric

  • 01
    100% cotton yarn, Camilla (50 g = 125 m) for the shell body, small amounts per shell (approx. 10-30 g depending on size)
  • 02
    100% cotton yarn, Maxi (100 g = 565 m) for trim and border, thin thread equivalent (use small amounts)
  • 03
    Alize 'Bahar Batik' variegated yarn (optional) for color effects
  • 04
    Alize 'Miss' (50 g = 280 m) mentioned as an alternative thin yarn for details

— Tools Required

  • 01
    Crochet hook size 1.5 mm (recommended for shell body)
  • 02
    Crochet hook size 1.0 mm (for trim and border)
  • 03
    Optional hooks: 1.75 mm or 2.00 mm if 1.5 mm is uncomfortable
  • 04
    Scissors
  • 05
    Yarn needle for weaving in ends
  • 06
    Stitch markers (optional)
  • 07
    White glue for shaping
  • 08
    Water for glue mixture
  • 09
    Small plastic bags (to fill shell while drying)
  • 10
    Rubber gloves (optional, for working with glue)
  • 11
    Chopstick or similar tool to shape the long thin shell top

Progress Tracker

0% Complete

— Crocheting the shell :

Info :

Starting from the tip of the shell and working in continuous rounds and in back loops only.

Rnd 1 :

6 sc in a magic ring (6)

Rnd 2 :

* 1 sc in each of next 2 sts, 2 sc in next; rep from * 1 more time (8)

Rnd 3 :

* 1 hdc in each of next 3 sts, 2 hdc in next; rep from * 1 more time (10)

Rnd 4 :

* 1 dc in each of next 4 sts, 2 dc in next; rep from * 1 more time (12)

Rnd 5 :

* 1 dc in each of next 2 sts, 2 dc in next; rep from * 3 more time (16)

Rnd 6 :

* 1 dc in each of next 3 sts, 2 dc in next; rep from * 3 more time (20)

Rnd 7 :

* 1 tr in each of next 3 sts, 2 tr in next; rep from * 4 more time (25)

Rnd 8 :

* 1 tr in each of next 4 sts, 2 tr in next; rep from * 4 more time (30)

Info :

Turn and continue working in rows from now on:

Row 1 :

working through front loops only: ch 1 (=1 sc), 2 sc in next st, 1 sc in each st; turn (31)

Row 2 :

working through both loops from now on: ch 1 (=1 sc), sc2tog, * 1 sc in each of next 2 sts, 2 sc in next; rep from * 7 more times; 1 sc in each of last 4 sts; turn (38)

Row 3 :

ch 1 (=1 sc), 2 sc in next st, 1 sc in each st; turn (39)

Row 4 :

ch 1 (=1 sc), sc2tog, 1 sc in each st; turn (38)

Rows 5, 7, 9, 11 :

same as Row 3

Rows 6, 8, 10 :

same as Row 4

Row 12 :

ch 1 (=1 sc), * sc2tog, 1 sc in next 2 sts, rep from * 8 more times; 1 sc in last 2 sts; turn (30)

Row 13 :

ch 1 (=1 sc), 2 sc in next st, 1 sc in each st; turn (31)

Row 14 :

ch 1 (=1 sc), * sc2tog, 1 sc in next 2 sts, rep from * 6 more times, 1 sc in last 2 sts; turn (24)

Row 15 :

ch 1 (=1 sc), 2 sc in next st, 1 sc in each st; turn (25)

Row 16 :

ch 1 (=1 sc), * sc2tog, 1 sc in next 2 sts, rep from * 5 more times; turn (19)

Row 17 :

ch 1 (=1 sc), 2 sc in next st, 1 sc in each st; turn (20)

Row 18 :

ch 1 (=1 sc), * sc2tog, 1 sc in next 2 sts, rep from * 3 more times, 1 sc in last 3 sts; turn (16)

Row 19 :

ch 1 (=1 sc), sc in next st, 1 sc in each st; turn (16)

Row 20 :

ch 1 (=1 sc), * sc2tog, 1 sc in next st, rep from * 3 more times, 1 sc in last 3 sts; turn (12)

Row 21 :

ch 1 (=1 sc), 1 sc in each st; turn (12)

Row 22 :

ch 1 (=1 sc), * sc2tog, 1 sc in next st, rep from * 2 more times, 1 sc in last 2 sts; turn (9)

Row 23 :

ch 1 (=1 sc), 1 sc in each st; turn (9)

Row 24 :

ch 1 (=1 sc), * sc2tog, 1 sc in next st, rep from * 1 more time, 1 sc in last 2 sts; turn (7)

Rows 25, 26, 27, 28 :

ch 1 (=1 sc), 1 sc in each st; turn (7)

Info :

Fasten off and weave in the ends.

— Crocheting the border :

Trim :

Using 1,00 mm hook and thin thread.

Trim (P1) :

Attach yarn to the front loop of last stitch of last round. Working into those front loops: 2 sc in one stitch all the way to the center of the shell. Fasten off and weave in the ends.

Border :

Using 1,00 mm hook and thin thread.

Border (P1) :

Attach yarn to the top of the shell opening. Ch 1 and then sc all the way around the shell opening inserting hook into the stitches. Now work 2. row only down of the opening of the shell by working 2 dcin one stitch and 1 dc in next. Few stitches before the tip of the shell make 2 hdc and 4-5 sc instead of dc. Fasten off and weave in the ends.

— Shaping the shell :

Infos :

In a cup mix 2 parts of water with 1 part of glue. Immerse the crocheted shell into the glue and water mixture (wear rubber gloves if necessary) until it’s fully wet. Carefully squeeze out excess glue-water mix. Start shaping the shell by gently pulling at the crochet fabric and giving it a desired shape. Use something (like chopstick) to help you straighten out the long ant thin shell top.

Infos :

Use small plastic bags to fill up the shell – it helps to hold it’s shape while the shell is drying. Pinch the bottom of the shell together and shape an opening. Pull at trim. Continue until you are satisfied with the shape. Leave it to dry on a towel. Remove the plastic bags.

— Few more tips and tricks :

Infos :

I use for most of my small crochet work 100% cotton yarn which has 125 m of yarn per 50 grams. Many brands have this weight. Some examples: Madame Tricote “Camilla”, Kartopu “Organica”, Anchor “Creativa Fino”, Schachenmayr “Catania” and there are many more. Yarn label calls for 3,0 mm hook for these yarns but I recommend to use as small hook as you possibly can. I usually work with 1,5 mm. If this feels too uncomfortable then try a bit larger hook like 1,75 mm or 2,00 mm. The smaller the hook, the tighter the stitches and the prettier an end result. But it has to feel comfortable! Crocheting always has to be fun not a struggle. Variegated yarn also gives a lovely effect to the shell. I’ve used Alize “Bahar Batik” with great success. I like to use even thinner yarn and smaller hook (1,0 mm) for added details. Like border and trim in this shell pattern. I mostly use Madame Tricote “Maxi” (100 gr = 565 m) or Alize “Miss” (50 gr = 280m). But again- there are many other options available depending on where you live. If you feel uncomfortable using that thin of the hook and yarn, you can add border and trim with same yarn you did the body of the shell – no problem! In this case I recommend you do *sc, ch 1 or crab stitch for trim. For second row in shell opening try dc, ch1, or plain 1 dc in each sc. Let’s talk some more about shaping the shell. I use regular white glue. It’s available all over the world. I mix either 2 parts of water to 1 part of glue or 1:1 if I want my end result to be even stiffer. If you have sensitive skin please wear rubber gloves while using glue mix. If you like the feel of cotton yarn and don’t want to add any stiffness to your shell you can just wet it in water, give it a desired shape and leave it to dry. I encourage you to experiment and find the way what suits you best! Finally let’s talk about further embellishing your shells. I have used watercolors or diluted acrylic paint to add some extra color to my shells. I’ve also experimented with adding some glitter and sealing it with some varnish. Or hand stitched on some seed beads (must be done before shaping with glue).

Assembly Instructions

  • After crocheting and finishing the trim, pinch the bottom of the shell together and shape the opening before shaping with glue, ensuring the trim is positioned neatly.
  • Fill the inside of the shell with small plastic bags to support and hold the shell shape while the glue-and-water mixture dries.
  • Use a chopstick or similar tool to help straighten and support the long, thin top of the shell during shaping and drying.
  • Once shaped and dried, remove the internal filler and weave in any remaining ends; no additional sewing is required for this decorative shell.
  • Work the border around the shell opening by attaching thin thread at the top and working one sc around, then a second row of alternating 2 dc in one stitch and 1 dc in next as instructed.

Important Notes

  • 💡Work in continuous rounds and do not join or turn unless the pattern specifically instructs you to change.
  • 💡Use a smaller hook than the yarn label suggests to achieve tight, neat stitches for a sculptural finish.
  • 💡Wear rubber gloves if you have sensitive skin when using glue-and-water mixtures for shaping the shell.
  • 💡Pin parts and use internal supports like small plastic bags while drying to maintain the intended shape.
  • 💡Weave in ends before shaping to avoid trapped tails under the glue mixture.

This tulip shell pattern creates a beautiful little coastal-inspired accent that you can shape and finish with delicate trims. It uses tight stitches and creative shaping for a professional look and tactile charm. Make a set in different colors for a lovely display or gift set. 🐚🧶

You ask,

we answer.

FAQs

What size will the finished piece be?

The finished shell size varies with yarn and hook choice; using the recommended yarn and a 1.5 mm hook gives a small decorative shell approximately 8-12 cm long depending on shaping.

Can I use different yarn weights for this pattern?

Yes, you can change yarn weight, but the final size and stiffness will change; adjust hook size accordingly and expect to change the look of the shell.

Do I need prior crochet experience for this pattern?

This pattern is rated intermediate and assumes you know basic stitches like sc, hdc, dc, tr and decreases such as sc2tog, as well as working in rounds and rows.

How long does this project typically take to complete?

Most crocheters complete the crocheting portion in 2-4 hours; shaping and drying time adds extra time while the glue-dry process completes.

How stiff will the shell be after shaping?

Stiffness depends on the glue-to-water ratio: 2 parts water to 1 part glue yields moderate stiffness, 1:1 yields a firmer shell; you can also leave it wet and air-dry for a softer result.