🧶 Beautiful ✨ Detailed 💝 Adorable

Cuddly Nessie Monster Amigurumi Pattern

Cuddly Nessie Monster Amigurumi Pattern
4.2★ Rating
12-15 Hours Time Needed
1.5K Made This
✂️

Intermediate Level

Ideal for those with basic crochet experience, featuring slightly more advanced stitches and techniques to expand your skills.

⏱️

Multi-Day Project

A rewarding 12+ hour journey—perfect for dedicated crafters who love detailed work.

🧸

Cute Companion

An adorable friend to cherish, handcrafted with love to bring comfort and joy for years to come.

About This Cuddly Nessie Monster Amigurumi Pattern

This pattern teaches you how to crochet a large, cuddly Nessie Monster using fluffy plush yarn with step-by-step row counts and shaping notes. It includes guidance for the head, neck, body, tail, fins, rainbow horns and tail details. You will also learn tips for working with fluffy yarn, stuffing evenly and adding felt cloud details.

Cuddly Nessie Monster Amigurumi Pattern crochet pattern - detailed view of completed project

The pattern includes materials, abbreviations, important working tips and detailed crochet rows for each part. Video references and advice on thread-markers and stretching details are included to help you get the best shape.

Why You'll Love This Cuddly Nessie Monster Amigurumi Pattern

I absolutely love this pattern because it combines plush textures with playful rainbow details that make the project delightful to crochet and to hold. I enjoy teaching my techniques for working with fluffy yarn because it makes shaping so much more satisfying when you know the tricks. I love how this Nessie grows as you crochet — each row changes the silhouette and invites you to slow down and enjoy the process. Seeing the finished cuddly monster come to life, soft and squishy, always makes me smile and I hope it brings you joy too.

Cuddly Nessie Monster Amigurumi Pattern step 1 - construction progress Cuddly Nessie Monster Amigurumi Pattern step 2 - assembly progress Cuddly Nessie Monster Amigurumi Pattern step 3 - details and accessories Cuddly Nessie Monster Amigurumi Pattern step 4 - final assembly and finishing

Switch Things Up

I love to customize this Nessie by changing the main yarn color to suit a nursery or gift recipient; try pastel pinks, mint or lavender for a softer look.

To make a mini version, use a thinner plush yarn and a smaller hook; adjust stuffing and make the rainbow details smaller to match scale.

I often swap the rainbow tail colors to create ombre effects or use variegated plush yarn for a unique, subtle color shift.

If you want a sturdier toy for toddlers, use a denser stuffing and hide all knots well; avoid small detachable parts and opt for embroidered eyes instead of felt or small pieces.

I sometimes add a pocket or small loop on the back so the Nessie can be hung as a pillow or nursery decoration.

Want extra texture? Add decorative stitches along the spine or embroider small stars or hearts on the side before fully stuffing.

I also enjoy making matching little accessories—tiny hats, scarves, or a mini rainbow friend—using leftover yarn to make a coordinated set.

For a seasonal twist, change the rainbow palette to autumn tones or use glittery yarn for festive holiday versions of Nessie.

If you like poseable toys, insert a thin wire armature into the neck or tail before stuffing to create slight posability while maintaining safety and softness.

I recommend experimenting with felt shapes for the clouds—try scalloped edges or layered felt for 3D clouds—and secure them with small invisible stitches for a clean finish.

Common Mistakes & How to Fix Them

✗ Skipping thread-markers when instructed will make shaping sections confusing; place contrasting thread-markers exactly as described to keep track of row segments and shaping. ✗ Overstuffing the detail causes lumps and distorted shaping; stuff gradually, stretching the detail slightly and distribute the hollow fiber evenly between steps. ✗ Using the wrong hook size for fluffy yarn creates too loose or too tight fabric; use the recommended 4.5mm for main crocheting and 2.5mm for finishing details and adapt if your gauge differs. ✗ Forgetting to move the beginning thread-marker will shift row alignment and shape; follow the instructions to change the marker position when prompted to maintain the correct monster silhouette.

Cuddly Nessie Monster Amigurumi Pattern

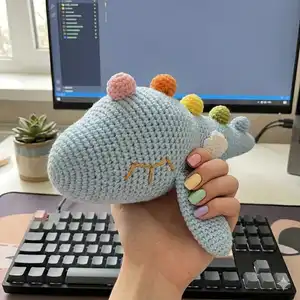
Create a soft, huggable Nessie Monster using fluffy plush yarn and simple amigurumi techniques. This pattern guides you step-by-step through crocheting the head, neck, body, tail and rainbow details with clear row counts and helpful tips for working with fluffy yarn. Perfect for makers who love cozy, tactile projects and want to learn special tricks for shaping and finishing plush toys.

Intermediate 12-15 Hours

Materials Needed for Cuddly Nessie Monster Amigurumi Pattern

— Main Fabric

  • 01
    Fluffy plush yarn (4-5 skeins) in the main color, recommended brands: Himalaya Koala, YarnArt Fable Fur, Koala Baby Premium, Premier Yarns Little Bunny
  • 02
    6 colors of plush yarn (small amounts) for the rainbow tail detail and rainbow horns
  • 03
    White felt - at least two A4 sheets for cloud details
  • 04
    Hollow fiber (polyester stuffing) - stuffing for toys, quantity to fill head, neck, body and tail
  • 05
    Cotton thread for sewing the rainbow detail on the tail (small amount)

— Tools Required

  • 01
    Crochet hook size 4.5mm for crocheting the main plush details
  • 02
    Crochet hook size 2.5mm to hide yarn ends and for small details
  • 03
    Sharp scissors for cutting felt and yarn
  • 04
    Toothbrush (to make plush yarn fluffier)
  • 05
    Tapestry needle for sewing crocheted parts
  • 06
    Small sewing needle for attaching felt clouds
  • 07
    Sewing pins for attaching felt clouds to crocheted body
  • 08
    Washable marker for transferring cloud pattern onto felt
  • 09
    Cardboard for printing or drawing a cloud pattern
  • 10
    Knitting needles for easy sewing of crocheted parts (optional)
  • 11
    Contrasting threads (several) to use as temporary row markers

Progress Tracker

0% Complete

— Head :

Row 1 :

2 ch, in the second chain from the hook - 8 sc (8)

Row 1 (alternate) :

8 sc in mr (8)

Info :

I do it this way because it's more comfortable with fluffy yarn. You can do it the way you know how to crochet. But from now in the pattern I will write like this - 2 ch, in the second chain from the hook ... sc. BUT it's the same that ... sc in mr.

Row 2 :

8 inc (16)

Row 3 :

(1 sc, 1 inc) x 8 (24)

Row 4 :

24 sc (24)

Row 5 :

(5 sc, 1 inc) x 4 (28)

Rows 6-7 :

28 sc (28)

Info :

Use a thread of a contrasting color (next - thread-marker) to mark the beginning of the row.

Row 8 :

Mark the beginning of the row with contrasting thread - (1 sc, 1 inc) x 3, here we put one more thread-marker - 8 sc, here we put the third thread-marker - (1 inc, 1 sc) x 3, here we put the last thread-marker then - 8 inc (42)

Row 9 :

42 sc (42)

Row 10 :

Mark the beginning of the row with first thread-marker (1 inc, 2 sc) x 3, here second thread-marker - 8 sc, here third thread-marker - (2 sc, 1 inc) x 3, and the last thread-marker - 1 inc, 6 sc, 2 inc, 6 sc, 1 inc (52)

Rows 11-16 :

52 sc (52)

Row 17 :

(1 dec, 2 sc) x 3, 8 sc, (2 sc, 1 dec) x 3, 1 dec, 6 sc, 2 dec, 6 sc, 1 dec (42)

Row 18 :

(5 sc, 1 dec) x 6 (36)

Row 19 :

2 sc, 1 dec, (4 sc, 1 dec) x 5, 2 sc (30)

Row 20 :

4 sc, 1 dec (8 sc, 1 dec) x 2, 4 sc (27)

Row 21 :

(7 sc, 1 dec) x 3 (24)

Info :

ATTENTION: stretch the detail a little and fill more (here we fill the Monster's head fully). Spread the hollow fiber evenly.

— Neck :

Rows 22-26 :

24 sc (24)

Info :

stretch the detail a little, fill, spread the hollow fiber evenly

Rows 27-31 :

24 sc (24)

Info :

stretch the detail a little, fill, spread the hollow fiber evenly

Rows 32-36 :

24 sc (24)

Info :

stretch the detail a little, fill, spread the hollow fiber evenly

Rows 37-41 :

24 sc (24)

Row 42 :

(5 sc, 1 inc) x 4 (28)

Row 43 :

28 sc (28)

Row 44 :

(6 sc, 1 inc) x 4 (32)

— Body :

Info :

Start crocheting the body. NOW we will change the place of the beginning of the row (move thread-marker) to see the shape correctly.

Row 45 :

5 sc, now there is a new beginning of the row - put a thread-marker here, 1 inc, 3 sc, 1 inc, here we put one more thread-marker - 10 sc, here we put the third thread-marker - 1 inc, 3 sc, 1 inc, here we put the last thread-marker - 1 inc, 10 sc, 1 inc (38)

Row 46 :

30 sc, 2 inc, 6 sc (40)

Row 47 :

1 inc, 22 sc, 1 inc, 7 sc, 2 inc, 7 sc (44)

Row 48 :

1 inc, 5 sc, 2 inc, 10 sc, 2 inc, 5 sc, 2 inc, 2 sc, 1 inc, 2 sc, 1 inc, 4 sc, 1 inc, 2 sc, 1 inc, 2 sc, 1 inc (56)

Row 49 :

56 sc (56)

Row 50 :

1 inc, 7 sc, 2 inc, 12 sc, 2 inc, 7 sc, 2 inc, 22 sc, 1 inc (64)

Info :

Here I ended up with the first skein of fluffy yarn

Rows 51-54 :

64 sc (64)

Row 55 :

1 inc, 9 sc, 2 inc, 14 sc, 2 inc, 9 sc, 1 inc, 26 sc (70)

Rows 56-65 :

70 sc (70)

Info :

ATTENTION: Here we stretch the Monster's body a bit (photos below) and continue stuffing and shaping as you go.

Assembly Instructions

  • Sew the head to the neck by aligning the final rounds of the head with the top opening of the neck, using a tapestry needle and whipstitch to secure evenly.
  • Attach fins to the sides of the body by positioning them symmetrically and sewing with small, hidden stitches; pin each fin before sewing to check placement.
  • Sew the legs/feet (if crocheted) to the bottom of the body using a ladder stitch or whipstitch, spacing evenly for stability and a balanced look.
  • Attach felt cloud details to the body using sewing pins to position them first, then stitch with white thread through the felt and into the plush surface.
  • Add rainbow tail detail and rainbow horns by sewing small crocheted pieces or plush yarn tufts in place with cotton thread, securing firmly so they withstand gentle play.

Important Notes

  • 💡Use contrasting thread-markers to mark the beginning of rows; you will move these markers several times to maintain correct shaping and alignment.
  • 💡Stuff gradually and evenly, stretching the detail slightly as instructed to achieve the smooth, rounded shape the pattern describes.
  • 💡Work with the recommended hook sizes and test your gauge; fluffy yarn behaves differently so adjust hook size if your fabric looks too loose or too tight.
  • 💡Pin parts in place and check symmetry before sewing permanently to ensure a balanced finished monster.

This cuddly Nessie pattern brings a dreamy, plush friend into your life with soft textures and rainbow accents that make every stitch a delight. Whether you crochet it for yourself or as a heartfelt gift, it will be a cozy companion to hug and cherish. Grab your fluffy yarn and enjoy the slow, meditative process of creating something handmade and full of personality. 🧶✨

You ask,

we answer.

FAQs

What size will the finished piece be?

The finished Nessie measures approximately a large plush toy size (varies by yarn weight and tension) — expect a sizeable cuddly monster when using the recommended fluffy yarn and 4.5mm hook.

Can I use different yarn weights for this pattern?

Yes, you can use other plush yarns, but the final size and texture will change; choose an appropriate hook for your yarn and be prepared to adjust stuffing and shaping.

Do I need prior crochet experience for this pattern?

This pattern is rated intermediate; basic knowledge of single crochet, increases, decreases and working in the round is recommended, plus patience for working with fluffy yarn.

How long does this project typically take to complete?

Most makers will complete this project over multiple sessions — typically 12-15 hours total depending on experience, speed, and the level of finishing detail you add.

How do I attach felt cloud details without them slipping?

Use sewing pins to position felt clouds first, then stitch with a thin needle and white thread through the felt and into the plush surface, securing the edges with small, even stitches.