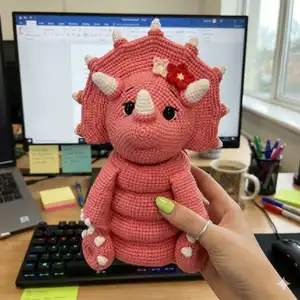
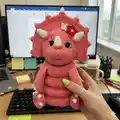
Make a charming hand-crocheted Triceratops toy that doubles as a playful ring tower for kids. You will follow detailed round-by-round instructions, clear photos, and assembly tips to build each piece from the base to the horns. This pattern is perfect if you enjoy shaping, joining rings, and adding cute details like spots and nails to personalize your dino.
Progress Tracker
0% Complete
— BASE :
Round 4 :
(1 sc; inc)*6 (18)
Round 7 :
(2 sc; inc)*6 (24)
Round 11 :
(3 sc; inc)*6 (30)
Round 16 :
(4 sc; inc)*6 (36)
Round 22 :
(5 sc; inc)*6 (42)
Round 29 :
(6 sc; inc)*6 (48)
Round 37 :
(7 sc; inc)*6 (54)
Round 46 :
(8 sc; inc)*6 (60)
Round 47 :
FLO (9 sc; inc)*6 (66)
Round 48 :
5 sc; inc; (10 sc; inc)*5; 5 sc (72)
Round 49 :
(11 sc; inc)*6 (78)
Round 50 :
6 sc; inc; (12 sc; inc)*5; 6 sc (84)
Round 51 :
(13 sc; inc)*6 (90)
Round 52 :
7 sc; inc; (14 sc; inc)*5; 7 sc (96)
Round 53 :
(15 sc; inc)*6 (102)
Round 54 :
8 sc; inc; (16 sc; inc)*5; 8 sc (108)
Round 55 :
(17 sc; inc)*6 (114)
Round 56-62 :
114 sc (114)
Round 63 :
(17 sc; dec)*6 (108)
Round 64 :
8 sc; dec; (16 sc; dec)*5; 8 sc (102)
Round 65 :
(15 sc; dec)*6 (96)
Round 66 :
7 sc; dec; (14 sc; dec)*5; 7 sc (90)
Round 67 :
(13 sc; dec)*6 (84)
Round 68 :
6 sc; dec; (12 sc; dec)*5; 6 sc (78)
Round 69 :
(11 sc; dec)*6 (72)
Round 70 :
5 sc; dec; (10 sc; dec)*5; 5 sc (66)
Round 71 :
(9 sc; dec)*6 (60)
Round 72 :
connect round 71 with round 47 (BLO) with 60 sc (60) fill with stuffing as you go, then continue to work in rounds.
Round 73 :
(8 sc; dec)*6 (54)
Round 74 :
(7 sc; dec)*6 (48)
Round 75 :
(6 sc; dec)*6 (42)
Round 76 :
(5 sc; dec)*6 (36)
Round 77 :
(4 sc; dec)*6 (30)
Round 78 :
(3 sc; dec)*6 (24)
Round 79 :
(2 sc; dec)*6 (18)
Round 80 :
(1 sc; dec)*6 (12)
Round 81 :
6 dec (6) cut the yarn, pull off hole, hide a tail.
— LEGS :
Round 3 :
(1 sc; inc)*6 (18)
Round 4 :
(2 sc; inc)*6 (24)
Round 5 :
(3 sc; inc)*6 (30)
Round 6 :
(4 sc; inc)*6 (36)
Round 7 :
BLO (2 sc; inc)*4; 24 sc (40)
Round 8 :
(3 sc; inc)*4; 24 sc (44)
Round 9 :
3 sc; dec; (4 sc; inc)*2; 3 sc; dec; 24 sc(44)
Round 10 :
2 sc; dec; (4 sc; dec)*2; 2 sc; dec; 24 sc(40)
Round 11 :
3 sc; (3 sc; dec)*2; 27 sc (38)
Round 12 :
3 sc; (2 sc; dec)*2; 27 sc (36)
Round 14 :
(4 sc; dec)*6 (30)
Round 15 :
(3 sc; dec)*6 (24) fill with stuffing
Round 16 :
BLO (2 sc; dec)*6 (18)
Round 17 :
(1 sc; dec)*6 (12) close the hole, leave a tail for sewing
Item Name (P1) :
NAILS (make 4 on each foot) With white yarn in one sc of the foot make (3 ch; 3 tr) and crochet them together, fasten off, cut the yarn, pull it through and tide a knot like in the pictures, then hide sticking yarn.
Info :
Sew legs to base in the front loops of round 16 like in the pictures (pin it before sewing, it really helps:)
— LARGE RING :
Round 1 :
60 ch; slst in 1st ch (60)
Round 2 :
(9 sc; inc)*6 (66)
Round 3 :
5 sc; inc; (10 sc; inc)*5; 5 sc (72)
Round 4 :
(11 sc; inc)*6 (78)
Round 5 :
6 sc; inc; (12 sc; inc)*5; 6 sc (84)
Round 6 :
(13 sc; inc)*6 (90)
Round 7 :
7 sc; inc; (14 sc; inc)*5; 7 sc (96)
Round 8 :
(15 sc; inc)*6 (102)
Round 16 :
(15 sc; dec)*6 (96)
Round 17 :
7 sc; dec; (14 sc; dec)*5; 7 sc (90)
Round 18 :
(13 sc; dec)*6 (84)
Round 19 :
6 sc; dec; (12 sc; dec)*5; 6 sc (78)
Round 20 :
(11 sc; dec)*6 (72)
Round 21 :
5 sc; dec; (10 sc; dec)*5; 5 sc (66)
Round 22 :
(9 sc; dec)*6 (60)
Info :
Sew round 22 with round 1, fill with stuffing as you go.
— MIDDLE RING :
Round 1 :
48 ch; slst in 1st ch (48)
Round 2 :
(7 sc; inc)*6 (54)
Round 3 :
4 sc; inc; (8 sc; inc)*5; 4 sc (60)
Round 4 :
(9 sc; inc)*6 (66)
Round 5 :
5 sc; inc; (10 sc; inc)*5; 5 sc (72)
Round 6 :
(11 sc; inc)*6 (78)
Round 7 :
6 sc; inc; (12 sc; inc)*5; 6 sc (84)
Round 8 :
(13 sc; inc)*6 (90)
Round 16 :
(13 sc; dec)*6 (84)
Round 17 :
6 sc; dec; (12 sc; dec)*5; 6 sc (78)
Round 18 :
(11 sc; dec)*6 (72)
Round 19 :
5 sc; dec; (10 sc; dec)*5; 5 sc (66)
Round 20 :
(9 sc; dec)*6 (60)
Round 21 :
4 sc; dec; (8 sc; dec)*5; 4 sc (54)
Round 22 :
(7 sc; dec)*6 (48)
Info :
Sew round 22 with round 1, fill with stuffing as you go.
— ARMS :
Round 3 :
(1 sc; inc)*6 (18)
Round 4 :
(2 sc; inc)*6 (24)
Round 10 :
(10 sc; dec)*2 (22)
Round 16 :
(9 sc; dec)*2 (20)
Round 22 :
(8 sc; dec)*2 (18)
Round 23 :
18 sc (18) fill with a little bit of stuffing
Round 24 :
(7 sc; dec)*2 (16)
Round 25 :
Fold in half and make 8 sc, fasten off, leave a long tail for sewing.
Item Name (P1) :
NAILS (make 3 on each hand) With white yarn in one sc of the hand make (2 ch; 2 dc) and crochet them together, fasten off, cut the yarn, pull it through and tide a knot the same way as we did with feet, then hide sticking yarn.
Info :
Make "dimples" in the arms. Sew arms to the small ring as you can see in the pictures
— SMALL RING :
Round 1 :
36 ch; slst in 1st ch (36)
Round 2 :
(5 sc; inc)*6 (42)
Round 3 :
3 sc; inc; (6 sc; inc)*5; 3 sc (48)
Round 4 :
(7 sc; inc)*6 (54)
Round 5 :
4 sc; inc; (8 sc; inc)*5; 4 sc (60)
Round 6 :
(9 sc; inc)*6 (66)
Round 7 :
5 sc; inc; (10 sc; inc)*5; 5 sc (72)
Round 8 :
(11 sc; inc)*6 (78)
Round 16 :
(11 sc; dec)*6 (72)
Round 17 :
5 sc; dec; (10 sc; dec)*5; 5 sc (66)
Round 18 :
(9 sc; dec)*6 (60)
Round 19 :
4 sc; dec; (8 sc; dec)*5; 4 sc (54)
Round 20 :
(7 sc; dec)*6 (48)
Round 21 :
3 sc; dec; (6 sc; dec)*5; 3 sc (42)
Round 22 :
(5 sc; dec)*6 (36) Sew round 22 with round 1, fill with stuffing as you go.
— HEAD :
Info :
The head consists of three parts: main part, large bony frill and inner part.
— MAIN PART (with pink yarn) :
Round 3 :
(1 sc; inc)*6 (18)
Round 4 :
(5 sc; inc)*3 (21)
Round 5 :
(6 sc; inc)*3 (24)
Round 6 :
(7 sc; inc)*3 (27)
Round 7 :
(8 sc; inc)*3 (30)
Round 8 :
(9 sc; inc)*3 (33)
Round 9 :
(10 sc; inc)*3 (36)
Round 10 :
(11 sc; inc)*3 (39)
Round 11 :
(12 sc; inc)*3 (42)
Round 12 :
(13 sc; inc)*3 (45)
Round 13 :
(14 sc; inc)*3 (48)
Round 14 :
(15 sc; inc)*3 (51)
Round 15 :
(16 sc; inc)*3 (54)
Round 16 :
(8 sc; inc)*4; 17 sc; inc (59)
Round 17 :
(9 sc; inc)*4; 18 sc; inc (64)
Round 18 :
(10 sc; inc)*4; 19 sc; inc (69)
Round 19 :
(5 sc; inc)*8; 21 sc (77)
Round 20 :
(6 sc; inc)*7; 28 sc (84)
Round 27 :
(BLO 60 sc); 3 sc; 18 ch (skip 18 sc); 3 sc (84)
Round 29 :
(BLO 60 sc); 24 sc (84)
Round 34 :
(12 sc; dec)*6 (78)
Round 35 :
(11 sc; dec)*6 (72)
Round 36 :
(10 sc; dec)*6 (66)
Round 37 :
(9 sc; dec)*6 (60)
Round 38 :
(8 sc; dec)*6 (54)
Round 39 :
(7 sc; dec)*6 (48)
Round 40 :
(6 sc; dec)*6 (42)
Round 41 :
(5 sc; dec)*6 (36)
Round 42 :
(4 sc; dec)*6 (30)
Round 43 :
(3 sc; dec)*6 (24)
Round 44 :
(2 sc; dec)*6 (18)
Round 45 :
(1 sc; dec)*6 (12)
— LARGE BONY FRILL :
Info :
With pink yarn start to crochet in 60 front loops of R 26:
Round 1 :
5 sc; (2 inc; 10 sc)*4; 2 inc; 5 sc turn and continue to crochet in front loops of round 28; 5 sc; (2 inc; 10 sc)*4; 2 inc; 5 sc (140)
Round 3 :
Sew back loops of round 2, crochet FLO: dec; 4 sc; (2 inc; 12 sc)*4; 2 inc; 4 sc; 2 dec; 4 sc; (2 inc; 12 sc)*4; 2 inc; 4 sc; dec (156)
Round 5 :
Sew back loops of round 4, crochet FLO: dec; 4 sc; (2 inc; 14 sc)*4; 2 inc; 4 sc; 2 dec; 4 sc; (2 inc; 14 sc)*4; 2 inc; 4 sc; dec (172)
Round 7 :
Sew back loops of round 6, crochet FLO: dec; 4 sc; (2 inc; 7 sc)*8; 2 inc; 4 sc; 2 dec; 4 sc; (2 inc; 7 sc)*8; 2 inc; 4 sc; dec (204)
Round 9 :
Sew back loops of round 8, crochet FLO: 2 dec; 2 sc; (2 inc; 9 sc)*8; 2 inc; 2 sc; 4 dec; 2 sc; (2 inc; 9 sc)*8; 2 inc; 2 sc; 2 dec (232)
Round 10 :
232 sc (232) fasten off.
Infos :
Now we need to make 9 points on edges, they will be located in places where we made 2 inc in the R9 of the frill (photos 1-9 on page 13). Sew stitches between those points FLO, fill with stuffing as you go
— POINTS on edges (9) :
With white yarn R1. BLO 4sc, turn 4 sc (8) R2. 8 sc (8) R3. (2 sc; dec)*2 (6) R4. 6 sc (6) fill with stuffing, fasten off. With pink yarn make (1 sc; inc)*4 (12) in front loops around each point.
Info :
Insert safety eyes in R16, between 11sc-12sc (15 sc apart) between 26sc-27sc or sew crochet eyes.
— INNER PART :
Info :
Now return to the hole that we left between rounds 26 and 27, continue to crochet in rounds:
Round 5 :
(4 sc; dec)*6 (30)
Round 8 :
(3 sc; dec)*6 (24)
Round 11 :
(2 sc; dec)*6 (18)
Round 13 :
(1 sc; dec)*6 (12)
Round 14 :
6 dec (6) fasten off.
— TAIL :
Round 4 :
(2 inc; 4 sc)*2 (16)
Round 6 :
1 sc; 2 inc; 6 sc; 2 inc; 5 sc (20)
Round 8 :
2 sc; 2 inc; 8 sc; 2 inc; 6 sc (24)
Round 10 :
3 sc; 2 inc; 10 sc; 2 inc; 7 sc (28)
Round 12 :
4 sc; 2 inc; 12 sc; 2 inc; 8 sc (32)
Round 14 :
5 sc; 2 inc; 14 sc; 2 inc; 9 sc (36)
Round 16 :
6 sc; 2 inc; 16 sc; 2 inc; 10 sc (40)
Round 18 :
7 sc; 2 inc; 18 sc; 2 inc; 11 sc (44)
Round 20 :
8 sc; 2 inc; 20 sc; 2 inc; 12 sc (48)
Round 22 :
9 sc; 2 inc; 22 sc; 2 inc; 13 sc (52)
Round 24 :
10 sc; 2 inc; 24 sc; 2 inc; 14 sc (56)
Round 26 :
11 sc; 2 inc; 26 sc; 2 inc; 15 sc (60)
Round 28 :
12 sc; 2 inc; 28 sc; 2 inc; 16 sc (64)
Round 29 :
64 sc (64) fasten off, fill with stuffing, sew to the base.
— SPOTS :
— LARGE SPOTS :
(make 3) With purple yarn Round 1. 6 sc in MR (6) Round 2. 6 inc (12) Round 3. (1 sc; inc)*6 (18) Round 4. (2 sc; inc)*6 (24) fasten off, leave long tail for sewing.
— SMALL SPOTS :
(make 8) With purple yarn Round 1. 6 sc in MR (6) Round 2. 6 inc (12) fasten off, leave long tail for sewing.
— MEDIUM SPOTS :
(make 6) With purple yarn Round 1. 6 sc in MR (6) Round 2. 6 inc (12) Round 3. (1 sc; inc)*6 (18) fasten off, leave long tail for sewing.
— BROW HORNS :
Info :
(make 2) Start with white yarn
Round 2 :
(1 sc; inc)*3 (9)
Round 4 :
(2 sc; inc)*3 (12)
Round 6 :
(3 sc; inc)*3 (15)
Round 7-10 :
15 sc (15) change to pink color
Round 11 :
FLO (1 sc; inc)*6 (18)
Round 12 :
18 sc (18) fasten off.
— SHORT HORN :
Info :
(make 1) Start with white yarn
Round 2 :
(1 sc; inc)*3 (9)
Round 4 :
(2 sc; inc)*3 (12)
Round 6 :
(3 sc; inc)*3 (15)
Round 7-8 :
15 sc (15) change to pink color
Round 9 :
FLO (1 sc; inc)*6 (18)
Round 10 :
18 sc (18) fasten off.
Info :
Fill with stuffing and sew horns as in the pictures using back loops of round 10 (brow horns) and back loops of round 8 (short horn)
— FINAL NOTES :
Info :
Sew spots in random order to the tail rings and back of the head, pin before sewing. You may skip this part if you don't like sewing.
This cheerful Triceratops ring tower is ready to delight young ones and add charm to your handmade collection. Customize colors and spots to make each dino truly your own. Thank you for making something special by hand — happy crocheting! 🧶🦖