🧢 Beautiful ✨ Detailed πŸ’ Adorable

Tommy The Fisher Amigurumi Pattern

Tommy The Fisher Amigurumi Pattern
4.8β˜… Rating
12-15 Hours Time Needed
3.2K Made This
βœ‚οΈ

Intermediate Level

Ideal for those with basic crochet experience, featuring slightly more advanced stitches and techniques to expand your skills.

⏱️

Multi-Day Project

A rewarding 12+ hour journeyβ€”perfect for dedicated crafters who love detailed work.

🧸

Cute Companion

An adorable friend to cherish, handcrafted with love to bring comfort and joy for years to come.

About This Tommy The Fisher Amigurumi Pattern

This pattern creates a 30 cm Tommy the Fisher amigurumi complete with hat, hair, jacket, trousers, shoes and tiny fish accessories. You will work in continuous rounds using Yarn Art Jeans and Etrofil yarns with clear color-change instructions. The design includes step-by-step rounds for each body part and clothing pieces to make assembly straightforward. Photos and notes guide placement of safety eyes and finishing touches.

Tommy The Fisher Amigurumi Pattern crochet pattern - detailed view of completed project

Detailed materials and abbreviations are provided so you can follow along easily and create a polished, poseable doll. Suitable as a decorative piece or a gentle toy when finished carefully.

Why You'll Love This Tommy The Fisher Amigurumi Pattern

I absolutely love this pattern because it balances character and technique in a really satisfying way. I enjoy the layered clothing design β€” the tiny trousers, jacket and hat add so much personality. The clear round-by-round instructions make shaping predictable and fun as you see the doll take form. I also love how customizable the colors and accessories are, letting me add my own little details for a truly unique finished piece.

Tommy The Fisher Amigurumi Pattern step 1 - construction progress Tommy The Fisher Amigurumi Pattern step 2 - assembly progress Tommy The Fisher Amigurumi Pattern step 3 - details and accessories Tommy The Fisher Amigurumi Pattern step 4 - final assembly and finishing

Switch Things Up

I love how easy it is to customize Tommy by swapping colors β€” try pastel tones for a softer nursery-friendly doll or bright nautical hues for a beachy look.

I often change the yarn weight and hook size to create different sizes: bulky yarn with a larger hook makes a chunky, cuddle-friendly Tommy while finer yarn makes a small collectible version.

I like to add embroidered freckles or a tiny stitched smile to change the personality β€” experiment with eye placement and mouth position to create different expressions.

For a posable version I sometimes add a thin wire core inside the limbs; if you prefer a soft toy, skip the wire and simply stuff firmly for stability.

Swap the trousers for a skirt, or crochet tiny accessories like a scarf or tiny fish bag to expand the character's story and make gift sets.

Try using different yarn brands or textures β€” a boucle jacket or fuzzy yarn for hair adds tactile interest and a unique finish.

Change the hat style: make a beanie or a fisherman cap variation by altering the brim rows and shaping rounds slightly.

I sometimes replace safety eyes with embroidered eyes for a fully baby-safe toy suitable for infants β€” just be sure to anchor stitches securely.

Make a family set by resizing the pattern for a parent and baby pair, adjusting hook and yarn weight consistently for proportional results.

Finally, personalize with little details like a sewn-on initial inside the jacket or a tiny wooden button to create heirloom-quality handmade gifts.

Common Mistakes & How to Fix Them

βœ— Skipping stitch markers at the join between pant legs can misalign the body join; place markers and count chains before joining to ensure even placement. βœ— Forgetting to change color at the correct round results in banding errors; mark the round where color changes occur and move your marker when instructed. βœ— Understuffing limbs leads to floppy arms and legs; stuff evenly as you go and add more fiberfill before closing to keep the shape firm. βœ— Placing safety eyes too high or low will change the facial expression; install eyes between rows 17-18, ten stitches apart as instructed for the intended look. βœ— Not cutting an insole from plastic or fiberboard for the foot reduces stability; cut and insert the insole before finishing the foot for a firm sole. βœ— Ignoring back loop/ front loop instructions will change the texture; follow BLO/FLO notes exactly to get the correct ribbing and edge definition.

Tommy The Fisher Amigurumi Pattern

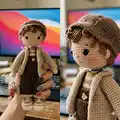
Bring a charming handmade fisherman to life with this detailed Tommy the Fisher amigurumi pattern. You will enjoy precise step-by-step rounds, clear color-change guidance, and helpful assembly notes to make a 30 cm decorative or baby-safe toy. Perfect for crocheters who love character dolls with clothing and accessories. The pattern includes materials, abbreviations, and full instructions for head, limbs, clothes, hair, hat and shoes.

Intermediate 12-15 Hours

Materials Needed for Tommy The Fisher Amigurumi Pattern

β€” Main Fabric

  • 01
    Skin color No.73 Yarn Art Jeans (use for head, hands, legs)
  • 02
    Beige color No.87 Yarn Art Jeans (for jacket/trouser details)
  • 03
    Yellow color No.84 Yarn Art Jeans (striped sweater rows)
  • 04
    Dark brown color No.70 Yarn Art Jeans (trousers, straps)
  • 05
    Brown color No.71 Yarn Art Jeans (hat, shoe top)
  • 06
    Brown color No.59 Etrofil Jeans (hair)
  • 07
    White color No.62 Yarn Art Jeans (shoe sole and stripes)
  • 08
    Grey color No.46 Yarn Art Jeans (body main color)
  • 09
    Polyester fiberfill for stuffing: 300 gram (as specified)

β€” Tools Required

  • 01
    Crochet hook size 2.3mm
  • 02
    Black safety eyes size: 10mm (2 pieces)
  • 03
    Polyester fiberfill for stuffing: 300 gram
  • 04
    2 small buttons
  • 05
    Sewing needle/yarn needle
  • 06
    Scissors
  • 07
    Fabric glue or glue gun
  • 08
    Stitch markers
  • 09
    Plastic or fiberboard for insoles (cut to fit)
  • 10
    Wire for posable limbs (optional) or thin metal rod as shown for arm wiring

Progress Tracker

0% Complete

β€” HEAD :

Rnd 1 :

6 sc in MR (6)

Rnd 2 :

6 inc (12)

Rnd 3 :

(sc, inc)*6 (18)

Rnd 4 :

(sc, inc, sc)*6 (24)

Rnd 5 :

(3 sc, inc)*6 (30)

Rnd 6 :

(2 sc, inc, 2 sc)*6 (36)

Rnd 7 :

(5 sc, inc)*6 (42)

Rnd 8 :

(3 sc, inc, 3 sc)*6 (48)

Rnd 9 :

(7 sc, inc)*6 (54)

Rnd 10 :

(4 sc, inc, 4 sc)*6 (60)

Rnd 11 :

(9 sc, inc)*6 (66)

Rnd 12-20 :

66 sc (66)

Info :

Eyes in row 17-18, each eye is 10 stitches apart. Nose in row 19-20.

Rnd 21 :

(9 sc, dec)*6 (60)

Rnd 22 :

(4 sc, dec, 4 sc)*6 (54)

Rnd 23 :

(7 sc, dec)*6 (48)

Rnd 24 :

(3 sc, dec, 3 sc)*6 (42)

Rnd 25 :

(5 sc, dec)*6 (36)

Rnd 26 :

(2 sc, dec, 2 sc)*6 (30)

Rnd 27 :

(3 sc, dec)*6 (24)

Rnd 28 :

(sc, dec, sc)*6 (18)

Info :

Fiberfill, fasten off and leaving a tail to sew into the body

β€” EARS :

Left ear (P1) :

(1 ch, 2 sc, 3 dc) in MR (5)

Info :

Draw yarn and fasten off. Leaving a tail to sew into the head

Right ear (P1) :

(2 ch, 2 dc, 3 sc) in MR (5)

Info :

Draw yarn and fasten off. Leaving a tail to sew into the head. Sewing the ears into the head in row 17-20

β€” RIGHT LEG :

Rnd 1 :

Make a chain of 9 ch, start in second ch from the hook: sc, 6 sc, 3 sc into the last stitch, 6 sc, inc (18)

Rnd 2 :

inc, 6 sc, 3 inc, 6 sc, 2 inc (24)

Rnd 3 :

sc, inc, 7 sc, hdc, 5 inc*dc, 2 dc, 2 hdc, 2 sc, inc, sc, inc (32)

Rnd 4 :

BLO: 32 sc (32)

Rnd 5-6 :

32 sc (32)

Rnd 7 :

10 sc, 6 dec, 10 sc (26)

Rnd 8 :

26 sc (26)

Rnd 9 :

7 sc, 6 dec, 7 sc (20)

Rnd 10 :

6 sc, 4 dec, 6 sc (16)

Rnd 11 :

15 sc, inc (17)

Rnd 12 :

2 sc, dec, 9 sc, inc, 3 sc (17)

Rnd 13 :

inc, sc, dec, 10 sc, inc, 2 sc (18)

Rnd 14 :

18 sc (18)

Rnd 15 :

14 sc, inc, 2 sc, inc (20)

Rnd 16 :

20 sc (20)

Rnd 17 :

2 sc, dec, 12 sc, inc, 3 sc (20)

Rnd 18-22 :

20 sc (20)

Rnd 23 :

dec, 14 sc, dec, 2 sc (18)

Rnd 24 :

inc, 7 sc, inc, 9 sc (20)

Rnd 25 :

20 sc (20)

Rnd 26 :

8 sc, dec, 6 sc, inc, 3 sc (20)

Rnd 27 :

inc, 7 sc, dec, 10 sc (20)

Rnd 28 :

3 sc, inc, 11 sc, inc, 4 sc (22)

Rnd 29-30 :

22 sc (22)

Rnd 31 :

3 sc, inc, 18 sc (23)

Rnd 32 :

19 sc, inc, 3 sc (24)

Info :

Change to Grey color

Rnd 33-35 :

24 sc (24)

Info :

Fiberfill, cut the yarn

β€” LEFT LEG :

Rnd 1 :

Make a chain of 9 ch, start in second ch from the hook: sc, 6 sc, 3 sc into the last stitch, 6 sc, inc (18)

Rnd 2 :

inc, 6 sc, 3 inc, 6 sc, 2 inc (24)

Rnd 3 :

sc, inc, 2 sc, 2 hdc, 2 dc, 5 inc*dc, hdc, 7 sc, inc, sc, inc (32)

Rnd 4 :

BLO: 32 sc (32)

Rnd 5-6 :

32 sc (32)

Rnd 7 :

10 sc, 6 dec, 10 sc (26)

Rnd 8 :

26 sc (26)

Rnd 9 :

8 sc, 6 dec, 6 sc (20)

Rnd 10 :

7 sc, 4 dec, 5 sc (16)

Rnd 11 :

15 sc, inc (17)

Rnd 12 :

2 sc, inc, 9 sc, dec, 3 sc (17)

Rnd 13 :

inc, sc, inc, 10 sc, dec, 2 sc (18)

Rnd 14 :

18 sc (18)

Rnd 15 :

inc, 2 sc, inc, 14 sc (20)

Rnd 16 :

20 sc (20)

Rnd 17 :

2 sc, inc, 12 sc, dec, 3 sc (20)

Rnd 18-22 :

20 sc (20)

Rnd 23 :

dec, sc, dec, 15 sc (18)

Rnd 24 :

inc, 9 sc, inc, 7 sc (20)

Rnd 25 :

20 sc (20)

Rnd 26 :

3 sc, inc, 9 sc, dec, 5 sc (20)

Rnd 27 :

inc, 9 sc, dec, 8 sc (20)

Rnd 28 :

4 sc, inc, 11 sc, inc, 3 sc (22)

Rnd 29-30 :

22 sc (22)

Rnd 31 :

17 sc, inc, 4 sc (23)

Rnd 32 :

4 sc, inc, 18 sc (24)

Info :

Change to Grey color

Rnd 33-35 :

24 sc (24)

Info :

Fiberfill. Don’t cut the yarn

β€” BODY :

Rnd 1 :

From left leg, chain 3 to and slip stitch to right leg (at a position 5 stitches from the yarn end of the right leg): 24 sc, 3 sc (into 3 chain), 24 sc, 3 sc (into 3 chain) (54)

Rnd 2-4 :

54 sc (54)

Rnd 5 :

13 sc, (move the marking position here) change to yellow color: 54 sc (54)

Rnd 6 :

54 sc (54)

Rnd 7 :

Change to white color: 54 sc (54)

Rnd 8 :

54 sc (54)

Rnd 9 :

Change to yellow color: 54 sc (54)

Rnd 10 :

54 sc (54)

Rnd 11 :

Change to white color: (7 sc, dec)*6 (48)

Rnd 12 :

(3 sc, dec, 3 sc)*6 (42)

Info :

If you want to make a wire diagram to make the doll sturdy, follow the instructions in the pictures, or you can not make the diagram if you want the doll to be soft.

Info :

Change to 2 rows of yellow color and 2 rows of white color alternately from round 13 to round 22

Rnd 13-22 :

42 sc (10 rounds) (42)

Rnd 23 :

Change to white color: (5 sc, dec)*6 (36)

Rnd 24 :

(2 sc, dec, 2 sc)*6 (30)

Rnd 25 :

Change to yellow color: (3 sc, dec)*6 (24)

Rnd 26 :

24 sc (24)

Info :

Fiberfill, fasten off and cut the yarn

β€” HANDS :

Right hand :

Rnd 1: 6 sc in MR (6)

Rnd 2 :

6 inc (12)

Rnd 3-4 :

12 sc (12)

Rnd 5 :

(2 sc, inc)*4 (16)

Rnd 6-7 :

16 sc (16)

Rnd 8 :

2 sc, sc3tog, 11 sc (14)

Rnd 9 :

sc, sc3tog, 10 sc (12)

Rnd 10 :

Change to yellow color: BLO: 12 sc; FLO: 12 sc (12)

Rnd 11 :

12 sc (12)

Rnd 12 :

Change to white color: 12 sc (12)

Rnd 13 :

12 sc (12)

Rnd 14-32 :

Hook 2 yellow color rows and then 2 white color rows until the hands ends: 12 sc (12)

Info :

Fiberfill, fasten off and leaving a tail to sew into the body

Left hand :

Make in same rounds as right hand: 6 sc in MR, 6 inc, 12 sc rounds, (2 sc, inc)*4, 16 sc, 2 sc, sc3tog, 11 sc, sc, sc3tog, 10 sc, change colors same as right hand, finish Rnd 14-32 same (12)

Info :

Connect hands to the body, mark the 4 positions. Sew the 6 stitches of the hand to the body.

β€” TROUSERS :

Rnd 1 :

Start with Beige color: Make a chain of 36 ch and close circle: 1 ch, 35 sc, slst (35)

Rnd 2-4 :

35 sc (35)

Rnd 5-26 :

Change to dark brown color: 35 sc (35)

Info :

Hook similar to the other pant leg and join them together

Rnd 27 :

32 sc, skip 3 chains of the 1st pant leg, skip 3 chains of the 2nd pant leg (and join them together), 32 sc (64)

Rnd 28 :

64 sc (64)

Rnd 29 :

(14 dc, dec*dc)*4 (60)

Rnd 30 :

(4 dc, dec*dc, 4 dc)*6 (54)

Rnd 31 :

(7 dc, dec*dc)*6 (48)

Rnd 32 :

16 slst, 2 ch, 16 dc, turn

Rnd 33 :

2 ch, skip 1 ch, 14 dc, turn

Rnd 34 :

2 ch, skip 1 ch, 13 dc, turn

Rnd 35 :

2 ch, skip 1 ch, 12 dc, turn

Rnd 36 :

2 ch, skip 1 ch, 11 dc, turn

Strap :

make 2

Rnd 37 :

Continue to make a chain of 35 ch, start in 8th ch from the hook: 28 sc, turn

Rnd 38 :

10 slst, make a chain of 35 ch, start in 8th ch from the hook: 28 sc

Info :

Fasten off. Cut the yarn

Pocket (P1) :

Make 1: Rnd 1: Make a chain of 11 ch, start in 3rd ch from the hook: 9 dc, turn

Rnd 2 :

2 ch, 9 dc, turn

Rnd 3 :

2 ch, 9 dc

Info :

Fasten off and leaving a tail to sew into the trousers

β€” HAIR :

Rnd 1 :

(1 ch, 8 hdc, slst) in MR (8)

Rnd 2 :

1 ch, BLO: 8 inc*hdc, slst (16)

Rnd 3 :

1 ch, BLO: (hdc, inc*hdc)*8, slst (24)

Rnd 4 :

1 ch, BLO: (hdc, inc*hdc, hdc)*8, slst (32)

Wings :

Rnd 1-8: Make a chain of 20 ch, start in second ch from the hook: 3 sc, 4 hdc, 9 dc, 3 hdc, skip 1 chain, slst

Rnd 9-10 :

Make a chain of 18 ch, start in second ch from the hook: 4 sc, 11 hdc, 2 sc, slst

Rnd 11-12 :

Make a chain of 16 ch, start in second ch from the hook: 4 sc, 9 hdc, 2 sc, slst

Rnd 13-14 :

Make a chain of 15 ch, start in second ch from the hook: 14 sc, slst

Rnd 15-16 :

Make a chain of 14 ch, start in second ch from the hook: 13 sc, slst

Rnd 17-20 :

Make a chain of 15 ch, start in second ch from the hook: 14 sc, slst

Rnd 21-22 :

Make a chain of 16 ch, start in second ch from the hook: 4 sc, 9 hdc, 2 sc, slst

Rnd 23-24 :

Make a chain of 18 ch, start in second ch from the hook: 4 sc, 11 hdc, 2 sc, slst

Info :

Fasten off. Cut the yarn. You can use glue guns or fabric glue to attach hair into the head

β€” HAT :

Rnd 1 :

6 sc in MR (6)

Rnd 2 :

6 inc (12)

Rnd 3 :

(sc, inc)*6 (18)

Rnd 4 :

(sc, inc, sc)*6 (24)

Rnd 5 :

(3 sc, inc)*6 (30)

Rnd 6 :

(2 sc, inc, 2 sc)*6 (36)

Rnd 7 :

(5 sc, inc)*6 (42)

Rnd 8 :

(3 sc, inc, 3 sc)*6 (48)

Rnd 9 :

(7 sc, inc)*6 (54)

Rnd 10 :

(4 sc, inc, 4 sc)*6 (60)

Rnd 11 :

(9 sc, inc)*6 (66)

Rnd 12 :

66 sc (66)

Rnd 13 :

(5 sc, inc, 5 sc)*6 (72)

Rnd 14 :

(11 sc, inc)*6 (78)

Rnd 15 :

(6 sc, inc, 6 sc)*6 (84)

Rnd 16 :

(13 sc, inc)*6 (90)

Rnd 17 :

(7 sc, inc, 7 sc)*6 (96)

Rnd 18 :

(3 sc, dec, 3 sc)*12 (84)

Rnd 19 :

(5 sc, dec)*12 (72)

Rnd 20 :

72 sc (72)

Rnd 21 :

(2 sc, dec, 2 sc)*12 (60)

Rnd 22 :

60 sc (60)

Rnd 23 :

FLO: 24 sc, turn (24)

Rnd 24 :

1 ch, 8 sc, (inc, sc)*4, 8 sc, turn (28)

Rnd 25 :

1 ch, dec, 4 sc, (inc, 3 sc)*4, 4 sc, dec, turn (30)

Rnd 26 :

1 ch, 2 dec, 22 sc, 2 dec, turn (26)

Rnd 27 :

1 ch, 2 dec, 18 sc, 2 dec (22)

Info :

Fasten off. Cut the yarn.

β€” SHOES :

Right shoe :

Make a chain of 9 ch, start in second ch from the hook: sc, 6 sc, 3 sc into the last stitch, 6 sc, inc, slst (18)

Rnd 2 :

1 ch, inc, 6 sc, 3 inc, 6 sc, 2 inc, slst (24)

Rnd 3 :

1 ch, sc, inc, 6 sc, hdc, 5 inc*dc, 2 dc, 2 hdc, 3 sc, inc, sc, inc, slst (32)

Rnd 4 :

1 ch, 12 sc, inc, sc, inc, 2 sc, inc, sc, inc, 12 sc, slst (36)

Rnd 5 :

1 ch, BLO: 36 sc, slst (36)

Rnd 6 :

Turn the sole (wrong side facing): 1 ch, 36 sc, slst (36)

Info :

Change to brown color (No.71 Yarn art Jeans)

Rnd 7 :

Turn the sole (wrong side facing): 1 ch, 36 sc, slst (36)

Info :

Change to white color (No.03 Yarn art Jeans)

Rnd 8 :

1 ch, 12 sc, 6 hdc*dec, 12 sc, slst (30)

Info :

Fasten off. Cut the yarn

Info :

Make the body of the shoe: Count 12 sc from the slip stitch to the left side and 12 sc from the slip stitch to the right side and marker.

Make the tongue of the shoe :

with the brown color: Rnd 1: BLO (in the 8th round of the sole): 1 ch, 6 sc, turn (6)

Rnd 2-7 :

1 ch, 6 sc, turn (6)

Info :

Fasten off. Cut the yarn. With the white color to make the shoelaces to finish

Left shoe :

Make same as Right shoe: Rnd1 make a chain of 9 ch, start in second ch from the hook: sc, 6 sc, 3 sc into the last stitch, 6 sc, inc, slst and continue same rounds mirrored (18)

Assembly Instructions

  • Sew head to the body by placing the head opening over the neck opening, align and sew using a whipstitch with the long tail left from the head; secure firmly and weave in ends.
  • Attach ears into the head between rows 17-20, spacing them symmetrically and sewing through the base tails to the head with a yarn needle.
  • Position arms on either side of the body and sew the 6 stitches of each hand into the marked positions on the body, securing with strong stitches for durability.
  • Sew legs to the bottom of the body, aligning the leg tops with the start of the body rounds and sewing evenly to keep the doll balanced.
  • Insert the cut insole into each foot before closing the sole for a stable base and to help the doll stand upright.
  • Attach trousers, pockets and straps to the body; sew small buttons on the straps to finish the overalls as shown in the photos.
  • Glue or stitch the hair piece into the head opening and attach the hat; use fabric glue if needed for extra hold on delicate hair pieces.

Important Notes

  • πŸ’‘Use stitch markers to mark round starts and color change rounds for accurate shaping and consistent stitch counts.
  • πŸ’‘Place safety eyes between rows 17-18, ten stitches apart, before closing the head and firmly secure backs to prevent shifting.
  • πŸ’‘Stuff limbs firmly but gradually; add small amounts of fiberfill and shape as you go to avoid lumps and ensure a smooth finish.
  • πŸ’‘Insert a plastic or fiberboard insole into each foot before finishing the sole to make shoes and feet sturdy and stable.

Tommy the Fisher is a delightful handmade companion with charming clothing and tiny accessories. This pattern guides you through every round and color change to create a polished toy. Perfect for display or gentle play, it makes a lovely gift with a lot of handmade heart. 🧢🐟

You ask,

we answer.

FAQs

What size will the finished piece be?

The finished amigurumi measures approximately 30 cm tall when using the recommended Yarn Art Jeans and 2.3 mm hook.

Can I use different yarn weights for this pattern?

Yes, you can use different yarn weights, but this will change the final size; use an appropriate hook size and expect adjustments to stitch counts and fit.

Do I need prior crochet experience for this pattern?

This pattern is rated intermediate, so basic knowledge of crochet stitches (sc, inc, dec, BLO/FLO) and working in rounds is recommended.

How long does this project typically take to complete?

Most crocheters complete this project in 12-15 hours, though time may vary based on experience, customization, and finishing details.

What size safety eyes should I use and where do I place them?

Use 10 mm black safety eyes and place them between rounds 17-18, spaced ten stitches apart for the correct facial proportion.