🧢 Beautiful ✨ Detailed πŸ’ Adorable

Chubby Milky Cow Amigurumi Pattern

Chubby Milky Cow Amigurumi Pattern
4.3β˜… Rating
5-7 Hours Time Needed
1.7K Made This
βœ‚οΈ

Intermediate Level

Ideal for those with basic crochet experience, featuring slightly more advanced stitches and techniques to expand your skills.

⏱️

Weekend Treat

Takes 5-7 hours, making it an enjoyable project to finish over a couple of days.

🧸

Cute Companion

An adorable friend to cherish, handcrafted with love to bring comfort and joy for years to come.

About This Chubby Milky Cow Amigurumi Pattern

This pattern creates a chubby, plush cow amigurumi worked in soft, chunky velvet-style yarn. You will crochet separate pieces β€” head, body (sitting and standing options), arms, legs, ears, horns, nose, tail and playful accessories β€” then sew them together. The design includes color changes, simple shaping, and optional decorative items like a cookie bag and ice cream cone.

Chubby Milky Cow Amigurumi Pattern crochet pattern - detailed view of completed project

Clear rounds and assembly notes help you place eyes, sew parts and stuff for a chunky finish. Photos and short tips are included to guide placement and finishing touches.

Why You'll Love This Chubby Milky Cow Amigurumi Pattern

I absolutely love this pattern because it combines simple stitches with adorable shaping that turns out incredibly cuddly. I enjoy how the chunky velvet yarn makes the cow super soft and child-friendly, and the small accessories add personality and play value. Sewing the features and seeing the face appear always brightens my day, and I hope you feel that joy too. This pattern is satisfying to make from start to finish and is perfect for gifting or keeping as a handmade keepsake.

Chubby Milky Cow Amigurumi Pattern step 1 - construction progress Chubby Milky Cow Amigurumi Pattern step 2 - assembly progress Chubby Milky Cow Amigurumi Pattern step 3 - details and accessories Chubby Milky Cow Amigurumi Pattern step 4 - final assembly and finishing

Switch Things Up

I love how easy it is to customize this pattern by swapping yarn colors to create different breeds or fantasy cows.

You can make a pastel version by choosing soft pinks and mint greens for a nursery-safe toy.

Want a mini keychain? Use a finer yarn and a smaller hook to create a pocket-sized version.

Make a giant cuddle buddy by using bulky yarn and a larger hook; increase stuffing for a plush look.

I sometimes add embroidered freckles, eyelashes or different mouth expressions to change personality.

Add wire inside the limbs for posability if you want your cow to sit and pose for photos.

Mix textures by using a boucle or faux fur for spots and velvet yarn for the body for a tactile contrast.

Customize accessories: make seasonal props like a tiny scarf, pumpkin or heart to celebrate holidays.

Use felt or safety eyes depending on recipientβ€”felt is safer for babies, safety eyes are quicker to install for gifts.

I often play with placement of spots and eye spacing to give each cow a unique face and expression.

Common Mistakes & How to Fix Them

βœ— Not placing safety eyes before closing the head can make spacing tricky; insert eyes between rounds 10-11 with 6-7 stitches between before you finish the head. βœ— Overstuffing early causes bulging seams and difficulty sewing parts together; stuff gradually while shaping and add filling at the end to adjust firmness. βœ— Skipping stitch markers during rounds leads to mis-counted increases and decreases; use a marker at the start of each round to keep accurate stitch counts. βœ— Forgetting to leave long tails when fastening off prevents easy sewing later; always leave a long tail on parts to sew them securely without reworking. βœ— Changing colors without securing ends can cause loose loops and messy edges; weave in ends neatly or carry color when possible to keep clean color changes. βœ— Incorrect tension will change the final size and shape of parts; keep a consistent, slightly firm tension for best shape and stitch definition.

Chubby Milky Cow Amigurumi Pattern

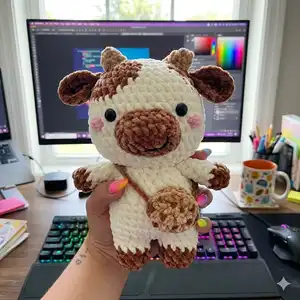
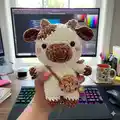
Make a charming Chubby Milky Cow with this friendly amigurumi pattern. You will crochet a soft, plush cow using chunky velvet-style yarn with step-by-step rounds for head, body, limbs and cute accessories. The pattern is detailed with photos, tips for stuffing and placement, and small extras like a cookie bag and tiny strawberry. Perfect for gifting or decorating, you will enjoy bringing this cuddly character to life.

Intermediate 5-7 Hours

Materials Needed for Chubby Milky Cow Amigurumi Pattern

β€” Main Fabric

  • 01
    Himalaya Dolphin Baby (chunky velvet yarn) - less than one skein required for each color (cream, brown, light brown, pink, red, green as used)
  • 02
    Alternative similar bulky/velvet yarns: YarnArt, Premier Parfait or equivalent chunky velvet - less than one skein of each color
  • 03
    Small amounts of darker felt or yarn for cookie chocolate decoration
  • 04
    Leftover yarn for tiny accessories (strawberry red, leaf green, cone light brown)

β€” Tools Required

  • 01
    Crochet hook size 4-5mm for chunky yarn
  • 02
    Stitch markers
  • 03
    Scissors
  • 04
    Polyester fiberfill stuffing
  • 05
    Safety eyes (10mm and/or 12mm recommended) or felt for eyes
  • 06
    Yarn needle for sewing parts
  • 07
    Pins for assembly and positioning

Progress Tracker

0% Complete

β€” Head :

Round 1 :

Mr 6sc (6)

Round 2 :

6inc (12)

Round 3 :

Sc, inc, Brown [sc, inc, sc], inc, (sc, inc)*3 (18)

Round 4 :

Sc, inc, sc, [sc, inc, 2sc, inc], 2sc, inc, [2sc, inc], 2sc, inc, sc (24)

Round 5 :

3sc, inc, [3sc, inc, 3sc], inc, 2sc [sc, inc, 3sc], inc, 3sc, inc (30)

Round 6 :

2sc, inc, 3sc, [sc, inc, 4sc, inc] 4sc, inc, [4sc] inc, 4sc, inc, 2sc (36)

Round 7 :

5sc, inc, 2sc, [3sc, inc, 3sc] 2sc, inc, 5sc [inc, sc] 4sc, inc, 5sc, inc (42)

Round 8 :

10sc, [6sc], 26sc (42)

Round 9-13 :

42sc (42)

Round 14 :

(5sc, dec)*6 (36)

Round 15 :

2sc, dec (4sc, dec)*5, 2sc (30)

Round 16 :

(3sc, dec)*6 (24)

Round 17 :

sc, dec (2sc, dec)*5, sc (18)

Info :

Fasten off & cut the yarn.

Info :

Try to stuff the head enough with filling to get a chubby head. Insert the eyes (I used both 10mm & 12mm, it's more personal preference) between r.10-11, 6-7 stitches between (it vary on how we sew the nose).

β€” Ears :

Round 1 :

Mr 8sc (8)

Round 2 :

8inc (16)

Round 3 :

16sc (16)

Info :

Fasten off & leave a long tail to sew them between r.6-7 of the head.

β€” Horn :

Round 1 :

Mr 4sc (4)

Round 2 :

4inc (8)

Round 3 :

8sc (8)

Info :

Fasten off & leave a long tail for sewing. Sew them between r.3-4 of the head.

β€” Nose :

Round 1 :

Ch 8, 2nd ch from hook, crochet 6sc, inc, on the other side of ch 5sc, inc (15) (take a look at the chart below)

Round 2 :

inc, 5sc, 3inc, 5sc, inc (20)

Round 3 :

20sc (20)

Info :

Fasten off and leave a long tail for sewing. Stuff it a little bit, and sew it between r.11-14 of the head.

β€” Arms :

Round 1 :

Mr 8sc (8)

Round 2 :

8sc (8)

Round 3-7 :

cream 8sc (8)

Info :

Fasten off & leave a long tail for sewing on the body r.16.

β€” Legs - sitting :

Round 1 :

Mr 6sc (6)

Round 2 :

6inc (12)

Round 3-4 :

12sc (12)

Info :

Fasten off & leave a long tail for sewing. Stuff the legs & sew them between r.4-6 of the body - sitting.

β€” Body - sitting :

Round 1 :

Mr 8sc (8)

Round 2 :

8inc (16)

Round 3 :

(sc, inc)*8 (24)

Round 4 :

(3sc, inc)*6 (30)

Round 5-10 :

30sc (30)

Round 11 :

(3sc, dec)*6 (24)

Round 12 :

24sc (24)

Round 13 :

(2sc, dec)*6 (18)

Info :

Fasten off & leave a long tail for sewing. Stuff filling while crochet. You did a good job so far *v* Stretch your body =*v*=

β€” Body - standing :

Round 1 :

Mr 6sc (6)

Round 2 :

6inc (12)

Round 3-4 :

12sc (12)

Round 5 :

cream 12sc (12)

Info :

Fasten off and make another leg but don’t cut off the yarn. Continue making ch 2 and join the first leg.

Round 6 :

12sc + 2sc (first side of the chains) + 12sc + 2sc (other side of the chains) (28)

Round 7 :

3sc, inc (6sc, inc)*3, 3sc (32)

Round 8-11 :

32sc (32)

Round 12 :

(14sc, dec)*2 (30)

Round 13-14 :

30sc (30)

Round 15 :

Sc, (5sc, dec)*4, sc (26)

Round 16 :

Sc, (4sc, dec)*4, sc (22)

Round 17 :

sc, (3sc, dec)*4, sc (18)

Info :

Fasten off & leave a long tail and sew it to the head. Don’t forget to feed the body with alotttt of filling. He wants to be chubbyyy.

β€” Tiny Heart :

Info :

Make ch 3, crochet everything into the first ch: 2 dc, 2 hdc, 1 dc, 2 hdc, 2 dc, ch 2 and slst. Leave a long tail of yarn. Sew it on the body. (video crochet the heart posted on my tiktok rin.meow21)

β€” Tail :

Round 1 :

Start with brown yarn. mr 5sc (5)

Round 2 :

5inc (10)

Round 3-4 :

10sc (10)

Round 5 :

5dec (5)

Info :

Weave in the rest of yarn and hide the yarn.

Info :

Start with white/cream yarn. Make a long 6 chains. Don’t forget to leave a long tail of yarn for both end. Sew one tail of yarn to the brown part, and the other to the body of the cow, between r.8-9, or r.3-4 of the sitting body.
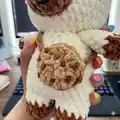
β€” Cookie bag :

Round 1 :

Mr 8sc (8)

Round 2 :

8 hdc inc (16)

Info :

Make 2 pieces and sew them together but let it open otherwise cowie can’t use it as a bag :P Use another darker felt or yarn so make the chocolate on cookie.

β€” Ice cream bag :

Round 1 :

Start from the cone - light brown color. Mr 4sc (4)

Round 2 :

4inc (8)

Round 3 :

8sc (8)

Round 4 :

(sc, inc)*4 (12)

Round 5 :

Change to another color 12sc (12)

Round 6 :

BLO (2sc, inc)*4 (16)

Round 7 :

16sc (16)

Round 8 :

(2sc, dec)*4 (12)

Round 9 :

(sc, dec)*4 (8)

Round 10 :

4dec (4)

Info :

Fasten off & weave in the rest. Insert your hook at FLO (r.6) Make ch 2, sc to the next stitch, repeat until done. Make a tiny strawberry for topping if you want.

β€” Strawberry - red :

Round 1 :

Mr 4sc (4)

Round 2 :

4inc (8)

Round 3 :

8sc (8)

Round 4 :

4dec (4)

Info :

Fasten off & cut the yarn.

β€” Strawberry leaf - green :

Round 1 :

Mr 4sc (4)

Round 2 :

sc, make ch 3, 2nd ch from hook and crochet 2 slst. Sc to the next two stitches. sc, make ch 3, 2nd ch from hook and crochet 2 slst.

Info :

Fasten off & leave a long tail for sewing. Video of making the horn and leaf as a strawberry is posted on my TikTok account rin.meow21.

Assembly Instructions

  • Sew ears to the head between rounds 6-7, using the long tail left when fastening off and position them symmetrically.
  • Attach horns between rounds 3-4 of the head, sewing securely through the base and knotting the yarn inside for stability.
  • Sew the nose centered between rounds 11-14 of the head, stuff lightly before attaching and secure with whipstitch.
  • Attach arms to the body at round 16 of the standing body (or as pictured) and use the long tails to sew firmly with invisible stitches.
  • For the sitting body, sew legs between rounds 4-6 of the body; for the tail sew the brown end to the tail base and secure the chain end between rounds 8-9 (sitting) or 3-4 as noted.

Important Notes

  • πŸ’‘Use stitch markers to keep track of rounds, especially during increases, decreases and color changes for accurate shaping.
  • πŸ’‘Stuff firmly but not excessively to maintain a chubby shape; add small amounts of filling gradually and shape by hand as you go.
  • πŸ’‘Leave long tails when fastening off to make sewing pieces easier and more secure without re-attaching yarn.

Thank you for choosing this pattern β€” I hope your Chubby Milky Cow brings lots of smiles and cozy hugs. Make one for yourself or crochet a herd for gifting, they are so satisfying to stitch and assemble. Share your finished cuddly cows and tag the pattern for others to enjoy! πŸ§ΆπŸ„

You ask,

we answer.

FAQs

What size will the finished piece be?

The finished amigurumi measures approximately 20-25 cm tall when using recommended chunky velvet yarn and a 4-5mm hook, depending on stuffing and tension.

Can I use different yarn weights for this pattern?

Yes, you can use different yarn weights, but this will affect the final size; use an appropriate hook for the yarn and expect changes in proportions.

Do I need prior crochet experience for this pattern?

This pattern is rated intermediate, so basic knowledge of magic ring, single crochet, increases, decreases and color changes is recommended for best results.

How long does this project typically take to complete?

Most crocheters complete this project in 5-7 hours, though time will vary based on experience, assembly detail and whether you make accessories.