About This Tick the Rabbit Amigurumi Pattern
This pattern creates a stretchy rabbit amigurumi with long, extendable limbs and a soft square body. It uses cotton/acrylic blend and fine cotton for embroidered details to achieve a neat finish. The instructions guide you through crocheting ears, legs, arms, eyes and assembling the toy step-by-step. Clear shaping and joining instructions help produce a durable, child-friendly toy.

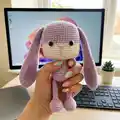
Worked in two color panels, the design mixes lilac and white for a gentle, modern look. Suitable for crafters familiar with basic amigurumi techniques and comfortable reading round and row instructions.
Why You'll Love This Tick the Rabbit Amigurumi Pattern
I absolutely love this pattern because it transforms simple stitches into a playful, stretchy toy full of personality. I enjoy how the long ear-legs create a whimsical, interactive feature kids love to pull and release. The color-block body gives a polished, modern look while staying quick to crochet. Sewing the pieces together is satisfying and makes the toy feel lovingly handmade. I also appreciate that the pattern uses small hooks for a tight stitch, producing a sturdy finished toy.
Switch Things Up
I love experimenting with colors; try swapping the lilac and white for pastels or bold contrasting colors to change the mood.
I sometimes use a sport-weight yarn and a slightly larger hook to make a chunkier, cuddlier version of the rabbit.
I like adding a tiny crocheted scarf or a felt bow to the neck for personality and seasonal variation.
To make a mini keychain version, use thinner thread or fingering yarn and a 1.5 mm hook, and reduce stitch counts proportionally.
I often embroider small freckles or a tiny smile to change facial expression and character.
For a posable version, I insert thin craft wire into the limbs before stuffing to allow for gentle posing.
I sometimes replace safety eyes with embroidered eyes for a fully toddler-safe toy that can be washed more easily.
If you want a heavier base, add a small bag of poly pellets inside the bottom while stuffing for better stability.
I enjoy making a whole family of rabbits by changing ear length, foot size, and color combinations for a charming collection.
Don't be afraid to adjust stuffing density and placement — it can dramatically improve shaping and the finished silhouette.
Common Mistakes & How to Fix Them
✗ Skipping stitch markers during rounds can lead to losing track of round starts; place a marker at the first stitch of each round to maintain orientation.
✗ Failing to stuff the lilac foot portion before switching colors makes shaping difficult later; stuff the lilac piece firmly at the indicated step to keep the shape.
✗ Using the wrong hook sizes will change final proportions and tension; use 2 mm for ears/arms/eyes and 3 mm for body as specified.
✗ Not checking stitch counts after increases and decreases causes uneven shaping; count stitches at the end of each round, especially after INC/DEC rounds.