🧢 Beautiful ✨ Detailed πŸ’ Adorable

The Piglet Amigurumi Pattern

The Piglet Amigurumi Pattern
4.3β˜… Rating
5-7 Hours Time Needed
3.5K Made This
βœ‚οΈ

Intermediate Level

Ideal for those with basic crochet experience, featuring slightly more advanced stitches and techniques to expand your skills.

⏱️

Weekend Treat

Takes 5-7 hours, making it an enjoyable project to finish over a couple of days.

🧸

Cute Companion

An adorable friend to cherish, handcrafted with love to bring comfort and joy for years to come.

About This The Piglet Amigurumi Pattern

This pattern creates a soft Piglet amigurumi using plush or cotton yarn with clear step-by-step rounds and photos. You will crochet the head and body as one piece, then add ears, arms, legs and a snout for a charming face. The pattern includes face tightening, embroidery and an optional balloon accessory for extra fun.

The Piglet Amigurumi Pattern crochet pattern - detailed view of completed project

Techniques include working in the round, color changes, working in the back loop and thread-mount arm attachment. Two yarn options are given so you can make a plush large version or a smaller cotton version.

Why You'll Love This The Piglet Amigurumi Pattern

I absolutely love this pattern because it combines simple amigurumi basics with playful finished details like the snout and expressive embroidered smile. I find the face-tightening technique gives the Piglet a lot of personality without complicated stitches. The pattern is versatile β€” you can use plush yarn for a soft toy or cotton yarn for a smaller, neater finish. Making the balloon accessory is one of my favorite finishing touches because it adds a whimsical prop and is surprisingly quick to crochet.

The Piglet Amigurumi Pattern step 1 - construction progress The Piglet Amigurumi Pattern step 2 - assembly progress The Piglet Amigurumi Pattern step 3 - details and accessories The Piglet Amigurumi Pattern step 4 - final assembly and finishing

Switch Things Up

I love to change yarn and hooks to alter size and texture: for a squishier Piglet I use plush yarn with a larger hook, and for a small tidy version I use cotton with a smaller hook.

I sometimes swap the color palette: pastel tones make a gentle nursery friend, while bright shades make a playful character that stands out.

I like to embroider different smiles and eye shapes β€” shifting eye placement or mouth curvature changes the entire personality of the Piglet.

Try adding tiny crocheted accessories like a scarf, little hat or a tiny balloon in different colors to personalize the finished toy.

For more poseability, I insert thin wire into the arms or legs so you can bend them slightly and create fun poses.

If you want a keychain, use thinner yarn and a 1-2 mm hook to make a mini version and attach a metal ring before finishing.

I also enjoy mixing yarn types in stripes on the body for a textured look β€” alternate plush and semi-cotton rounds for soft ridges.

Embroidery gives huge character β€” try different eyebrow shapes, stitched freckles, or even tiny teeth for a playful grin.

Swap safety eyes for embroidered eyes if the toy is for small children: satin or black thread eye embroidery is safe and looks sweet.

Use the balloon pattern with different wire thicknesses and lengths to create a bouquet of balloons or a single statement prop to match your Piglet's outfit.

Common Mistakes & How to Fix Them

βœ— Skipping stitch markers when working continuous rounds leads to losing the start of round; place a marker at the first stitch of every round and move it after each round to stay on track. βœ— Stuffing the head too firmly before tightening the face makes it hard to shape the mouth; stuff gradually and leave the head a bit soft until face tightening is finished. βœ— Changing colors without securing tails can cause unraveling and lumps; secure color joins and weave in ends or tie them before continuing. βœ— Not counting stitches after increases or decreases results in incorrect shaping; count after each shaping round, especially where combinations like (SC, INC)* or (SC, DEC)* are used. βœ— Pulling the slip-stitch (SS) joining thread too tight when changing color can make the next round difficult; keep joining threads snug but not overly tight to allow easy insertion next round.

The Piglet Amigurumi Pattern

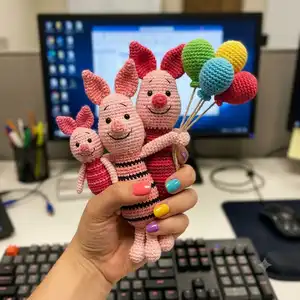
Make a cuddly Piglet amigurumi using plush or cotton yarn with clear step-by-step rounds and assembly photos. This pattern guides you through head, body, ears, arms, legs, snout and a cute balloon accessory. You will learn face tightening and thread-mount techniques to create a stable, smiling toy you can gift or display.

Intermediate 5-7 Hours

Materials Needed for The Piglet Amigurumi Pattern

β€” Main Fabric

  • 01
    Plush yarn 120m/100g (Himalaya Dolphin Baby or YarnArt Dolce) - less than a ball of each color; Light pink (1) 80319, Pink (2) 80314, Crimson (3) 80310
  • 02
    Alize Cotton Gold (for cotton version) - color 149 for body and 33 for ears (less than 50 g total)
  • 03
    YarnArt Jeans (for head/legs/arms in cotton version) - color 74 (less than 50 g total)
  • 04
    Red semi-cotton yarn for balloon (small amount)
  • 05
    Thin cotton thread for balloon thread winding and small details

β€” Tools Required

  • 01
    Crochet hook size 3.25 mm for plush yarn (recommended for plush version)
  • 02
    Crochet hook size 3-4 mm (general plush hook range used in pattern)
  • 03
    Crochet hook size 2 mm for cotton small details
  • 04
    Hook 3.5-4 mm for plush balloon (balloon materials section)
  • 05
    Hook 1.75-2 mm for semi-cotton (balloon materials)
  • 06
    Hook 1 mm for thin yarn (balloon thread details)
  • 07
    Safety eyes approximately 8 mm (a pair recommended; try different sizes to choose best fit)
  • 08
    Small piece of felt to fix the eyes
  • 09
    Yarn sewing needles
  • 10
    Stitch markers
  • 11
    Pins with large head
  • 12
    Scissors
  • 13
    Fiber filling (polyester stuffing)
  • 14
    Synthetic/tooth thread for tightening and thread mount of paws (optional but stronger)
  • 15
    Copper wire D=2mm 30 cm and copper wire D=1.5mm 15 cm for balloon thread (use copper rather than aluminum)
  • 16
    Superglue, pliers and cutter (for balloon assembly)

Progress Tracker

0% Complete

β€” Head - Body :

Infos :

*stuff while crocheting, don't stuff the head too tight so that to make face tightening easier. * start working with light pink yarn (1)

Round 1 :

6 SC in MR;

Round 2 :

6 INC (12);

Round 3 :

(SC, INC)*6 (18);

Round 4 :

(2 SC, INC)*6 (24);

Round 5 - 8 :

4 rounds of 24 SC;

Round 9 :

4 INC, 4 SC, 4 INC, 12 SC (32);

Round 10 - 14 :

5 rounds of 32 SC;

Info :

insert eyes between 8th and 9th rounds at a distance of 4 SC (between INCs, or embroider them with black thread);

Round 15 :

(6 SC, DEC)*4 (28);

Round 16 :

(5 SC, DEC)*4 (24);

Round 17 :

(6 SC, DEC)*3 (21);

Infos :

*change color to crimson (3)

Round 18 - 19 :

2 rounds of 21 SC;

Round 20 :

(6 SC, INC)*3 (24);

Infos :

*change color to pink (2)

Round 21 :

24 SS;

Info :

*don't pull the thread (of SS) too much, so that it will be easier to work next round. *work the last SS with the crimson thread (3)

Infos :

*change color to crimson (3)

Round 22 :

BLO: 24 SC;

Round 23 :

(7 SC, INC)*3 (27);

Round 24 :

27 SC;

Infos :

*change color to pink (2)

Round 25 :

27 SS;

Infos :

*change color to crimson (3)

Round 26 :

BLO: (8 SC, INC)*3 (30);

Round 27 :

(9 SC, INC)*3 (33);

Round 28 :

(10 SC, INC)*3 (36);

Infos :

*change color to pink (2)

Round 29 :

36 SS;

Infos :

*change color to crimson (3)

Round 30 :

BLO: 36 SC;

Round 31 - 32 :

2 rounds of 36 SC;

Infos :

*change color to pink (2)

Round 33 :

36 SS;

Infos :

*change color to crimson (3)

Round 34 :

BLO: 36 SC;

Round 35 :

36 SC;

Round 36 :

(4 SC, DEC)*6 (30);

Infos :

*change color to pink (2)

Round 37 :

30 SS;

Info :

- cut pink thread (2) and tie it with the main crimson thread;

Infos :

*change color to crimson (3)

Round 38 :

BLO: (3 SC, DEC)*6 (24);

Round 39 :

24 SC;

Round 40 :

(2 SC, DEC)*6 (18);

Round 41 :

(SC, DEC)*6 (12);

Round 42 :

6 DEC;

Info :

- pull the hole down, fix the thread and hide the ending.

β€” Ear :

Infos :

EAR (2 details): *pink yarn (2) *don't stuff

Round 1 :

3 SC in MR;

Round 2 :

3 INC (6);

Round 3 :

6 SC;

Round 4 :

(SC, INC)*3 (9);

Round 5 :

(2 SC, INC)*3 (12);

Round 6 :

(3 SC, INC)*3 (15);

Round 7 :

(4 SC, INC)*3 (18);

Round 8 :

18 SC;

Round 9 :

(4 SC, DEC)*3 (15);

Round 10 :

(3 SC, DEC)*3 (12);

Round 11 :

(2 SC, DEC)*3 (9);

Info :

- fold in half and crochet 4 SS together; - fix the thread and cut it.

β€” Arm :

Infos :

ARM (2 details): * light pink yarn (1) * don't stuff

Round 1 :

3 SC in MR;

Round 2 :

3 INC (6);

Round 3 - 4 :

2 rounds of 6 SC;

Round 5 :

DEC, 4 SC (5);

Round 6 :

INC, 4 SC (6);

Round 7 :

INC, 5 SC (7);

Round 8 - 14 :

7 rounds of 7 SC;

Round 15 :

3 DEC, don't work in the last St (4);

Info :

- pull the hole down, fix the thread and hide the ending.

β€” Leg :

Infos :

LEG (2 details): * light pink yarn(1)

Round 0 :

Chain 6;

Round 1 :

start in the 2nd chain from the hook 4 SC, 3 SC into the last chain from the hook, on the other side: 3 SC, INC (12);

Round 2 - 3 :

2 rounds of 12 SC;

Round 4 :

3 SC, 3 DEC, 3 SC (9);

Round 5 :

2 SC, 3 DEC, SC (6);

Info :

- stuff the foot, don't stuff further;

Round 6 - 8 :

3 rounds of 6 SC;

Round 9 :

DEC, 4 SC (5);

Infos :

- probably, you need to work additional SC, so that the foot to be positioned directly forward; - fold detail in half and crochet it together 2 SC;

β€” Snout :

Infos :

*start with pink yarn (2)

Round 1 :

3 SC in MR;

Round 2 :

INC, 3 SC in the same St, INC (7);

Infos :

*change color to light pink

Round 3 :

7 BPSC;

Info :

- SS, fix the thread, leave a long ending to sew.

β€” Assembly :

Info :

Face tightening:

Step 1 :

- mark 4 points under the eyes 5 rounds lower the eye at a distance of 5-6 SC between two internal points;

Step 2 :

- take a strong thread of main yarn color and a long needle; insert it in the 1st point and withdraw it on the side of the eye;

Step 3 :

- insert the needle in the point from the other side of the eye;

Step 4 :

- withdraw the needle at the bottom, near the 1st point;

Step 5 :

- stretch the thread well; tie several knots and hide endings inside;

Step 6 :

- repeat the steps on the other side;

Step 7 :

- then do a horizontal eye if needed (see the photo);

Attach the snout :

- sew the snout in place as shown in the photos;

Embroider the smile :

o mark 4 points as it is shown in the photo;

Embroider the smile step :

o insert needle under the face and withdraw it on back side; o stretch the thread under the pins; o fix two bottom points with thread; (if needed); o embroider horizontal stitches in the corners of the smile.

Embroider the eyebrows :

- embroider the eyebrows with black yarn/thread as shown in photos; * you can embroider additionally black eyelids

Attach the ears :

- position the ears and sew them to the head following the photo reference;

Attach the arms (thread mount) :

- try on the arms, choose the appropriate position; - insert a long needle through the body in the place of mounting the 1st arm and withdraw it in the place of mounting the 2nd arm;

Attach the arms step :

- insert the needle through the arm, step aside 1-2 SC on the front side; - turn back through the same hole to the initial ending and put the 2nd arm on the needle;

Attach the arms final :

- stretch the thread very well and tie the thread endings, hide them in the body through the same (initial) hole, so a knot can hide inside; - if a knot doesn't hide, it means that you hid the endings not in the same hole; re-do the mounting.

Attach the legs :

- sew them on one line at the bottom.

Assembly Instructions

  • Face tightening: Mark 4 points under the eyes (five rounds lower); insert a strong thread and needle through the marked points around each eye, draw the thread, pull to form the face shape, tie several knots and hide the ends inside the head.
  • Attach the snout by positioning it centered below the eyes and sew securely through the snout base into the head using a long yarn needle and the long sewing tail left when fastening off.
  • Attach ears by pinning them symmetrically on top of the head, then sew each ear firmly through the base to the head, hiding ends inside.
  • Attach arms using thread-mount method: pass a long needle through the body from one side to the other, thread through arm, return to initial hole, tension and knot threads inside so the joint is secure and hidden.
  • Sew legs along a single line at the bottom of the body so the toy stands or sits as intended.
  • Embroider the smile using marked points: insert the needle under the face and bring it out on the back side, stretch the thread under pins and secure the horizontal corner stitches for a natural smile.

Important Notes

  • πŸ’‘Choose the right size of eyes for your yarn β€” test different sizes and use a small piece of felt to fix small-diameter eyes securely.
  • πŸ’‘Stuff while crocheting and avoid overstuffing the head; leave it slightly soft until face tightening is done for better shaping.
  • πŸ’‘Use stitch markers to keep track of round starts and color changes for even shaping and accurate placement of facial features.
  • πŸ’‘Use copper wire for balloon threads rather than aluminum because copper is stronger and holds shape better.
  • πŸ’‘When changing colors, work the last SS with the next color thread as shown so the color transition is smooth and secure.

This Piglet amigurumi pattern helps you create a charming handmade friend with clear rounds, color changes, and assembly steps. Whether you choose plush yarn for a soft cuddle or cotton for a neat collectible, the instructions guide you through every stitch. Make a matching balloon accessory and personalize your Piglet with embroidered expressions and tiny details. πŸ§ΆπŸ’–

You ask,

we answer.

FAQs

What size will the finished piece be?

The finished Piglet measures approximately 28-30 cm (11.5") tall when using plush yarn (Himalaya Dolphin Baby) and about 15-17 cm (6.5") with Alize Cotton Gold or YarnArt Jeans, depending on yarn and hook size.

Can I use different yarn weights for this pattern?

Yes, you can use different yarn weights but the final size changes. Use the recommended hook sizes for the yarn you choose: 3.25 mm for plush, 2 mm for cotton; adjust accordingly for desired size.

Do I need prior crochet experience for this pattern?

This pattern is rated intermediate since it includes shaping with increases/decreases, back-post single crochet, color changes, and assembly techniques like thread-mounting arms and face tightening.

How long does this project typically take to complete?

Most crocheters complete this project in 5-7 hours, though time may vary based on experience level, yarn choice, and how much time you spend on assembly and embroidery.

How do I fix small safety eyes securely?

To fix small-diameter eyes well, use a small piece of felt: make holes in the felt with a thick needle, place it on the inside of the head and melt the eye stalk slightly or secure with an eye cap as shown to prevent slipping.