About This Sunburst Coasters Pattern
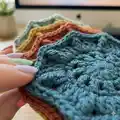
This pattern creates a dainty sunburst-style coaster worked in joined rounds with a textured scalloped edge. The coasters are worked from the center out using double crochet, clusters, and treble crochet detail stitches. Youll make one coaster per color, each finishing at approximately 4"/10cm diameter—perfect for mixing and matching.
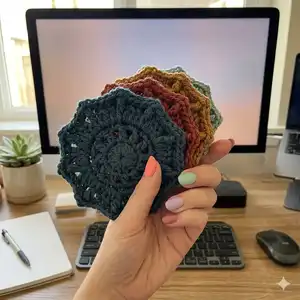
The design uses standard US terms and includes a stitch chart and stitch explanation for the 3dccl. These coasters are quick to work up and make great gifts or a stylish home accent.
Why You'll Love This Sunburst Coasters Pattern
I absolutely love this pattern because it combines simple construction with a beautiful textured finish that looks far more complicated than it is. I enjoy that each coaster works up quickly, so you can make a set in an afternoon and still feel accomplished. The sunburst motif is a favorite of mine — it adds handcrafted elegance to any table setting. I also love how easy it is to customize the palette, which makes this pattern endlessly adaptable for seasons or gifts.
Switch Things Up
I love experimenting with color when I make these coasters — try swapping the recommended Color Theory shades for a monochrome set or a high-contrast palette.
I often change yarn weight and hook size to create different sizes; a bulky yarn with a larger hook yields a chunkier coaster, while fingering or sport weight makes a delicate miniature version.
I like to add a small embroidered initial in the center for personalized gifts; use a contrasting yarn and a yarn needle to embroider after finishing the coaster.
For a sturdier coaster, try using a cotton or cotton-blend worsted yarn which will resist moisture and block crisp edges better than acrylic.
If you want a reversible look, experiment with front-post or back-post variations of the clusters to create more pronounced texture on one side.
I sometimes join two coasters together with a thin layer of batting in between for insulated drink coasters — sew around the edge and secure tightly with a slip stitch or whip stitch.
I recommend trying a simple border round in a contrasting color to frame the sunburst and make the scalloped edge pop visually.
To create a matching set, coordinate colors with placemats, napkin rings, or other small table accents for a cohesive tabletop collection.
I like to make tiny versions as keychain accessories by using lighter yarn and a smaller hook, attaching them to a keyring after finishing and weaving ends.
Finally, I always test placement for the tr worked into 2 rounds below before committing — you can adjust tension or skip a repeat to change the final scallop spacing.
Common Mistakes & How to Fix Them
✗ Skipping the stitch marker when working joined rounds can make it hard to identify the start of a round; place a removable marker at the beginning of each round to avoid confusion.
✗ Not counting stitches after rounds with clusters can lead to incorrect placement in following rounds; count your stitches after each round to confirm you have the written number.
✗ Pulling the 3dccl too tightly flattens the cluster and changes the texture; work clusters with even tension and allow the loops to sit naturally before drawing through the final loops.
✗ Forgetting that ch 2 counts as part of a 3dccl at the start of a round will change stitch counts; when a 3dccl begins the round treat the ch 2 as the first dc of the cluster.
✗ Failing to fasten off and weave ends securely can cause coasters to unravel after washing; fasten off neatly and weave in ends firmly with a tapestry needle.