🧢 Beautiful ✨ Detailed πŸ’ Adorable

Succulent Potted Plant Amigurumi Pattern

Succulent Potted Plant Amigurumi Pattern
4.3β˜… Rating
2-3 Hours Time Needed
1.5K Made This
βœ‚οΈ

Beginner Friendly Level

Perfect for those just starting their crochet journey, with clear instructions and simple techniques

⏱️

Bite-Sized Project

Finishes in 2-4 hoursβ€”perfect for an afternoon of creative relaxation.

🎁

Tiny Treasure

Small, sweet, and gift-worthy creations that fit perfectly in the palm of your hand with detailed charm.

About This Succulent Potted Plant Amigurumi Pattern

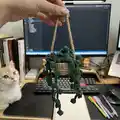
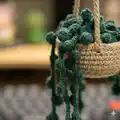
This pattern teaches you to crochet a tiny hanging potted succulent with a crocheted pot, green circle base, and multiple puff-stitch succulent ropes. It uses basic stitches and a simple puff stitch repeat to create long trailing greenery. Perfect as a handmade gift or a cozy shelf accent, the finished piece is lightweight and very customizable.

Succulent Potted Plant Amigurumi Pattern crochet pattern - detailed view of completed project

Clear row-by-row instructions and photos guide you through assembly and finishing. Make several succulents to vary the look and hang them as a sweet miniature planter.

Why You'll Love This Succulent Potted Plant Amigurumi Pattern

I absolutely love this pattern because it transforms a few simple stitches into a charming, lifelike hanging succulent that adds instant personality to any room. I enjoy the rhythmic nature of the puff-stitch ropesβ€”they are relaxing to crochet and look incredibly playful when draped over the pot. The project is small and portable, so I can work on it anywhere and finish quickly. Sharing this makes people smile, and I always appreciate how satisfying the finished tiny planter looks when displayed.

Succulent Potted Plant Amigurumi Pattern step 1 - construction progress Succulent Potted Plant Amigurumi Pattern step 2 - assembly progress Succulent Potted Plant Amigurumi Pattern step 3 - details and accessories Succulent Potted Plant Amigurumi Pattern step 4 - final assembly and finishing

Switch Things Up

I love how easy it is to customize this pattern by changing colors; try soft pastels for a delicate look or bright greens for a bold statement.

I often vary the length of each succulent rope to create a more natural, flowing appearance instead of identical pieces.

To make a larger planter, I use a thicker yarn and larger hook and increase rounds proportionally for a chunkier, more substantial pot.

If I want a keychain-sized version, I switch to thinner yarn and a smaller hook and shorten the hanging chain considerably.

I like to add small embroidered details or beads to some succulent tips to create highlights and extra texture on a few ropes.

For a potted grouping, I make several different succulents in varied shades of green and arrange them together in a small tray for a mini garden display.

Sometimes I replace the hanging rope with a chain of three shorter ropes joined together for a macrame-inspired hanger effect that looks very decorative.

I also experiment with mixing yarn textures, like a cotton blend for the pot and a soft acrylic for the succulents, to get different drape and stitch definition.

When gifting, I include a tiny paper tag or a crocheted leaf accent to personalize each planter and make it feel extra special.

I recommend trying gentle felting on the succulent tips or adding a tiny pompom to the end of a rope for a whimsical twist that children especially love.

Common Mistakes & How to Fix Them

βœ— Not keeping your chain tension consistent when making succulent ropes can result in uneven lengths and uneven puff placement; maintain even tension and measure ropes as you go to keep them similar. βœ— Skipping the 'chain-1 at beginning of row' note for pots will cause your rounds to shift; always chain 1 at the start and finish each row with the required slip stitch to maintain row alignment. βœ— Overstuffing the pot distorts the shape and makes sewing the circle base difficult; add stuffing gradually and check the fit inside the pot so it stays nicely shaped. βœ— Sewing succulent ropes unevenly around the pot can look messy and unbalanced; pin or mark equal spaces around the pot before sewing each rope to ensure even placement.

Succulent Potted Plant Amigurumi Pattern

Make a charming hanging succulent potted plant to brighten any space. This small amigurumi project uses simple stitches and a fun puff stitch to create trailing succulents. You will enjoy quick rounds, straightforward assembly, and a delightful finished piece perfect for gifts or decor. Follow the step-by-step instructions for a satisfying, creative make.

Beginner Friendly 2-3 Hours

Materials Needed for Succulent Potted Plant Amigurumi Pattern

β€” Main Fabric

  • 01
    Super fine yarn 1.8 oz (50 g) - Beige Brown (for pot), approximately one skein or 50 g
  • 02
    Super fine yarn 1.8 oz (50 g) - Pine Green (for succulents), approximately one skein or 50 g

β€” Tools Required

  • 01
    Crochet hook size 2.5-3.0 mm
  • 02
    Stitch marker
  • 03
    Sewing needle
  • 04
    Scissors
  • 05
    Cotton filling (polyester stuffing)

Progress Tracker

0% Complete

β€” Pots :

Info :

*chain-1 at beginning of row, slip stitch in every time the end of the row*

Round 1 :

Magic ring, chain 1, 10 Single Crochet. (10)

Round 2 :

chain 1, (1 Single Crochet, 1 increase ) 5 times (15 stitches)

Round 3 :

chain 1 (2 Single Crochet, 1 increase) 5 times. (20 stitches)

Round 4 :

chain 1 (3 Single Crochet, 1 increase) 5 times. (25 stitches)

Round 5 :

chain 1 (4 Single Crochet, 1 increase) 5 times. (30 stitches)

Round 6 :

chain 1 (5 Single Crochet, 1 increase) 5 times. (35 stitches)

Round 7-10 :

chain 1, 35 Single Crochet (35 stitches)

β€” Circle Base : (green)

Round 1 :

Magic Ring, chain 1, 10 half double crochet (10 stitch)

Round 2 :

10 half double crochet increase (20 stitch)

Round 3 :

chain 1, (1 half double Crochet, 1 increase) 10 times (30 stitch)

Round 4 :

chain 1 (5 Single Crochet, 1 increase) 5 times. (35 stitches)

β€” Succulent (make 7-9) :

Step 1 :

Chain 4, 1 Puff stitch in 3rd sts, 1 slip stitch in next sts

Step 2 :

Chain 8, 1 Puff stitch in 3rd sts, 1 slip stitch in next sts *this step crochet (8ch, 1PS in 3rd,1 SL ST) until the length you want*

β€” Sewing Step :

Info :

sew the circle inside the pot and dont forget stuffing ^_^

Info :

next step is sew every succulent rope on the midle of pots

Hanging rope :

chain 60 in the sides of the pots

Assembly Instructions

  • Sew the green circle base inside the beige pot to form the internal lining and place polyester stuffing inside to shape the pot securely.
  • Arrange and sew every succulent rope around the middle top edge of the pot, spacing them evenly to create a natural trailing effect.
  • Attach the hanging rope by chaining 60 and securing both ends to opposite sides of the pot so it hangs balanced.
  • Trim and weave in any loose ends after sewing all succulent ropes and the hanging rope for a tidy finish.

Important Notes

  • πŸ’‘Use a stitch marker at the beginning of each round to maintain proper stitch counts and alignment.
  • πŸ’‘Stuff the pot gently and gradually so the shape remains smooth and the circle base sits flat inside.
  • πŸ’‘Pin succulent ropes in place before sewing to ensure even spacing and a balanced drape.

This tiny hanging succulent is a delightful little project that brightens any corner with handmade charm. Perfect as a gift or a sweet shelf accent, it comes together quickly and is endlessly customizable. Thanks for supporting small pattern makers β€” happy crocheting! 🧢🌿

You ask,

we answer.

FAQs

What size will the finished piece be?

The finished hanging succulent measures approximately 8-12 cm long for the pot with trailing ropes, depending on your yarn tension and rope length.

Can I use different yarn weights for this pattern?

Yes, you can use different yarn weights but the final size will change; adjust your hook accordingly and make a gauge test to achieve the desired size.

Do I need prior crochet experience for this pattern?

This pattern is beginner friendly, so basic crochet knowledge such as magic ring, single crochet, and chain stitches is recommended for best results.

How long does this project typically take to complete?

Most crocheters complete this project in 2-3 hours, though time may vary based on experience and how many succulent ropes you make.