🧢 Beautiful ✨ Detailed πŸ’ Adorable

Plant Car Pattern

Plant Car Pattern
4.1β˜… Rating
2-4 Hours Time Needed
4.0K Made This
βœ‚οΈ

Intermediate Level

Ideal for those with basic crochet experience, featuring slightly more advanced stitches and techniques to expand your skills.

⏱️

Bite-Sized Project

Finishes in 2-4 hoursβ€”perfect for an afternoon of creative relaxation.

🏑

Cozy Accent

A warm touch for your space that transforms ordinary corners into inviting nooks filled with handmade charm.

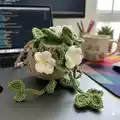
About This Plant Car Pattern

This pattern creates a small hanging plant pot with a padded green circle, trailing vines, crochet leaves and small flowers. It uses simple rounds and small motif techniques to build a lifelike miniature planter. The design is compact and perfect for using leftover yarn and adding personal color choices.

Plant Car Pattern crochet pattern - detailed view of completed project

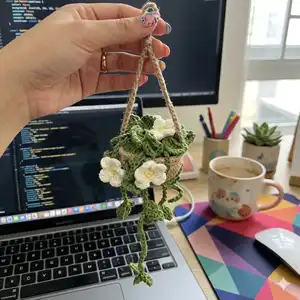
Clear row-by-row instructions are provided for the pot, circle base, vines, leaves and flowers. The pattern includes assembly notes so you can sew and finish the planter with confidence.

Why You'll Love This Plant Car Pattern

I absolutely love this pattern because it turns tiny stitches into a charming hanging planter that brightens any space. I enjoy how the vines and leaves create natural movement and personality in such a small project. The small flowers are a delightful detail that make each piece feel handmade and special. I appreciate that the pattern uses minimal yarn but produces a high-impact decorative item I can gift or keep.

Plant Car Pattern step 1 - construction progress Plant Car Pattern step 2 - assembly progress Plant Car Pattern step 3 - details and accessories Plant Car Pattern step 4 - final assembly and finishing

Switch Things Up

I love how easy it is to customize this pattern by changing yarn colors to fit your decor.

I often switch the green to a variegated yarn for a more textured, natural appearance.

To make a larger planter I use thicker yarn and a bigger hook, increasing rounds proportionally to keep the shape.

For a miniature keychain version I use thread-weight yarn and a 1.5-2.0 mm hook, shortening vine chains accordingly.

I sometimes embroider tiny details on the green circle to mimic moss or soil texture for added realism.

You can add beads or tiny wooden beads to the vine ends for weighted drape and decorative accents.

I like to mix leaf shapes and sizesβ€”make more leaves on some vines and fewer on others for variety.

Try making flowers in pastel shades or bright tones to change the mood of the planter quickly.

I also experiment with adding a small loop of wire inside a vine to make it posable and hold a particular spiral or curl.

Finally, combine several small planters on a single hanger to create a cascading grouped display for a striking handmade decoration.

Common Mistakes & How to Fix Them

βœ— Not counting increases accurately during early rounds; recount your stitches at the end of each round to ensure you have the correct stitch total. βœ— Cutting the yarn too soon after round 11 of the pot; keep the yarn attached as instructed to create the hanging chain and avoid re-joining. βœ— Overstuffing the pot before sewing the circle base; stuff gradually and check fit often so the circle sits flush inside without bulging. βœ— Skipping the specified chain lengths for vines (30ch, 25ch, 20ch); follow the chain lengths to ensure the vines hang at different natural lengths. βœ— Sewing vines and flowers without pinning and arranging first; pin or lay out all pieces on the green circle to check placement before stitching to avoid uneven spacing.

Plant Car Pattern

Create a delightful hanging plant pot with realistic vines, leaves, and delicate flowers. This pattern walks you through each piece step-by-step so you can make a charming mini planter to hang or gift. Perfect for using small amounts of yarn and practicing shaping and small motifs. You'll love the finished look of cascading vines and tiny blossoms.

Intermediate 2-4 Hours

Materials Needed for Plant Car Pattern

β€” Main Fabric

  • 01
    Super fine yarn (supper fine) 1.8 oz (50 g) - main weight for pot and details
  • 02
    Color: Beige - small amount for pot body
  • 03
    Color: Light green - small amount for circle, vines, leaves (several grams)
  • 04
    Color: White - small amount for flower petals
  • 05
    Color: Yellow - small amount for flower centers

β€” Tools Required

  • 01
    Crochet hook size 2.5-3.0 mm
  • 02
    Stitch marker
  • 03
    Sewing needle (yarn/tapestry needle)
  • 04
    Scissors
  • 05
    Cotton filling (polyester stuffing)
  • 06
    Yarn needle for sewing vines and pieces together
  • 07
    Pins (for positioning pieces before sewing)

Progress Tracker

0% Complete

β€” Materials :

Info :

Weight/yardage: supper fine 1.8 oz (50 g). Color : beige, white, yellow and green light. hook size : 2.5-3.0 mm. Stitch maker. Sewing needle. Scissors. Cotton filling.

β€” Abbreviations :

Info :

Row: round. MR : Magic Ring. st(s) : stitch(es). sl st : slip stitch. sk : skip. ch: chain. sc : single crochet. dc : double crochet. hdc : half double crochet. inc : increase. * : Repeat instructions after asterisk.

β€” Pots :

Row 1 :

Magic ring, chain 1, 10 single crochet, slip stitch end row 1. (10 stitches)

Row 2 :

chain 1, (1 single crochet, 1 increase) 5 times, slip stitch end row 2. (15 stitches)

Row 3 :

chain 1, (2 single crochet, 1 increase) 5 times, slip stitch end row 3 (20 stitches)

Row 4 :

chain 1, (3 single crochet, 1 increase) 5 times (25 stitches)

Row 5 :

chain 1, (4 single crochet, 1 increase) 5 times (30 stitches)

Row 6 :

chain 1, (5 single crochet, 1 increase) 5 times (35 stitches)

Row 7 :

chain 1, (6 single crochet, 1 increase) 5 times (40 stitches)

Row 8-11 :

40 single crochet (40 stitches)

Info :

*do not cut yarn*

Info :

sl st end row 11 and chain 60 make a hanging

β€” Circle Base :

Row 1 :

Magic ring, chain 1, 10 half double crochet. (10 stitches)

Row 2 :

10 half double crochet increase. (20 stitches)

Row 3 :

(1 half double crochet, 1 increase) 10 times. (30 stitches)

Row 4 :

(2 single crochet, 1 increase)*10 (40 stitches)

β€” Leaf (Part 1) :

Info :

Before make leaf, make the vines by 30ch, 25ch and 20ch. (make 5-6)

Info :

- start crochet the Leaf - *every vines crochet 1 - 5 leaf*

Step 1 :

Slip knot and yarn over in chain stitch(vines), chain 7, 1 single crochet in 3rd stitches

Step 2 :

2 half double crochet, 1 double crochet, chain 3 and slip stitch in next stitches

β€” Leaf (Part 2) :

Step 1 :

1 slip stitch into the opposite row, chain 3 , 1 double crochet in next sts, 1 double crochet, 2 half double crochet, 1 single crochet

Step 2 :

slip stitch in the first sts and cut yarn to finish the leaf.

β€” Flower (Make 5-8) :

Info :

(ylloew) hook in the vines a magic ring

Step 1 :

5 single crochet (5stitches)

Step 2 :

Cut yarn.

Info :

(white) chain 2, 2 double crochet in same sts, chain 2 and hook in same stitches (all in one stitches)

Step :

Slip titch in next stitch and do the same do

Step :

After 5 petals have been completed, slip stitch in first sts to end row and cut yarn.

β€” Assembly :

Info :

Use needle : sewing the circle inside the pot and stuffing inside the pot to finish

Info :

next step : sew every vines on the green circle

Assembly Instructions

  • Sew the circle base inside the pot using a yarn needle, matching the edges and stitching evenly so the circle sits flat inside.
  • Stuff the pot lightly with cotton filling before fully closing the circle to create a rounded soil effect and sew securely.
  • Attach the hanging chain created after row 11 by positioning and reinforcing the chain ends on opposite sides so the pot hangs evenly.
  • Arrange vines, leaves and flowers on the green circle, pinning each piece to check placement, then sew each vine and flower in place with small stitches.
  • Tidy ends by weaving in all yarn tails into the pot and underside of the circle to hide joins and secure pieces.

Important Notes

  • πŸ’‘Use stitch markers to mark the start of each round to keep track of rounds and increase points.
  • πŸ’‘Do not cut the yarn after row 11 of the pot; chain the 60 stitches for the hanging before finishing.
  • πŸ’‘Stuff the pot gradually and check fit before final sewing to prevent bulging or gap issues.
  • πŸ’‘Pin motifs in place before sewing to ensure symmetrical spacing and natural drape of vines.

This charming hanging plant pot is perfect for gifting or brightening a little nook in your home. The pattern uses minimal yarn but yields maximum charm with cascading vines and tiny flowers. Enjoy stitching each delicate leaf and petalβ€”happy crocheting! 🧢πŸͺ΄

You ask,

we answer.

FAQs

What size will the finished piece be?

The finished hanging planter is a small decorative piece approximately palm-sized when using super fine yarn and a 2.5-3.0 mm hook; exact size will vary with tension and yarn.

Can I use different yarn weights for this pattern?

Yes, you can change yarn weight, but the final size and stitch counts will change; use a larger hook for bulkier yarn and adjust chain lengths for vines if needed.

Do I need prior crochet experience for this pattern?

This pattern is rated intermediate, so familiarity with single crochet, half double crochet, double crochet, increases and working in the round is recommended.

How long does this project typically take to complete?

Most crocheters finish this project in 2-4 hours, depending on experience level and the number of motifs (leaves and flowers) you create.

How do I attach the vines and flowers to the pot?

Arrange vines and flowers on the green circle, pin them in place, then sew each piece down using a yarn needle and small even stitches; weave in ends neatly.