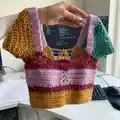
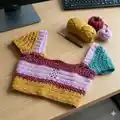
Make a colorful, lace-accented cropped top with this detailed crochet pattern. Youll work shells and lace rows across five vibrant colors to create a unique strappy top that is easy to customise. The pattern includes full row-by-row instructions for sizes S-XL, hook changes, and sleeve and strap finishing tips. Perfect for makers who love playful colorwork and adjustable fit.
Progress Tracker
0% Complete
— Initial information :
Info :
Crochet terminology: US. Tools: A 4mm and 7mm crochet hook. Yarn thickness: 100g = 290m, size 2, 5 different colours, around 200g of yarn in total. Scissors and yarn needle.
— Abbreviations :
Infos :
dc = double crochet. sc = single crochet. ch = chain. skip1ch = skip one chain. ss = slip stitch. dc2tog = double crochet 2 together (decrease). e.g. 20 x 1dc = place 1dc in each stitch for 20 stitches. e.g. 6 x 2dc = place 2dc in each stitch for 6 stitches.
— Special stitches :
Info :
shell: *1 x 1dc, ch3 or ch4, 1 x 1dc in the same stitch, skip1st*
— Important note :
Info :
ch3 at the beginning does not count as a dc. It isn't included in the stitch count.
— Sizing :
Info :
Size S is equivalent to 6-8 UK size. Size M is equivalent to 10 UK size. Size L is equivalent to 12-14 UK size. All three sizes fit cup sizes A-D. Guidance provided for larger cup sizes (DD and above) to make front panel size S or M longer and for smaller cup/larger bust combinations to make back panel longer.
— Stitches description :
Info :
Two types of stitches used: shells (appear in chest part and sleeves) and lace (appears in chest part and mostly in the sleeves). Instructions for lace rows are in the sleeves section.
— Front panel (Colour 1: yellow) :
Info :
At the end of each row, turnover. * symbol means repeat until the end of the row* I am using 5 different colours, and have included the names of the colours so it is clear when looking at the follow-up pictures. You can use whichever colours you'd like.
Row 1 :
Size S: ch62, turnover, skip2st, 60 x 1dc
Row 2 :
Size S: ch3, 60 x 1dc
Row 3 :
Size S: ch3, 60 x 1dc
Row 4 :
Size S: ch3, 60 x 1dc
Row 5 :
Size S: ch3, 60 x 1dc
Row 6 :
Size S: ch3, 60 x 1dc
Row 7 :
Size S: ch3, 60 x 1dc, cut, fasten off.
Row 1 :
Size M: ch72, turnover, skip2st, 70 x 1dc
Row 2 :
Size M: ch3, 70 x 1dc
Row 3 :
Size M: ch3, 70 x 1dc
Row 4 :
Size M: ch3, 70 x 1dc
Row 5 :
Size M: ch3, 70 x 1dc
Row 6 :
Size M: ch3, 70 x 1dc
Row 7 :
Size M: ch3, 70 x 1dc, cut, fasten off.
Row 1 :
Size L: ch82, turnover, skip2st, 80 x 1dc
Row 2 :
Size L: ch3, 80 x 1dc
Row 3 :
Size L: ch3, 80 x 1dc
Row 4 :
Size L: ch3, 80 x 1dc
Row 5 :
Size L: ch3, 80 x 1dc
Row 6 :
Size L: ch3, 80 x 1dc
Row 7 :
Size L: ch3, 80 x 1dc, cut, fasten off.
Row 1 :
Size XL: ch92, turnover, skip2st, 90 x 1dc
Row 2 :
Size XL: ch3, 90 x 1dc
Row 3 :
Size XL: ch3, 90 x 1dc
Row 4 :
Size XL: ch3, 90 x 1dc
Row 5 :
Size XL: ch3, 90 x 1dc
Row 6 :
Size XL: ch3, 90 x 1dc
Row 7 :
Size XL: ch3, 90 x 1dc, cut, fasten off.
— Colour 2: dark pink (shell row) :
Info :
Note: before starting these rows, I flipped the yellow band so that the shirt doesn't taper at the bottom. Note: the instructions between the star symbols "*" means to repeat the instructions within them until the end of the row. Note: here we are using the 'shell' stitch which you can find instructions for in the terminology section of the pattern.
Size S Row 1 :
ch3, *1 x 1dc, ch3, 1 x 1dc in the same space, skip2st*. 1 x 1dc, turnover
Size S Row 2 :
ch3, 1 x 1dc, 20 shells in the 20 ch3 spaces, cut and fasten off.
Size M Row 1 :
ch3, *1 x 1dc, ch3, 1 x 1dc in the same space, skip2st*. 1 x 1dc, turnover
Size M Row 2 :
ch3, 1 x 1dc, 23 shells in the 23 ch3 spaces, cut and fasten off.
Size L Row 1 :
ch3, *1 x 1dc, ch3, 1 x 1dc in the same space, skip2st*. 1 x 1dc, turnover
Size L Row 2 :
ch3, 1 x 1dc, 26 shells in the 26 ch3 spaces, cut and fasten off.
Size XL Row 1 :
ch3, *1 x 1dc, ch3, 1 x 1dc in the same space, skip2st*. 1 x 1dc, turnover
Size XL Row 2 :
ch3, 1 x 1dc, 30 shells in the 30 ch3 spaces, cut and fasten off.
— Colour 3: light pink (chest dc rows) :
Size S Row 1 :
ch3, *1 x 2dc in each shell space, 1 x 1dc in the space between two shells*
Size S Row 2 :
ch3, 28 x 1dc, ch4, skip2st, 1 x 1sc, ch4, skip2st, 28 x 1dc
Size S Row 3 :
ch3, 28 x 1dc, ch4, 1sc into space, ch4, 1sc into space, 28 x 1dc
Size S Row 4 :
ch3, 28 x 1dc, ch4, 1sc into space, ch4, 1sc into space, 28 x 1dc
Size S Row 5 :
ch3, 28 x 1dc, ch4, 1sc into space, ch4, 1sc into space, 28 x 1dc
Size S Row 6 :
ch3, 28 x 1dc, ch4, 1sc into space, ch4, 1sc into space, 28 x 1dc
Size S Row 7 :
ch3, 28 x 1dc, ch4, 1sc into space, ch4, 1sc into space, 28 x 1dc
Size M Row 1 :
ch3, *1 x 2dc in each shell space, 1 x 1dc in the space between two shells*
Size M Row 2 :
ch3, 33 x 1dc, ch4, skip2st, 1 x 1sc, ch4, skip2st, 33 x 1dc
Size M Row 3 :
ch3, 33 x 1dc, ch4, 1sc into space, ch4, 1sc into space, 33 x 1dc
Size M Row 4 :
ch3, 33 x 1dc, ch4, 1sc into space, ch4, 1sc into space, 33 x 1dc
Size M Row 5 :
ch3, 33 x 1dc, ch4, 1sc into space, ch4, 1sc into space, 33 x 1dc
Size M Row 6 :
ch3, 33 x 1dc, ch4, 1sc into space, ch4, 1sc into space, 33 x 1dc
Size M Row 7 :
ch3, 33 x 1dc, ch4, 1sc into space, ch4, 1sc into space, 33 x 1dc
Size L Row 1 :
ch3, *1 x 2dc in each shell space, 1 x 1dc in the space between two shells*
Size L Row 2 :
ch3, 38 x 1dc, ch4, skip2st, 1 x 1sc, ch4, skip2st, 38 x 1dc
Size L Row 3 :
ch3, 38 x 1dc, ch4, 1sc into space, ch4, 1sc into space, 38 x 1dc
Size L Row 4 :
ch3, 38 x 1dc, ch4, 1sc into space, ch4, 1sc into space, 38 x 1dc
Size L Row 5 :
ch3, 38 x 1dc, ch4, 1sc into space, ch4, 1sc into space, 38 x 1dc
Size L Row 6 :
ch3, 38 x 1dc, ch4, 1sc into space, ch4, 1sc into space, 38 x 1dc
Size L Row 7 :
ch3, 38 x 1dc, ch4, 1sc into space, ch4, 1sc into space, 38 x 1dc
Size XL Row 1 :
ch3, *1 x 2dc in each shell space, 1 x 1dc in the space between two shells*
Size XL Row 2 :
ch3, 43 x 1dc, ch4, skip2st, 1 x 1sc, ch4, skip2st, 43 x 1dc
Size XL Row 3 :
ch3, 43 x 1dc, ch4, 1sc into space, ch4, 1sc into space, 43 x 1dc
Size XL Row 4 :
ch3, 43 x 1dc, ch4, 1sc into space, ch4, 1sc into space, 43 x 1dc
Size XL Row 5 :
ch3, 43 x 1dc, ch4, 1sc into space, ch4, 1sc into space, 43 x 1dc
Size XL Row 6 :
ch3, 43 x 1dc, ch4, 1sc into space, ch4, 1sc into space, 43 x 1dc
Size XL Row 7 :
ch3, 43 x 1dc, ch4, 1sc into space, ch4, 1sc into space, 43 x 1dc
Info :
Note: if you are a larger cup size, do a few extra rows of this colour, until your bust is covered. All up to personal preference :)
— Back panel (switch to 4mm hook) :
Info :
Where we cut off the dark pink yarn, attach yellow yarn.
Size S :
Ch3, 43 x 1dc, turnover* repeat for 12 rows in total. At the end of the twelfth row, ch120-ch150, so it is 70cm long. Repeat for the other side of the front panel.
Size M :
Ch3, 43 x 1dc, turnover* repeat for 14 rows in total. At the end of the fourteenth row, ch120-ch150, so it is 70cm long. Repeat for the other side of the front panel.
Size L :
Ch3, 43 x 1dc, turnover* repeat for 16 rows in total. At the end of the sixteenth row, ch120-ch150, so it is 70cm long. Repeat for the other side of the front panel.
Size XL :
Ch3, 43 x 1dc, turnover* repeat for 18 rows in total. At the end of the eighteenth row, ch120-ch150, so it is 70cm long. Repeat for the other side of the front panel.
Info :
If you have made the front panel longer to support a larger cup size, just continue to do 1dc until the end of the side of the front panel, for example 55 x 1dc - however many you need. Decide which way round you'd like the top to be; the designer attached shoulder straps to the dark pink yarn so chain 120-150 is below it to allow lacing from bottom to top.
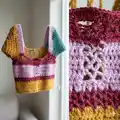
— Shoulder Straps :
Info :
With a 4mm hook, in an appropriate place for the first strap, attach your yarn and place 6 x 1dc, ch2, turnover. Create 28 rows in total of 6 x 1dc, this is the shoulder strap. Sc the shoulder strap to the end of the back panel. Repeat for the second shoulder strap, symmetrically to the first.
Info :
If longer or shorter straps are needed, you can customise the straps; the next part of the pattern is a guide based on the length of the 28 rows.
— Colour 4: turquoise (sleeves) :
Size S Row 1 :
ch3, 78 x 1dc, ss
Size S Row 2 :
switch to 7mm hook ch3, 38 x 1dc, (skip every other st) ss
Size S Row 3 :
ch3, 38 x 1dc, ss
Size S Row 4 :
ch3, *6 x 1dc, dc2tog*, ss
Size S Row 5 :
ch3, *6 x 1dc, dc2tog*, ss
Size S Row 6 :
ch3, dc2tog, 24 x 1dc, dc2tog, ss, cut, fasten off. Repeat with the other sleeve. (26st)
Size M Row 1 :
ch3, 85 x 1dc, ss
Size M Row 2 :
switch to 7mm hook ch3, 42 x 1dc, (skip every other st) ss
Size M Row 3 :
ch3, 42 x 1dc, ss
Size M Row 4 :
ch3, *6 x 1dc, dc2tog*, ss (37st)
Size M Row 5 :
ch3, *6 x 1dc, dc2tog*, ss (33st)
Size M Row 6 :
ch3, dc2tog, 29 x 1dc, dc2tog, ss, cut, fasten off. Repeat with the other sleeve. (31st)
Size L Row 1 :
ch3, 90 x 1dc, ss
Size L Row 2 :
switch to 7mm hook ch3, 45 x 1dc, (skip every other st) ss
Size L Row 3 :
ch3, 45 x 1dc, ss
Size L Row 4 :
ch3, *6 x 1dc, dc2tog*, ss (40st)
Size L Row 5 :
ch3, *6 x 1dc, dc2tog*, ss (35st)
Size L Row 6 :
ch3, dc2tog, 31 x 1dc, dc2tog, ss, cut, fasten off. Repeat with the other sleeve. (33st)
Size XL Row 1 :
ch3, 102 x 1dc, ss
Size XL Row 2 :
switch to 7mm hook ch3, 51 x 1dc, (skip every other st) ss
Size XL Row 3 :
ch3, 51 x 1dc, ss
Size XL Row 4 :
ch3, *6 x 1dc, dc2tog*, ss (47st)
Size XL Row 5 :
ch3, *6 x 1dc, dc2tog*, ss (41st)
Size XL Row 6 :
ch3, dc2tog, 31 x 1dc, dc2tog, ss, cut, fasten off. Repeat with the other sleeve. (39st)
Info :
If you don't have enough stitches at the end of the row for another decrease, e.g 4 x 1dc, finish with a slip stitch as normal, then do 2 x 1dc and dc2tog in the next row - so 6 minus the remaining amount of stitches - (if the next row is also a decrease row).
Info :
If you have made the straps longer or shorter, use this part as a guide and don't worry about matching the exact number of stitches after you finish the row. Make sure to still half the number of total stitches in Row 2 with your 7mm hook, match that number in row 3, and do a decrease every 6 stitches in Rows 4 and 5. Decrease once in the beginning of row 6 and again at the end of the row.
— Colour 5: sage green (shell rows for strap top edge) :
Size S Row 1 :
ch3, *1 x 1dc, ch4, 1dc in the same space, skip 1st* ss
Size S Row 2 :
ch3, 13 shells in 13 ch4 spaces, ss, cut, fasten off
Size M Row 1 :
ch3, *1 x 1dc, ch4, 1dc in the same space, skip1st* ss
Size M Row 2 :
ch3, 15 shells in 15 ch4 spaces, ss, cut, fasten off
Size L Row 1 :
ch3, *1 x 1dc, ch4, 1dc in the same space, skip 1st* ss
Size L Row 2 :
ch3, 17 shells in 17 ch4 spaces, ss, cut, fasten off
Size XL Row 1 :
ch3, *1 x 1dc, ch4, 1dc in the same space, skip 1st* ss
Size XL Row 2 :
ch3, 20 shells in 20 ch4 spaces, ss, cut, fasten off
Info :
If you have customised the length of your straps, just make sure you have around half the number of shells as you do 7mm hook stitches. (e.g size S, 26 st, and then 13 shells)
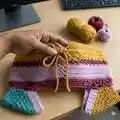
— Finishing and assembly notes :
Info :
Sew shoulder straps to the end of the back panel. Repeat for the second shoulder strap symmetrically. Lace the back up with the chain 120-150 used in the back panel. Weave in ends and block gently if desired.
This colorful striped lace crop top pattern is perfect for expressing your personal style with five playful colors and delicate shell details. Mix and match yarns, extend panels for extra coverage, and make the straps your own for a perfect fit. Happy crocheting and enjoy wearing your handmade top! 🧶✨