๐Ÿงถ Beautiful โœจ Detailed ๐Ÿ’ Adorable

Yellow Cute Banana Amigurumi Pattern

Yellow Cute Banana Amigurumi Pattern
4.5โ˜… Rating
3-5 Hours Time Needed
1.2K Made This
โœ‚๏ธ

Intermediate Level

Ideal for those with basic crochet experience, featuring slightly more advanced stitches and techniques to expand your skills.

โฑ๏ธ

Afternoon Project

Takes 3-5 hours, perfect for an afternoon or evening of relaxing crochet.

๐Ÿงธ

Cute Companion

An adorable friend to cherish, handcrafted with love to bring comfort and joy for years to come.

About This Yellow Cute Banana Amigurumi Pattern

This pattern recreates a small, rounded yellow character wearing bright blue overalls, complete with one prominent circular eye, a stitched smile, tiny black gloves and boots, and a little 'C' emblem on the pocket. The finished toy is made in worsted weight yarn with clear sections for the head, body, limbs, and accessories for easy assembly. The single large eye and goggle add a whimsical focal point while the overalls give the amigurumi a classic, playful look. Instructions include tips for eye placement, stuffing, and tidy sewing so your finished piece looks polished.

Yellow Cute Banana Amigurumi Pattern crochet pattern - detailed view of completed project

The design emphasizes soft shaping, realistic stitch counts, and subtle details such as straps with button points and an embroidered pocket emblem. Suitable for gifting or display, this amigurumi balances simple construction with cute personality.

Why You'll Love This Yellow Cute Banana Amigurumi Pattern

I love how this pattern combines simple, rounded shaping with a bold, single-eye focal point โ€” it gives the toy so much personality. I enjoy the little details like the embroidered pocket emblem and the textured goggle rim, which elevate a small project into a charming keepsake. The overalls and tiny accessories make assembly relaxed but satisfying; I always enjoy the finishing touches that bring the character to life.

Yellow Cute Banana Amigurumi Pattern step 1 - construction progress Yellow Cute Banana Amigurumi Pattern step 2 - assembly progress Yellow Cute Banana Amigurumi Pattern step 3 - details and accessories Yellow Cute Banana Amigurumi Pattern step 4 - final assembly and finishing

Switch Things Up

I absolutely loved designing this pattern because it offers so many opportunities for creative customization while maintaining a structure that's fun and manageable to crochet. The single large eye and goggle make the face design very expressive, and you can change the eye color or add lashes to make different personalities.

You could make seasonal variations by swapping the overall color (green for spring, red for holiday themes), or change the emblem on the pocket with initials or small motifs. For a smaller version, use sport weight yarn and a 2.5mm hook; for a larger plush, choose bulky yarn and increase hook size accordingly. I also like to add tiny accessories like a scarf, mini hat, or embroidered freckles to personalize each finished toy.

Common Mistakes & How to Fix Them

โœ— Skipping stitch markers at round starts can cause misaligned features and uneven shaping; always mark your first stitch of each round โœ— Inconsistent tension between rounds creates lumpy or uneven surfaces; practice maintaining steady, even tension throughout the entire project โœ— Not stuffing gradually as you work causes difficulty reaching inside later; stuff sections as you complete them for best results โœ— Forgetting to secure color changes allows yarn tails to show; weave in ends or carry yarn neatly when changing colors โœ— Placing safety eyes too late limits repositioning; insert and secure eyes before the head is fully closed โœ— Sewing pieces without pinning first can result in asymmetry; always pin limbs and accessories in place before stitching โœ— Not checking stitch math when increasing/decreasing leads to incorrect stitch counts; recount after each shaping round to confirm accuracy

Yellow Cute Banana Amigurumi Pattern

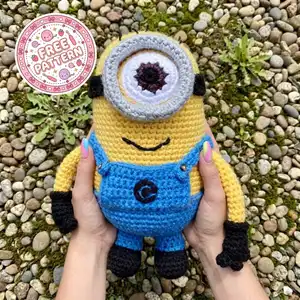
This lovable yellow amigurumi captures the playful charm of a small banana-inspired friend wearing bright blue overalls, a single big eye with a grey goggle, black gloves and boots, and a stitched smile. The plush is soft, round-bodied, and perfect for gifting or cuddling. Clear construction notes, shaping tips, and assembly guidance make this pattern approachable for intermediate crocheters who enjoy detailed amigurumi work.

Intermediate 3-5 Hours

Materials Needed for Yellow Cute Banana Amigurumi Pattern

โ€” Main Fabric

  • 01
    Worsted weight yarn (#4), approximately 120g in main color (bright yellow)
  • 02
    90g in accent color A (royal blue for overalls)
  • 03
    60g in accent color B (black for gloves, boots, and strap accents)
  • 04
    20g in light grey (goggle rim)
  • 05
    20g in white (eye white)
  • 06
    10-15g in dark brown and black (iris and pupil embroidery)

โ€” Tools Required

  • 01
    3.5mm (E) crochet hook for main work (recommended)
  • 02
    3.0mm (D) hook for tighter areas and details (optional)
  • 03
    2.5mm (C) hook for small details (optional)
  • 04
    Yarn needle for sewing and embroidery
  • 05
    Safety eyes 20mm large single eye or round flat-safety eye alternative; if not using safety eyes, embroidery is recommended
  • 06
    Polyester fiberfill stuffing
  • 07
    Stitch markers (at least 4)
  • 08
    Scissors
  • 09
    Tapestry needle for weaving ends
  • 10
    Pins for assembly and positioning
  • 11
    Optional: small snaps or decorative studs for overall straps
  • 12
    Optional: floral wire for poseable limbs (if desired)

Progress Tracker

0% Complete

โ€” Head :

Round 1 :

6 sc in magic ring (6)

Round 2 :

6 inc (12)

Round 3 :

(1 sc, 1 inc) x 6 (18)

Round 4 :

(2 sc, 1 inc) x 6 (24)

Round 5 :

(3 sc, 1 inc) x 6 (30)

Round 6 :

(4 sc, 1 inc) x 6 (36)

Round 7 :

(5 sc, 1 inc) x 6 (42)

Round 8 :

(6 sc, 1 inc) x 6 (48)

Round 9-12 :

1 sc in each st (48)

Info :

Place stitch marker at the start of each round. Work evenly for four rounds to form the top dome of the head. Check tension so the head sits round and even.

Round 13 :

1 sc in each st (48)

Info :

Eye placement: for a single large eye, place it centered on the front of the head between rounds 13 and 14. Mark the center stitch and leave approximately 6-8 stitches between seam edges for a centered look. If using a sewn eye rather than safety eye, you will embroider the pupil later.

Round 14-16 :

1 sc in each st (48)

Round 17 :

(6 sc, 1 dec) x 6 (42)

Round 18 :

(5 sc, 1 dec) x 6 (36)

Info :

Begin gentle stuffing now. Use small amounts of fiberfill and push into the dome shape; do not overstuff or the eye area will distort. Keep the front area slightly less firm until the goggle is attached so the eye can sit naturally.

Round 19 :

(4 sc, 1 dec) x 6 (30)

Round 20 :

(3 sc, 1 dec) x 6 (24)

Round 21 :

(2 sc, 1 dec) x 6 (18)

Round 22 :

(1 sc, 1 dec) x 6 (12)

Round 23 :

6 dec (6)

Info :

At 6 sts, fasten off leaving a long tail for sewing if joining to body later. Alternatively, if you prefer a neck tube, continue crocheting in continuous rounds to form a short neck.

Round 24-28 :

1 sc in each st (6) for 5 rounds to form a short neck tube (6)

Info :

If you made a neck tube, stuff lightly and leave a longer tail to sew into body opening. If closing the head now, finish stuffing firmly and use a tapestry needle to close the 6 sts using a needle gather method.

โ€” Eye & Goggle :

Info :

This amigurumi has one large central eye made by crocheting concentric circles for pupil, iris, and white, then surrounding with a grey goggle rim. Work eyes flat in joined rounds; leave long tails for sewing. You can either use a 20mm safety eye in the center or crochet the pupil/iris and sew them closed.

Eye Round 1 (Pupil) :

Using black yarn: 6 sc in magic ring (6)

Eye Round 2 :

inc x6 (12)

Eye Round 3 (Iris) :

Change to dark brown. (1 sc, inc) x 6 (18)

Eye Round 4 :

1 sc in each st (18)

Eye Round 5 (White) :

Change to white. (2 sc, inc) x 6 (24)

Eye Round 6 :

1 sc in each st (24)

Info :

Flatten the eye slightly and block with your fingers so it sits flat against the face. Sew the completed eye onto the front of the head centered between rounds 13-14 as noted earlier. If using a safety eye, attach it now through the white layer and secure the washer before sewing the grey goggle around it.

Goggle Rim Round 1 :

Using light grey yarn: 8 sc in magic ring (8)

Goggle Rim Round 2 :

inc x8 (16)

Goggle Rim Round 3 :

(1 sc, inc) x 8 (24)

Goggle Rim Round 4 :

1 sc in each st (24)

Goggle Rim Round 5 :

1 sc in each st BLO to create a little ridge for the goggle rim (24)

Info :

Flatten and sew the goggle rim around the eye piece, ensuring the pupil centers correctly in the goggle hole. Secure invisibly by sewing the grey rim to the yellow head in small whipstitches along the inner edge, taking care to hide tails.

โ€” Body :

Round 1 :

6 sc in magic ring (6)

Round 2 :

6 inc (12)

Round 3 :

(1 sc, 1 inc) x 6 (18)

Round 4 :

(2 sc, 1 inc) x 6 (24)

Round 5 :

(3 sc, 1 inc) x 6 (30)

Round 6 :

(4 sc, 1 inc) x 6 (36)

Round 7 :

(5 sc, 1 inc) x 6 (42)

Round 8-12 :

1 sc in each st (42)

Info :

If adding overalls, change to blue yarn at round 13. Carry the yellow yarn inside the work or fasten off if you prefer a clean edge. Work round 13 in BLO for a neat overall edge if desired.

Round 13 (Change to Blue) :

Change to blue yarn, 1 sc in each st BLO (42)

Round 14-18 :

1 sc in each st (42)

Info :

Start stuffing the lower body firmly from round 15 onward. The body should be plump but not over-stuffed to allow the head to attach neatly. Use small pieces of fiberfill and pack evenly.

Round 19 :

(6 sc, 1 dec) x 6 (36)

Round 20 :

(5 sc, 1 dec) x 6 (30)

Round 21 :

1 sc in each st (30)

Round 22 :

(3 sc, 1 dec) x 6 (24)

Round 23 :

(2 sc, 1 dec) x 6 (18)

Round 24 :

(1 sc, 1 dec) x 6 (12)

Round 25 :

6 dec (6)

Info :

Fasten off leaving a long tail for sewing the head to the body. If you prefer to join head and body by crocheting together, leave both pieces open and use a 3.5mm hook to seam them using slip stitches or a round of sc around both edges.

โ€” Arms (Make 2) :

Round 1 :

6 sc in magic ring (6)

Round 2 :

inc x6 (12)

Round 3 :

(1 sc, inc) x 6 (18)

Round 4-6 :

1 sc in each st (18)

Info :

These rounds form the upper hand and wrist base. Stuff hands firmly after round 6 so they keep a rounded shape. Leave the arm opening unstuffed for now to facilitate sewing into the shoulder seam.

Round 7 (Change to Black) :

Change to black yarn for glove, 1 sc in each st (18)

Round 8 :

(2 sc, 1 dec) x 6 (12)

Round 9 :

1 sc in each st (12)

Round 10 :

(1 sc, 1 dec) x 4 (8)

Round 11 :

1 sc in each st (8)

Info :

For glove finger detail, you can make a tiny thumb nub: with black yarn and a 3.0mm hook, make a 4-sc tube in magic ring, 2 rounds even, stuff and sew to the side of the glove. Alternatively, use surface embroidery to indicate finger separation.

Round 12-15 :

1 sc in each st (8). Stuff lightly for arm stability and shape the tube.

Round 16 :

Work decreases to form a tapered shoulder base: (1 sc, 1 dec) x 2 (6)

Round 17 :

1 sc in each st (6)

Round 18 :

Fasten off leaving long tail for sewing (6)

Info :

Sew the arm opening to the body between rounds 14-16 of the body for a natural arm placement. Pin before sewing to achieve symmetry.

โ€” Legs (Make 2) :

Round 1 (Boot Base) :

6 sc in magic ring using black yarn (6)

Round 2 :

inc x6 (12)

Round 3 :

(1 sc, inc) x 6 (18)

Round 4-5 :

1 sc in each st (18)

Round 6 :

(2 sc, 1 dec) x 6 (12)

Round 7 :

1 sc in each st (12)

Info :

These first rounds build a rounded boot. Stuff firmly to create a stable base that allows the toy to sit. The boot should be short and squat compared to the leg tube you'll build next.

Round 8 (Change to Blue) :

Change to blue yarn for leg tube, 1 sc in each st (12)

Round 9-14 :

1 sc in each st (12)

Round 15 :

(1 sc, inc) x 4 (16)

Round 16-18 :

1 sc in each st (16)

Round 19 :

(2 sc, 1 dec) x 4 (12)

Round 20 :

1 sc in each st (12), fasten off leaving tail for sewing

Info :

Leave longer tails for sewing legs onto the bottom of the body. Legs are sewn to the bottom between body rounds 22-25. Make sure boots align equally apart for a balanced stance.

โ€” Overall Bib and Pocket :

Round 1 (Pocket Base) :

Using blue, ch 12, join with sl st to form a ring, round 1: 12 sc around chain (12)

Round 2 :

inc around to make the pocket slightly rounded: (1 sc, inc) x 4, 4 sc (16)

Round 3-4 :

1 sc in each st (16)

Info :

Make a small rectangular pocket by working a short flat panel attached to the bib. Use surface embroidery to add a 'C' emblem in black on the pocket: embroider a spiral C shape using backstitch or chain stitch.

Bib Round 1 :

Attach yarn to body at round 13 center front. Ch 1, sc in each st across a 14-st width approximate to create a flat bib panel; row length will vary depending on your stitch gauge.

Bib Round 2-6 :

Work rows of sc back and forth (or joined rounds if you prefer) to create a rectangular bib about 6 rows tall. Fasten off and sew pocket to the front center of the bib panel.

Info :

Use small decorative studs or faux buttons at the bib ends where the straps will attach. Stitch straps to the top corners of the bib and over the shoulders to meet buttons on the back if desired.

โ€” Straps (Make 2) :

Strap Round 1 :

With blue yarn ch 24 (or desired length), turn and sc in 2nd ch from hook and across (23)

Strap Round 2-3 :

1 sc in each st, fasten off leaving tail for attaching (23)

Info :

Sew one end of each strap to the top corners of the bib and the other ends to the back of the body using small button points or sew directly and add a faux button for realism.

โ€” Gloves (Make 2 Small Thumbs/Nubs) :

Round 1 :

6 sc in magic ring (6)

Round 2-3 :

1 sc in each st (6)

Round 4 :

sl st around and fasten off, leave tail to sew to glove side (6)

Info :

Sew tiny thumb nubs to the side of the glove at the join between the hand and wrist. You can also use black embroidery to indicate finger lines if desired.

โ€” Boots Finishing :

Info :

After sewing legs to body, add a small round of black felt under each boot sole if you want a firmer base. You can also reinforce seams with extra whipstitches to ensure stability for display and light play.

โ€” Decorative Details :

Info :

Use black yarn and embroidery to stitch the smile centered between the bottom of the goggle and the top of the bib. A simple curved backstitch or satin stitch creates a soft smile as shown. Add small embroidered creases at fabric edges for extra detail.

Info :

For hair, use short strands of black yarn stitched into the top of the head at even intervals (3-6 tiny loops) and trim to desired short 'spiky' length. These are optional and add personality.

โ€” Final Touches :

Info :

Weave in all ends neatly into the interior of each piece, and if desired, apply a small dab of fabric glue behind safety-eye washers for extra security. Add blush with fabric chalk or light dusting for a friendly face.

Info :

Block and shape the goggle and bib if necessary by pinning them into place on the head and lightly wetting/reshaping the goggle to make it sit flat and smooth. Allow to dry fully before final sewing.

Assembly Instructions

  • Attach head to body by inserting the neck portion into the body opening. Pin in place first to ensure alignment and sew using whip stitch or ladder stitch around the neck seam evenly, matching the rounds on the head and body. Use the long tails left from both pieces to embroider reinforcement stitches through both layers for a tidy join.
  • Position arms on the sides of body at approximately body rounds 14-16 (counting from the top of the body bib) for a natural look. Pin both arms in the same position on each side, then sew through both the arm opening and body using a mattress or ladder stitch for an invisible seam.
  • Attach legs to the bottom of the body by aligning boot centers to body bottom between body rounds 22-25. Space them evenly (roughly 6-8 stitches apart center-to-center) so the figure stands balanced. Sew securely with multiple passes for strength.
  • Sew the bib to the body front centered at round 13 and secure pocket to the bib centered and slightly lower. Use small invisible stitches at the edges and visible topstitching for the pocket opening for a neat look.
  • Sew straps to the top corners of the bib and attach the other ends to the back of the body at symmetric points. Use studs or sewn button points to add realism and stop straps from shifting.
  • Sew the goggle rim around the eye area by matching the inner edge of the grey rim to the outer edge of the white eye circle. Use small whipstitches and hide tails inside the head. If the eye is a safety eye, secure its washer before sewing the rim.
  • Attach tiny thumbs (glove nubs) to the glove base by stitching them at the side seam of the glove. Embroider finger lines if desired for extra definition.
  • After all pieces are sewn, weave in remaining ends into the body interior and trim close. Check all joins for gaps and add extra reinforcement stitches where necessary for durability.

Important Notes

  • ๐Ÿ’กUse stitch markers consistently at the beginning of each round to avoid counting errors and maintain proper shaping
  • ๐Ÿ’กStuff body parts gradually as you work rather than waiting until the end, especially for narrow openings like arms and legs
  • ๐Ÿ’กFor safety eyes, position and secure before stuffing head fully - they cannot be repositioned once locked in place
  • ๐Ÿ’กMaintain consistent tension throughout the project; too tight creates stiff, small pieces, too loose creates floppy, holey fabric
  • ๐Ÿ’กWhen sewing pieces together, use yarn slightly thinner than working yarn for neater, less visible seams
  • ๐Ÿ’กPin all pieces in position before final sewing to ensure proper placement and symmetry
  • ๐Ÿ’กFor amigurumi, work tightly enough that stuffing doesn't show through stitches; use a hook one size smaller if necessary
  • ๐Ÿ’กCount stitches carefully after shaping rounds and correct any mistakes early to avoid distortion at assembly

This joyful amigurumi brings a splash of color and personality to any shelf or gift bag! The sunny yellow body, single expressive eye, and cheerful overalls combine into a lovable character that is fun to crochet and delightful to finish. The pattern includes focused shaping tips and finishing details so each section joins smoothly to create a polished, snuggly friend. ๐Ÿงถ Give it as a sweet handmade present or keep it as a bright, cheerful companion. Happy stitching! ๐ŸŽ

You ask,

we answer.

FAQs

What is the finished size of this amigurumi?

Based on the specified materials and 3.5mm hook, the finished piece will measure approximately 8-10 inches (20-25 cm) in height. Using different yarn weights will proportionally change the final size.

Can I use different yarn weights for this pattern?

Yes! You can use any yarn weight, but remember to adjust your hook size accordingly (generally 1-2 sizes smaller than yarn recommendation for tight amigurumi fabric). Thicker yarn will make a larger toy and require more stuffing and yarn.

Do I need to use safety eyes or can I embroider them?

Both options work beautifully! Safety eyes give a professional look and are very secure, perfect for display. Embroidered eyes are ideal for very young children as they have no small parts, and allow for more expression customization.

How much stuffing will I need?

For this size project, approximately 50-100 grams of polyester fiberfill should be sufficient. Stuff firmly but not overly tight, allowing the piece to maintain its shape while still being cuddly.

Can I make the arms and legs poseable?

Absolutely! Insert pipe cleaners or floral wire before stuffing limbs completely. Bend wire to desired shape, ensuring ends are folded and covered to avoid poking, then continue stuffing around the wire.

What if my stitch count is off?

If you notice a counting error, it's best to unravel back to where the count was correct. Trying to compensate later often creates visible distortions. Using a stitch marker at round starts helps prevent counting mistakes.

How do I prevent holes when stuffing?

Work with tight, consistent tension throughout, using a hook slightly smaller than yarn recommendation. When stuffing, distribute fiberfill evenly in small amounts rather than large chunks.

Can I customize colors and details?

Definitely! Feel free to use any color combinations you love. You can add accessories, change facial expressions, or adjust proportions slightly to make your creation unique while following the basic structure.