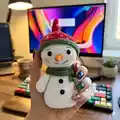
About This Snowman Amigurumi Pattern
This pattern creates a sweet, hand-sized snowman amigurumi with a pointed festive hat, scarf, carrot nose, and button accents. Youll work mostly in single crochet rounds with increases and decreases to shape the body and head. The design uses three main colors and finishes at approximately 15 cm when using similar yarn and hook sizes. Clear photos and placement notes help you assemble and finish the face and accessories.

Includes full round-by-round crochet instructions for body, nose, arms, hat and scarf. Helpful assembly tips and recommended materials are provided to guide you from start to finish.
Why You'll Love This Snowman Amigurumi Pattern
I absolutely love this pattern because it captures cozy holiday charm in a small, satisfying project. I enjoy how the shaping creates a friendly face and rounded body that feels balanced and cute. The hat and scarf give lots of room for personalization, and I always have fun stitching tiny snowflake details on the hat. I find the pattern rewarding because the step-by-step rounds make shaping predictable and relaxing, and the finished snowman makes a wonderful handmade gift.
Switch Things Up
I love customizing this snowman to make each one unique, and I often swap the hat and scarf colors to match my decor.
You can make the snowman larger by using thicker yarn and a larger hook, or make tiny keychain versions by using finer yarn and a 1.5mm hook.
I sometimes embroider different expressions on the face to give each snowman its own personality, trying simple smiles or surprised mouths.
Swap the button style for tiny felt circles, beads, or embroidered buttons for a softer look without hardware.
Try changing the hat tip shape: elongate it for a whimsical elf hat, or shorten it for a classic beanie silhouette.
For a vintage look, use wool-blend yarns and muted colors, then lightly brush the finished piece for a fuzzy texture.
I also like to add small accessories like a tiny broom, mini mittens, or a crochet gift for the snowmans hands.
If you prefer, use safety eyes or embroider the eyes instead for a child-safe toy; embroidering gives a gentler look too.
Try stitching snowflake patterns on the hat with contrasting thread to add handmade detail and texture to the surface.
Finally, bundle multiple snowmen in a decorative tray for a charming seasonal display — its a great way to show variations and color experimentation.
Common Mistakes & How to Fix Them
✗ Skipping the instruction to stuff as you go can lead to lumps or uneven shaping; stuff gradually and adjust as you complete shaping rounds.
✗ Not attaching the eyes in the correct rows will change facial placement; follow the note and place eyes on the 43rd and 44th rows nine stitches apart.
✗ Overtightening your tension when using small hooks creates a stiff fabric; maintain even, relaxed tension throughout for smooth amigurumi stitches.
✗ Forgetting to change color on the hat at the specified round will alter the brim appearance; change to green exactly after round 30 and continue as written.
✗ Ignoring BLO (back loop only) instructions can flatten textured edges; work BLO and FLO instructions precisely to get the intended finish.