🧶 Beautiful ✨ Detailed 💝 Adorable

Snowflake Ornament Pattern

Snowflake Ornament Pattern
4.5★ Rating
1-2 Hours Time Needed
2.9K Made This
✂️

Beginner Friendly Level

Perfect for those just starting their crochet journey, with clear instructions and simple techniques

⏱️

Quick Make

Complete in under 2 hours—lightning fast fun for instant gratification and quick gifts.

🎄

Holiday Cheer

Festive fun for the season, bringing handmade magic to celebrations and creating new family traditions.

About This Snowflake Ornament Pattern

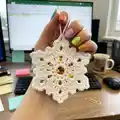
This pattern creates a pretty white Snowflake Ornament that finishes about 13 cm (5") across, perfect for holiday trees and gift tags. It uses Red Heart Niki yarn and basic crochet stitches including chains, double crochets, half-treble and trebles for elegant points. The design works up quickly and is a lovely way to add handmade charm to your holiday decor.

Snowflake Ornament Pattern crochet pattern - detailed view of completed project

Perfect for quick makes and gift sets, you can make a batch in an afternoon for a coordinated tree. Simple finishing instructions are included to add a hanging loop of your choice.

Why You'll Love This Snowflake Ornament Pattern

I absolutely love this pattern because it combines fast, satisfying crochet with a delicate finished result that looks far more intricate than it actually is. I enjoy how each round builds the snowflake shape quickly, giving great visual progress as you work. Making a set of these feels festive and rewarding, and I love gifting them to friends and family. The pattern is forgiving and beginner-friendly, so I feel confident recommending it to crocheters of all skill levels.

Snowflake Ornament Pattern step 1 - construction progress Snowflake Ornament Pattern step 2 - assembly progress Snowflake Ornament Pattern step 3 - details and accessories Snowflake Ornament Pattern step 4 - final assembly and finishing

Switch Things Up

I love customizing these snowflakes by changing yarn color; try metallic or sparkly yarn for extra holiday shine.

I sometimes work this pattern in a finer yarn with a smaller hook to make tiny ornaments for garlands or gift tags.

I also like making jumbo versions using bulky yarn and a larger hook for statement decorations or tree toppers.

I often add a small bead or sequin to the center before fastening off to give a subtle sparkle.

I recommend experimenting with ribbon widths and textures for the hanging loop to match your tree decor.

I like to block mine on a star template to get perfectly even points; pin and lightly steam or spray with water to set the shape.

I sometimes crochet two layers and slightly offset them, sewing them together for a fuller, 3D snowflake effect.

I enjoy mixing and matching yarns—try a white outer round with a colored center for a tasty contrast.

I occasionally embroider a tiny design on one point for a personalized touch or to add initials for gifted ornaments.

I also make a set in coordinating colors to create themed decorations for seasonal events.

I encourage you to try embellishments like tiny bells or charms tied into the hanging loop for a musical jingle.

I always recommend making a practice snowflake first to test tension and size before committing to multiple finished pieces.

Common Mistakes & How to Fix Them

✗ Skipping the initial ring join can make the center hole too loose; be sure to join ch 6 with a slip stitch to form a neat ring before starting Round 1. ✗ Not counting the ch-3 spaces after Round 2 will affect placement of points; count the 12 ch-3 spaces and mark them if necessary to keep symmetry. ✗ Working inconsistent tension during the treble clusters can make points uneven; maintain even, relaxed tension and practice the (2 tr, ch 3, 2 tr) cluster before continuing. ✗ Forgetting to fasten off neatly leaves a visible tail; after Round 4 fasten off and weave in ends securely to hide tails and keep the snowflake tidy.

Snowflake Ornament Pattern

Create delicate, handmade snowflake ornaments to brighten your tree or gift to friends this season. This easy pattern uses basic stitches and works up quickly so you can make several in an afternoon. You only need one ball of yarn and a 3.75 mm hook to get started—perfect for holiday crafting and decorations. Follow the step-by-step rounds and finishing notes to make a beautiful 13 cm snowflake.

Beginner Friendly 1-2 Hours

Materials Needed for Snowflake Ornament Pattern

— Main Fabric

  • 01
    Red Heart Niki (Main Color A: White, shade 02034) - 1 ball
  • 02
    Red Heart Niki, Art. 9809634, 50 g (1.76 oz), 106 m (116 yd) per ball

— Tools Required

  • 01
    Crochet hook size 3.75mm (US F-5)
  • 02
    Yarn needle
  • 03
    Ribbon or thread for hanging loop (your choice)

Progress Tracker

0% Complete

— Snowflake :

Info :

Snowflake measures 13 cm [5"] in diameter.

Info :

With A, ch 6; join with a slip st to form a ring.

Round 1 :

Ch 1, 12 dc in ring; join with a slip st in first dc - 12 dc.

Round 2 :

Ch 1, dc in first st, [ch 3, dc in next dc] 11 times; htr in first dc to join and form last space - 12 ch-3 spaces.

Round 3 :

Ch 1, dc over htr, *(2 tr, ch 3, 2 tr) in next space**, dc in next space; repeat from * around, ending last repeat at **; join with a slip st in first dc.

Round 4 :

Ch 4, slip st in same st as joining, *ch 2, (dc, ch 3, dc, ch 5, dc, ch 3, dc) in next ch-3 space, ch 2*, (slip st, ch 4, slip st) in next dc; repeat from * around, ending last repeat at **; join with a slip st in slip st of last round. Fasten off.

Finishing :

Weave in ends. Add hanging loop of your choice.

Infos :

ch = chain; cm = centimeters; dc = double crochet; htr = half treble crochet; mm = millimeters; st(s) = stitch(es); tr = triple or treble crochet; [ ] = work directions in brackets the number of times specified; * or ** = repeat whatever follows the * or ** as indicated.

Assembly Instructions

  • Weave in all ends securely with a yarn needle so no tails are visible on the finished snowflake.
  • Add a hanging loop of ribbon, thread, or metallic cord through one of the outer picot or ch-5 loops and knot securely out of sight.
  • If desired, lightly block the snowflake by pinning it to shape on a blocking mat and spraying with water to set the points, then allow to dry.
  • Check that the join from Round 1 is neat and that the slip stitch joins from each round are secure before hanging.

Important Notes

  • 💡Check your tension: the finished snowflake should measure about 13 cm (5") across; adjust hook size to match if necessary.
  • 💡Work rounds in continuous rounds as written and join each round with a slip stitch to keep neat seams.
  • 💡Weave in ends and fasten off cleanly to prevent unravelling when the ornament is handled or stored.

Make your holiday tree shine with handmade snowflake ornaments that feel personal and festive. 🎄 These delicate snowflakes are quick to make and look wonderful in clusters or mixed with baubles for texture and charm. ❄️ Whether you gift them or keep them, each one brings a handcrafted touch to the season. 🧶

You ask,

we answer.

FAQs

What size will the finished piece be?

The finished snowflake measures approximately 13 cm (5") in diameter when using the recommended yarn and 3.75 mm hook.

Can I use different yarn weights for this pattern?

Yes, you can substitute yarn weights but the finished size will change; use a suitable hook to maintain fabric and shape.

Do I need prior crochet experience for this pattern?

This pattern is rated beginner friendly, so basic knowledge of chain, double crochet, slip stitch and treble crochet is helpful.

How long does this project typically take to complete?

Most crocheters can complete a single snowflake in under 2 hours, though time will vary by skill level and detailing.