🧢 Beautiful ✨ Detailed πŸ’ Adorable

Small Pumpkin Amigurumi Pattern

Small Pumpkin Amigurumi Pattern
4.1β˜… Rating
2-3 Hours Time Needed
1.2K Made This
βœ‚οΈ

Beginner Friendly Level

Perfect for those just starting their crochet journey, with clear instructions and simple techniques

⏱️

Bite-Sized Project

Finishes in 2-4 hoursβ€”perfect for an afternoon of creative relaxation.

πŸ‚

Autumn Vibes

Earthy tones with cozy textures inspired by falling leaves and the rich, warm colors of harvest season.

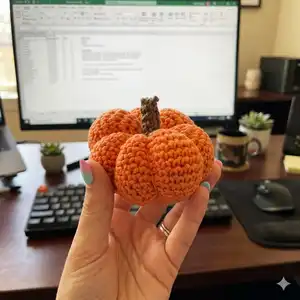
About This Small Pumpkin Amigurumi Pattern

This pattern creates a small, stuffed crochet pumpkin perfect for autumn decor, gifts, or keychain charms. The design focuses on simple amigurumi shaping to form the pumpkin segments that give it a plump, rounded look. You will find the full free pattern and photos on the designer's blog linked in this PDF. This version is perfect for practicing increases, decreases, and simple assembly.

Small Pumpkin Amigurumi Pattern crochet pattern - detailed view of completed project

The PDF shown here points you to the full pattern on PeachUnicornDesigns.com. Head to the Crochet Blog on the site to access the complete, free instructions.

Why You'll Love This Small Pumpkin Amigurumi Pattern

I absolutely love this pattern because it is quick to make and incredibly satisfying to finish in one sitting. I enjoy how simple shaping and basic stitches combine to create a charming seasonal decoration. The size and construction make it perfect for using scrap yarn, so you can make several variations quickly. I also love that it is accessible to beginners while still offering a polished, professional-looking result.

Small Pumpkin Amigurumi Pattern step 1 - construction progress Small Pumpkin Amigurumi Pattern step 2 - assembly progress Small Pumpkin Amigurumi Pattern step 3 - details and accessories Small Pumpkin Amigurumi Pattern step 4 - final assembly and finishing

Switch Things Up

I love transforming this small pumpkin by experimenting with different yarn textures; try cotton for a firmer pumpkin or fuzzy yarn for a soft, decorative look.

I often change the colors to create a set of pumpkins in cream, rust, and mustard for a cozy autumn display.

I sometimes make a miniature version using lighter-weight yarn and a smaller hook to create cute keychain-sized pumpkins.

I also add embroidered veins or beads at the center to give each pumpkin unique character and detail.

If you want a rustic look, use a brown variegated yarn for the stem instead of solid brown yarn to add subtle visual interest.

I occasionally stuff the stem more firmly so it stands upright better, or leave it floppy for a more natural, casual style.

Try making a garland by stringing several small pumpkins together with twine and spacing them evenly for seasonal decor.

I recommend blocking or shaping the finished pumpkins slightly with light steam (if yarn allows) to even out stitches and enhance their round shape.

For gifts, I place the pumpkin in small organza bags and add a handmade tag; it makes a charming, handmade present that people love.

I enjoy combining this pumpkin with crocheted leaves or tiny acorns to create themed table centerpieces or wreath additions for fall decorating.

Common Mistakes & How to Fix Them

βœ— Skipping stitch markers when working in continuous rounds can cause you to lose track of the round; place a marker at the start of every round and move it up as you work. βœ— Stuffing too tightly will distort the pumpkin shape and make stitches bulge; stuff gradually and evenly, adding small amounts until you reach the desired firmness. βœ— Forgetting to count stitches after increases or decreases leads to uneven segments; count your stitches frequently and mark key stitch points to stay accurate. βœ— Pulling yarn too tightly when sewing segments together changes the final proportions; use loose, even sewing stitches and adjust tension as you join pieces to maintain shape.

Small Pumpkin Amigurumi Pattern

Make a charming small crochet pumpkin to decorate your home or give as a seasonal gift. This free pattern is quick and perfect for using up scrap yarn and practicing amigurumi shaping. Follow the link to the designer's blog for the complete step-by-step instructions and photo guide. A delightful little autumn project you can finish in an afternoon.

Beginner Friendly 2-3 Hours

Materials Needed for Small Pumpkin Amigurumi Pattern

β€” Main Fabric

  • 01
    Worsted weight yarn (#4) - Orange - approximately 25-40g for the body
  • 02
    Small amount of worsted weight yarn (#4) - Brown - 5-10g for the stem
  • 03
    Optional green scrap for a leaf - 2-5g

β€” Tools Required

  • 01
    Crochet hook size 3.5mm (E) or size recommended for your yarn
  • 02
    Yarn needle for sewing and weaving ends
  • 03
    Scissors
  • 04
    Stitch marker
  • 05
    Polyester stuffing (small amount)
  • 06
    Pins for holding pieces in place while assembling

Progress Tracker

0% Complete

β€” Pattern Link :

Info :

This PDF page contains a link to the full free Small Pumpkin pattern on the designer's blog at www.PeachUnicornDesigns.com. Visit the Crochet Blog on PeachUnicornDesigns to access the complete pattern, step-by-step instructions, and photos.

Info :

Click the 'Click here' link shown on this page or open your browser and go to www.PeachUnicornDesigns.com then navigate to the Crochet Blog to find the Small Pumpkin pattern.

β€” Preview Image :

Info :

The image on this page shows the finished small pumpkin for reference; the full crocheting rounds and assembly steps are provided on the blog page linked above.

Assembly Instructions

  • If the pattern on the blog uses separate segments, align the segments evenly around the pumpkin and sew them together by whipstitching the edges through corresponding stitches to create the rounded ribs.
  • After sewing segments together, insert stuffing through the opening, filling evenly until the pumpkin is plump but not overstuffed, then close the opening with an invisible stitch.
  • Create the stem by crocheting the small brown tube or stump as per the blog instructions, stuff lightly if required, and sew securely to the center top of the pumpkin.
  • Optionally add a small crocheted leaf or embroidered lines across each segment; pin the leaf into position and sew with matching yarn for a neat finish.

Important Notes

  • πŸ’‘Use a stitch marker to mark the beginning of each round to keep your stitch counts accurate when working in continuous rounds.
  • πŸ’‘Stuff the pumpkin gradually while assembling to ensure an even, smooth shape and avoid lumps or overfilling.
  • πŸ’‘Pin all pieces in place before sewing to check placement and symmetry for a neat final result.

This free Small Pumpkin pattern is available on PeachUnicornDesigns.comβ€”visit the Crochet Blog to get the complete tutorial and photos. πŸ‚ Make a batch in different colors for a festive autumn display or gift them to friends and family. 🎁 Happy crocheting and enjoy making cozy little pumpkins for your home this season! 🧢

You ask,

we answer.

FAQs

What size will the finished piece be?

The finished small pumpkin measures approximately 6-8 cm across when using worsted weight yarn and a 3.5mm hook; exact size depends on yarn and tension.

Can I use different yarn weights for this pattern?

Yes, you can use different yarn weights, but the final size will change; adjust your hook accordingly and expect a larger pumpkin with bulky yarn or a tiny one with fingering yarn.

Do I need prior crochet experience for this pattern?

This pattern is beginner friendly and uses basic stitches like single crochet, increases, and decreases, making it suitable for new crocheters with basic skills.

How do I access the full pattern since this PDF links to the blog?

Open www.PeachUnicornDesigns.com in your browser and go to the Crochet Blog, or click the hyperlink shown on the PDF page to reach the complete free pattern and photos.