๐Ÿงถ Beautiful โœจ Detailed ๐Ÿ’ Adorable

Jellyfish Crochet Amigurumi Pattern

Jellyfish Crochet Amigurumi Pattern
4.4โ˜… Rating
5-7 Hours Time Needed
1.2K Made This
โœ‚๏ธ

Intermediate Level

Ideal for those with basic crochet experience, featuring slightly more advanced stitches and techniques to expand your skills.

โฑ๏ธ

Weekend Treat

Takes 5-7 hours, making it an enjoyable project to finish over a couple of days.

๐Ÿงธ

Cute Companion

An adorable friend to cherish, handcrafted with love to bring comfort and joy for years to come.

About This Jellyfish Crochet Amigurumi Pattern

This pattern teaches you how to crochet a lovable jellyfish amigurumi with a ruffled edge and two types of tentacles. You will make a rounded head, add a decorative ridge, sew on cheeks, and attach curly and chain tentacles. The instructions include stitch counts, assembly guidance, and helpful photos to make finishing easy and satisfying.

Jellyfish Crochet Amigurumi Pattern crochet pattern - detailed view of completed project

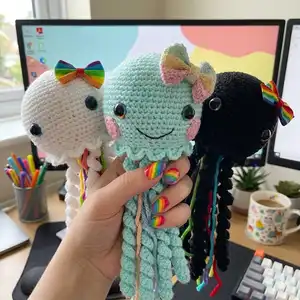
Designed for intermediate crocheters, the pattern uses worsted weight yarn and a 3.25 mm hook to create a roughly 16-inch jellyfish with long tentacles. Full material lists, abbreviations, and helpful tips are included to support your making process.

Why You'll Love This Jellyfish Crochet Amigurumi Pattern

I absolutely love this pattern because it combines simple amigurumi shaping with playful tentacle textures that really bring the jellyfish to life. I enjoy how the ridge and ruffled edge add character without complicated shaping. The two tentacle styles let me customize each jellyfish to match colors or moods, and sewing everything together feels rewarding. Every finished jellyfish looks unique depending on yarn and color choices, which keeps the pattern fresh and fun to make again and again.

Jellyfish Crochet Amigurumi Pattern step 1 - construction progress Jellyfish Crochet Amigurumi Pattern step 2 - assembly progress Jellyfish Crochet Amigurumi Pattern step 3 - details and accessories Jellyfish Crochet Amigurumi Pattern step 4 - final assembly and finishing

Switch Things Up

I love changing up the colors to make each jellyfish feel different; try ombre yarn for a gradient body or pick contrasting tentacle colors for a playful look.

You can make the jellyfish smaller or larger by using a different yarn weight and hookโ€”choose a DK or sport weight with a smaller hook to make a mini version for keychains.

If you want a plush, chunky jellyfish, use bulky yarn and a larger hook to create a super squishy friend.

I sometimes swap the safety eyes for embroidered eyes or felt for a softer, baby-safe toy.

Add wire inside some tentacles to make them poseable so your jellyfish can curl and hold a pose.

Embellish with tiny crocheted accessories like bows, flowers, or a little star to give personality to each jellyfish.

Try different tentacle combinationsโ€”more chain tentacles for a flowing look, or more curly tentacles for a full, textured skirt.

I recommend testing eye placements before attaching; moving the eyes slightly up or down changes the expression dramatically.

For a holiday twist, choose seasonal yarns (metallic accents or sparkly blends) to make gift-ready jellyfish.

I often mix fiber typesโ€”cotton for crisp definition, acrylic for soft drapeโ€”to tweak the final texture and drape of tentacles.

Common Mistakes & How to Fix Them

โœ— Placing safety eyes in the wrong rounds will misplace facial features; follow the pattern and place the eyes between rounds 17 and 18 leaving 11 stitches between them to ensure correct placement. โœ— Forgetting to stuff as you go can make finishing messy and uneven; start stuffing at the recommended round and add stuffing gradually to keep an even, smooth shape. โœ— Not using a stitch marker leads to losing the beginning of rounds; place a marker at the first stitch of each round and move it each round to maintain stitch counts. โœ— Skipping the BLO (back loops only) instruction for the ridge reduces the defined edge effect; always work the specified BLO rounds to create the correct ruffled ridge. โœ— Leaving tentacles unanchored or unevenly spaced causes a lopsided look; pin chain tentacles in a circle and arrange curly tentacles around them before sewing to ensure balance.

Jellyfish Crochet Amigurumi Pattern

Make a sweet, squishy jellyfish amigurumi with clear step-by-step instructions you can follow at home. This pattern includes full stitch-by-stitch rounds, tentacle variations, assembly photos, and helpful tips to guide you. Perfect for gifting or adding a playful handmade friend to your collection, the finished jellyfish has a ruffled skirt and curly tentacles for lots of personality.

Intermediate 5-7 Hours

Materials Needed for Jellyfish Crochet Amigurumi Pattern

โ€” Main Fabric

  • 01
    Worsted Weight yarn (#4), approximately 100g main color (Color A - Main Color)
  • 02
    Accent colors: 50-75g total for tentacles and details (Color B - Tentacle Color)
  • 03
    Color C: Pink - approx 10-20g for cheeks and small details
  • 04
    18 mm safety eyes (pair)
  • 05
    Black embroidery thread for smile and facial details

โ€” Tools Required

  • 01
    Crochet hook size D / 3.25 mm
  • 02
    18 mm safety eyes (2 pieces)
  • 03
    Scissors
  • 04
    Yarn/sweing needle for sewing and weaving ends
  • 05
    Stitch marker
  • 06
    Polyester fiberfill stuffing
  • 07
    Pins for marking and assembly
  • 08
    Black embroidery thread for facial embroidery

Progress Tracker

0% Complete

โ€” Head :

Round 1 :

Make 6 sc into a magic ring=6

Round 2 :

Increase in each st around= 12

Round 3 :

(sc, inc) x 6= 18

Round 4 :

(2 sc, inc) x 6= 24

Round 5 :

(3 sc, inc) x 6= 30

Round 6 :

(4 sc, inc) x 6= 36

Round 7 :

(5 sc, inc) x 6= 42

Round 8 :

(6 sc, inc) x 6= 48

Round 9 :

(7 sc, inc) x 6= 54

Round 10 :

(8 sc, inc) x 6= 60

Round 11-21 :

sc in each st around

Info :

Place the eyes between rounds 17 and 18, leaving 11 holes in between them.

Round 22 :

(8 sc, dec) x 6= 54

Round 23 :

(7 sc, dec) x 6= 48

Round 24 :

(6 sc, dec) x 6= 42

Round 25 :

(5 sc, dec) x 6= 36

Round 26 :

BLO (4 sc, dec) x 6= 30

Info :

Start stuffing the head

Round 27 :

(3 sc, dec) x 6= 24

Round 28 :

(2 sc, dec) x 6= 18

Round 29 :

(sc, dec) x 6= 12

Round 30 :

dec x 6= 6

Info :

F/O and sew the hole closed

โ€” Ridge on Head :

Info :

With Color A: Attach the yarn to round 26 of the head. *Follow pictures below for help* 1. *(hdc, dc, tr, dc, hdc) in one st, sl st in the 2 stitches* Repeat from * to * around the head. F/O and weave in the tail ends

โ€” Curly Tentacles (Make 7) :

Item :

With Color A: CH 71. 1. sc in 2nd ch from hook, inc in next st, (sc, inc) across the chain. F/O and leave a long tail for sewing

โ€” Chain Tentacles (Make 5) :

Item :

With Color of Choice: CH 75. 1. Sl st in 2nd ch from hook and across. F/O and leave a long tail for sewing

โ€” Cheeks (Make 2) :

Item :

With Color C: 1. Make 6 sc into a magic ring= 6. 2. Increase in each st around= 12. F/O and leave a long tail for sewing

โ€” Assembly :

Head and Body :

1. Mark 2 spots on the head with pins approximately between rounds 21 and 22. Cut a long strand of black embroidery thread. Thread your needle and insert the needle into a hole on the side of the head. Bring your needle up to the first pin and then bring the needle to the 2nd pin. Make a line and be easy and wrap the thread around the middle of the smile to hold it in place. Weave in the tail ends. 2. Pin the cheeks next to the eyes and sew into place.

Chain Tentacles :

1. Pin the chain tentacles in the middle of the jellyfish in a circle. 2. Sew them onto the jellyfish.

Curly Tentacles :

1. Pin the curly tentacles around the chain tentacles. 2. Sew the curly tentacles onto the jellyfish.

Infos :

Do not join rounds unless stated, work in a continuous spiral. Use a stitch marker to mark the beginning of each round. All stitches are worked in both loops unless stated otherwise in the pattern.

Assembly Instructions

  • Mark two spots on the head between rounds 21 and 22 and embroider the smile using a long strand of black embroidery thread, bringing the needle up to the first pin and then to the second pin and wrapping gently to form the smile; weave in tail ends.
  • Pin the cheeks beside the eyes and sew the small cheek circles (Color C) into place using the long tail left from finishing each cheek.
  • Pin the chain tentacles in the center of the base of the jellyfish in a circular arrangement and sew them securely to the head, making sure they are evenly spaced.
  • Arrange the curly tentacles around the circle of chain tentacles, pinning evenly, then sew each curly tentacle into place so the cluster forms a full skirt of tentacles.
  • Weave in all remaining yarn tails, trim excess, and check all attachments for secure sewing before finishing.

Important Notes

  • ๐Ÿ’กDo not join rounds unless stated in the pattern; work in a continuous spiral for smooth amigurumi shaping.
  • ๐Ÿ’กUse a stitch marker to mark the beginning of each round so you can track your rounds and maintain correct stitch counts.
  • ๐Ÿ’กStart stuffing at the recommended round and add fiberfill gradually to keep a smooth, even shape without lumps.
  • ๐Ÿ’กPin all tentacles and facial features in place before sewing to ensure symmetry and balanced placement.
  • ๐Ÿ’กWeave in ends and secure all sewn attachments so the jellyfish holds up to gentle play and handling.

This delightful jellyfish amigurumi pattern is perfect for adding a splash of handmade charm to any shelf or nursery. Make one in bright rainbow hues or soft pastels โ€” each version is utterly adorable and unique. Share your finished jellyfish with me, I love seeing your creations! ๐Ÿงถโœจ๐Ÿ™

You ask,

we answer.

FAQs

What size will the finished piece be?

The finished jellyfish measures approximately 16 inches from the top of the head to the bottom of the tentacles when using worsted weight yarn and a 3.25 mm hook.

Can I use different yarn weights for this pattern?

Yes, you can use different yarn weights but it will change the final size; adjust the hook accordingly and expect to change eye placement and tentacle length.

Do I need prior crochet experience for this pattern?

This pattern is rated intermediate, so basic amigurumi shaping skills and familiarity with increases, decreases, and back loop only (BLO) stitches are recommended.

How long does this project typically take to complete?

Most crocheters complete this project in 5-7 hours, depending on experience level, yarn choice, and how much time you spend on assembly and sewing.

What are the recommended materials and tools?

Use worsted weight (#4) yarn (about 100g main color), a 3.25 mm (D) hook, 18 mm safety eyes, polyester stuffing, stitch marker, sewing needle, scissors, and black embroidery thread for the smile.