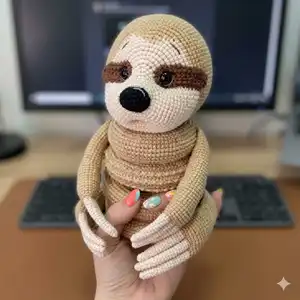
Make a charming sloth stacking toy that doubles as a cuddly friend and a fun stacking set. This pattern guides you through each ring, limb, and facial detail so you can create a professional-looking toy with clear step-by-step rounds. You'll enjoy shaping the rings and sewing the parts together to form the final adorable sloth.
Progress Tracker
0% Complete
— Terms Used :
Infos :
MR - magic ring. Ch - chain. sl st - slip stitch. sc - single crochet. inc - increase (2 sc in 1 st). dec - decrease. BLO - back loop only. FLO - front loop only. rev - reverse crochet (crab stitch).
— Materials :
Infos :
Yarn: Beige - Alize Cotton Gold 262 (2 balls - 660m (722 yrd)). Ivory - Alize Cotton Gold 67. Brown - Alize Cotton Gold 493. Hook: 1.5 mm and 3 mm (or in accordance with the yarn you use). Fiberfill for stuffing, scissors, safety eyes diameter 12mm (or bits of black yarn for crochet eyes), tapestry needle for sewing.
— Base :
Round 4 :
(1 sc; inc)*6 (18)
Round 7 :
(2 sc; inc)*6 (24)
Round 11 :
(3 sc; inc)*6 (30)
Round 16 :
(4 sc; inc)*6 (36)
Round 22 :
(5 sc; inc)*6 (42)
Round 29 :
(6 sc; inc)*6 (48)
Round 37 :
(7 sc; inc)*6 (54)
Round 46 :
(8 sc; inc)*6 (60)
Round 47 :
FLO (9 sc; inc)*6 (66)
Round 48 :
5 sc; inc; (10 sc; inc)*5; 5 sc (72)
Round 49 :
(11 sc; inc)*6 (78)
Round 50 :
6 sc; inc; (12 sc; inc)*5; 6 sc (84)
Round 51 :
(13 sc; inc)*6 (90)
Round 52 :
7 sc; inc; (14 sc; inc)*5; 7 sc (96)
Round 53 :
(15 sc; inc)*6 (102)
Round 54 :
8 sc; inc; (16 sc; inc)*5; 8 sc (108)
Round 55 :
(17 sc; inc)*6 (114)
Round 56-62 :
114 sc (114)
Round 63 :
(17 sc; dec)*6 (108)
Round 64 :
8 sc; dec; (16 sc; dec)*5; 8 sc (102)
Round 65 :
(15 sc; dec)*6 (96)
Round 66 :
7 sc; dec; (14 sc; dec)*5; 7 sc (90)
Round 67 :
(13 sc; dec)*6 (84)
Round 68 :
6 sc; dec; (12 sc; dec)*5; 6 sc (78)
Round 69 :
(11 sc; dec)*6 (72)
Round 70 :
5 sc; dec; (10 sc; dec)*5; 5 sc (66)
Round 71 :
(9 sc; dec)*6 (60)
Round 72 :
connect round 71 with round 47 (BLO) with 60 sc (60) fill with stuffing as you go, then continue to work in rounds.
Round 73 :
(8 sc; dec)*6 (54)
Round 74 :
(7 sc; dec)*6 (48)
Round 75 :
(6 sc; dec)*6 (42)
Round 76 :
(5 sc; dec)*6 (36)
Round 77 :
(4 sc; dec)*6 (30)
Round 78 :
(3 sc; dec)*6 (24)
Round 79 :
(2 sc; dec)*6 (18)
Round 80 :
(1 sc; dec)*6 (12)
Round 81 :
6 dec (6) cut the yarn, pull off hole, hide a tail.
— Legs :
Info :
Make 2 legs. With ivory yarn and 1.5 mm hook make 3 claws, middle claw will be a bit longer, then other two.
Long claw (make 1) :
Round 1. 6 sc in MR (6)
Round 13 :
1 sc; inc; 5 sc (8)
Round 18 :
2 sc; inc; 5 sc (9)
Round 19-22 :
9 sc (9) fasten off.
Short claws (make 2) :
Round 1. 6 sc in MR (6)
Round 11 :
1 sc; inc; 5 sc (8)
Round 16 :
2 sc; inc; 5 sc (9)
Round 17-20 :
9 sc (9) fasten off one claw and in second short claw change yarn to beige and from now on use 3 mm hook.
Connect claws :
Connect short, long and short claw: Round 1. 9 sc in a short claw; 5 sc in a long claw; 9 sc in a second short claw; 4 sc in a long claw (27)
Round 2 :
9 sc; inc; 3 sc; inc; 10 sc; inc; 2 sc (30)
Round 8 :
9 sc; dec; (3 sc; dec)*2; 4 sc; inc; (1 sc; inc)*2 (30)
Round 9-13 :
23 sc; BLO 7 slst (30)
Round 15 :
(3 sc; dec)*6 (24)
Round 31 :
(2 sc; dec)*6 (18)
Round 32 :
5 sc, turn fold in half and crochet 9 sc closing the hole (fill with stuffing, not too tight - 3/4 of the leg)
Info :
Sew legs to the base as you can see in the photos, connect as much as you like.
— Tail :
Round 4 :
(1 sc; inc)*6 (18)
Round 6 :
(2 sc; inc)*6 (24)
Round 8 :
(3 sc; inc)*6 (30)
Round 14 :
BLO(3 sc; dec)*6 (24)
Round 15 :
(2 sc; dec)*6 (18) fill with stuffing
Round 16 :
(1 sc; dec)*6 (12)
Row 17 :
6 dec (6) fasten off, leave a tail for sewing.
Info :
Sew the tail to the base as you can see in the photos.
— Large Ring :
Round 1 :
60 ch; slst in 1st ch (60)
Round 2 :
(9 sc; inc)*6 (66)
Round 3 :
5 sc; inc; (10 sc; inc)*5; 5 sc (72)
Round 4 :
(11 sc; inc)*6 (78)
Round 5 :
6 sc; inc; (12 sc; inc)*5; 6 sc (84)
Round 6 :
(13 sc; inc)*6 (90)
Round 7 :
7 sc; inc; (14 sc; inc)*5; 7 sc (96)
Round 8 :
(15 sc; inc)*6 (102)
Round 12 :
BLO 102 sc (102)
Round 13-15 :
102 sc (102)
Round 16 :
(15 sc; dec)*6 (96)
Round 17 :
7 sc; dec; (14 sc; dec)*5; 7 sc (90)
Round 18 :
(13 sc; dec)*6 (84)
Round 19 :
6 sc; dec; (12 sc; dec)*5; 6 sc (78)
Round 20 :
(11 sc; dec)*6 (72)
Round 21 :
5 sc; dec; (10 sc; dec)*5; 5 sc (66)
Round 22 :
(9 sc; dec)*6 (60)
Info :
Sew round 22 with round 1, fill with stuffing as you go.
— Middle Ring :
Round 1 :
48 ch; slst in 1st ch (48)
Round 2 :
(7 sc; inc)*6 (54)
Round 3 :
4 sc; inc; (8 sc; inc)*5; 4 sc (60)
Round 4 :
(9 sc; inc)*6 (66)
Round 5 :
5 sc; inc; (10 sc; inc)*5; 5 sc (72)
Round 6 :
(11 sc; inc)*6 (78)
Round 7 :
6 sc; inc; (12 sc; inc)*5; 6 sc (84)
Round 8 :
(13 sc; inc)*6 (90)
Round 16 :
(13 sc; dec)*6 (84)
Round 17 :
6 sc; dec; (12 sc; dec)*5; 6 sc (78)
Round 18 :
(11 sc; dec)*6 (72)
Round 19 :
5 sc; dec; (10 sc; dec)*5; 5 sc (66)
Round 20 :
(9 sc; dec)*6 (60)
Round 21 :
4 sc; dec; (8 sc; dec)*5; 4 sc (54)
Round 22 :
(7 sc; dec)*6 (48)
Info :
Sew round 22 with round 1, fill with stuffing as you go.
Info :
There are two ways to make pretty edges on the rings - in rounds 10, 12, 14 in the front loops make slip stitch round or reverse crochet (crab stitch) round.
Note :
R 10,12,14. (1 rev; skip 1 sc)*45 (45) - example reverse edge option.
— Arms :
Info :
Make 2 arms. With ivory yarn and 1.5 mm hook make 3 claws, middle claw will be a bit longer, then other two.
Long claw (make 1) :
Round 1. 6 sc in MR (6)
Round 16 :
1 sc; inc; 5 sc (8)
Round 17-18 :
8 sc (8) fasten off.
Short claws (make 2) :
Round 1. 6 sc in MR (6)
Round 14 :
1 sc; inc; 5 sc (8)
Round 15-16 :
8 sc (8) fasten off one claw and in second short claw, change yarn to beige and from now on use 3 mm hook.
Connect claws :
Round 1. 8 sc in a short claw; 4 sc in a long claw; 8 sc in a second short claw; 4 sc in a long claw (24)
Round 8 :
5 sc; dec; (3 sc; dec)*2; 4 sc; 3 inc (24)
Round 9-13 :
18 sc; BLO 6 slst (24)
Round 15 :
(2 sc; dec)*6 (18)
Round 35 :
6 sc, turn fold in half and crochet 9 sc closing the hole (fill with stuffing, not too tight - 3/4 of the arm)
Info :
Make the arms the same way you did the legs before, use the previous photos to remember the whole process.
— Small Ring :
Round 1 :
36 ch; slst in 1st ch (36)
Round 2 :
(5 sc; inc)*6 (42)
Round 3 :
3 sc; inc; (6 sc; inc)*5; 3 sc (48)
Round 4 :
(7 sc; inc)*6 (54)
Round 5 :
4 sc; inc; (8 sc; inc)*5; 4 sc (60)
Round 6 :
(9 sc; inc)*6 (66)
Round 7 :
5 sc; inc; (10 sc; inc)*5; 5 sc (72)
Round 8 :
(11 sc; inc)*6 (78)
Round 16 :
(11 sc; dec)*6 (72)
Round 17 :
5 sc; dec; (10 sc; dec)*5; 5 sc (66)
Round 18 :
(9 sc; dec)*6 (60)
Round 19 :
4 sc; dec; (8 sc; dec)*5; 4 sc (54)
Round 20 :
(7 sc; dec)*6 (48)
Round 21 :
3 sc; dec; (6 sc; dec)*5; 3 sc (42)
Round 22 :
(5 sc; dec)*6 (36)
Info :
Sew round 22 with round 1, fill with stuffing as you go.
— Head :
Info :
Start with black yarn for nose (hook 1.5 mm)
Row 1 :
5 ch; turn and continue to work in rounds
Round 2 :
inc; 2 sc; 2 inc in first ch; 2 sc; inc in fourth ch (12)
Round 3 :
(1 sc; inc)*6 (18)
Round 4 :
(2 sc; inc)*6 (24)
Round 7a :
BLO (2 sc; dec)*6 (18) fill with stuffing
Round 8a :
(1 sc; dec)*6 (12) fasten off, close the hole.
Info :
Start to crochet in front loops of round 6 with ivory yarn and 3 mm hook:
Round 7 :
(3 sc; inc)*6 (30)
Round 9 :
(4 sc; inc)*6 (36)
Round 10 :
(5 sc; inc)*6 (42)
Round 11 :
(6 sc; inc)*6 (48)
Round 12 :
(7 sc; inc)*6 (54)
Round 13 :
(8 sc; inc)*6 (60)
Round 14 :
6 sc; 6 inc; 48 sc (66)
Round 17 :
6 sc; (1 sc; inc)*6; 48 sc (72)
Round 19 :
14 sc; change to beige-3 sc; change to ivory-55 sc(72)
Round 20 :
6 sc; (2 sc; inc)*2; change to beige - 1 sc; inc; 2 sc; inc; change to ivory - (2 sc; inc)*2; 48 sc (78)
Round 21 :
13 sc; change to beige - 11 sc; change to ivory - 54 sc (78) change to beige color
Round 22 :
(12 sc; inc)*6 (84)
Round 23 :
(13 sc; inc)*6 (90)
Round 24 :
(14 sc; inc)*6 (96)
Round 25 :
62 sc; 18 ch (skip 18 sc); 16 sc (96)
Round 35 :
(14 sc; dec)*6 (90)
Round 36 :
(13 sc; dec)*6 (84)
Round 37 :
(12 sc; dec)*6 (78)
Round 38 :
(11 sc; dec)*6 (72)
Round 39 :
(10 sc; dec)*6 (66)
Round 40 :
(9 sc; dec)*6 (60)
Round 41 :
(8 sc; dec)*6 (54)
Round 42 :
(7 sc; dec)*6 (48)
Round 43 :
(6 sc; dec)*6 (42)
Round 44 :
(5 sc; dec)*6 (36)
Round 45 :
(4 sc; dec)*6 (30)
Round 46 :
(3 sc; dec)*6 (24)
Round 47 :
(2 sc; dec)*6 (18)
Round 48 :
(1 sc; dec)*6 (12)
Round 49 :
6 dec (6) fasten off.
— Eye patches :
Info :
Make 2 eye patches with brown yarn. Sew "eye patches", insert safety eyes as shown in the photos.
Row 1 :
11 ch; turn and continue to work in rounds
Round 2 :
9 sc; 3 sc in 1st ch; 8 sc; inc (22)
Round 3 :
inc; 8 sc; 3 inc; 8 sc; 2 inc (28) leave a tail for sewing.
Info :
After attaching (or sewing eyes) fill the head with stuffing and continue to crochet, starting in the spot between rounds 26-27:
Round 5 :
(4 sc; dec)*6 (30)
Round 8 :
(3 sc; dec)*6 (24)
Round 11 :
(2 sc; dec)*6 (18)
Round 13 :
(1 sc; dec)*6 (12)
Round 14 :
6 dec (6) fasten off.
— Assembly :
Info :
Sew legs to the base, sew the tail to the base, sew rings together (large, middle, small) connecting round 22 with round 1 as directed, attach arms to the small ring and sew head to the top ring. Attach eye patches, insert safety eyes and embroider or crochet nose details; hide all tails and make sure pieces are evenly placed before final sewing.
This sloth stacking toy pattern brings a playful, handmade charm to your home with stackable rings and a sweet face. Create a lovable companion using cotton yarn with durable construction for years of play. Perfect as a unique gift or a special nursery accent. 🧶 Handmade with care and lots of snuggles! 🧵