🧢 Beautiful ✨ Detailed πŸ’ Adorable

Round Bag with T-Shirt Yarn Pattern

Round Bag with T-Shirt Yarn Pattern
4.3β˜… Rating
2-4 Hours Time Needed
3.0K Made This
βœ‚οΈ

Beginner Friendly Level

Perfect for those just starting their crochet journey, with clear instructions and simple techniques

⏱️

Bite-Sized Project

Finishes in 2-4 hoursβ€”perfect for an afternoon of creative relaxation.

✨

Stylish Touch

An elegant detail to elevate any look, combining traditional techniques with contemporary design sensibilities.

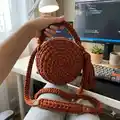
About This Round Bag with T-Shirt Yarn Pattern

This pattern teaches you how to crochet a round bag using t-shirt yarn (fabric yarn) and a 6 mm hook. It includes the full base circle, side rows, edging, assembly instructions and a tassel finishing tutorial. The bag is sturdy, fashionable and ideal for practicing continuous round crochet.

Round Bag with T-Shirt Yarn Pattern crochet pattern - detailed view of completed project

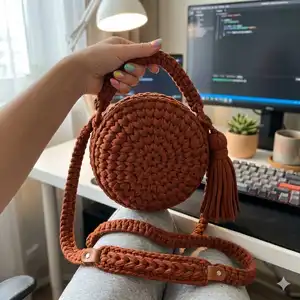
Step-by-step photos and clear notes help you follow along easily. Perfect for making a unique handmade accessory or a special gift.

Why You'll Love This Round Bag with T-Shirt Yarn Pattern

I absolutely love this pattern because it turns simple t-shirt yarn into a chic, structured round bag that feels both modern and handmade. I enjoy how quickly the circular base grows and how satisfying the steam-blocking step is to give the bag a polished look. The pattern is approachable β€” even if you are new to working with fabric yarn β€” but still produces a professional finished piece. I also love the finishing options: you can add leather trims, chains or a tassel to personalize every bag.

Round Bag with T-Shirt Yarn Pattern step 1 - construction progress Round Bag with T-Shirt Yarn Pattern step 2 - assembly progress Round Bag with T-Shirt Yarn Pattern step 3 - details and accessories Round Bag with T-Shirt Yarn Pattern step 4 - final assembly and finishing

Switch Things Up

I love to change the look of this bag by swapping hardware and trims; try brass rings and a leather strap for a vintage vibe.

I sometimes make a mini version by using thinner fabric yarn and a 4 mm hook to create a small coin-purse style bag.

I also change colors mid-round to create a striped edge or contrast base and side for a bolder style.

Try adding a lining for extra structure and to protect the interior from snagging on chain links.

If you want a softer bag, use a slightly larger hook with the same yarn to create less dense stitches and a slouchy look.

I often swap the tassel for a crocheted flower or pom-pom to match outfits or seasons.

To make it crossbody, simply lengthen the chain and add adjustable hardware so the strap can be shortened or extended.

I recommend experimenting with decorative stitches on the side rows (like front post SC) to add texture and interest.

For a more secure closure, sew in a zipper inside the valve flap or add a small internal pocket for cards and keys.

I enjoy adding small metal studs or rivets around the valve area to create a more industrial or designer-inspired finish.

Common Mistakes & How to Fix Them

βœ— Not taking the yarn from the outside of the bobbin; the yarn will twist and loop messily; always pull the working thread from the outside of the bobbin to avoid twisting. βœ— Using a hook held perpendicular when crocheting with t-shirt yarn; this can leave holes in the fabric; hold the hook at an angle and pull the working thread slightly above the stitch level. βœ— Cutting the thread too early after round 6; you need to steam and leave the thread for joining; do not cut the thread until after steaming and joining steps are complete. βœ— Forgetting to hide the starting end after row 2; this leaves a hole in the middle; pull the end through the first row stitches from the wrong side, tighten and hide the tail securely.

Round Bag with T-Shirt Yarn Pattern

Make a stylish round crochet bag using thick t-shirt yarn and simple single crochet stitches. This pattern guides you step-by-step from the circular base to assembly, tassel and hardware finishing. You will get a durable, structured bag perfect for everyday use or gifting. Follow the clear photos and instructions to create a beautiful handmade accessory.

Beginner Friendly 2-4 Hours

Materials Needed for Round Bag with T-Shirt Yarn Pattern

β€” Main Fabric

  • 01
    T-shirt yarn, width 7-9 mm, 131 yard (120 meters) - main material

β€” Tools Required

  • 01
    Crochet hook N6 - 6 mm
  • 02
    Set of hardware: chain - 47 inches (120 cm); valve with button; 2 snap hook-rings; 3 snap hooks
  • 03
    Sewing thread
  • 04
    Sewing needle
  • 05
    Needle with large eyelet (for threading yarn through chain)
  • 06
    Scissors
  • 07
    Iron and damp cloth (for steaming/ironing)

Progress Tracker

0% Complete

β€” Materials and tools :

Infos :

T-shirt yarn, width 7-9 mm, 131 yard (120 meters). Hook N6 - 6 mm. Set of furniture (chain - 47 inches (120 cm); valve with button; 2 snap hook-rings; 3 snap hooks). Sewing thread. Sewing needle. Needle with large eyelet. Scissors. Iron and damp cloth. Finished bag from the specified materials: diameter - 7-8inches (18-20 cm), width - 4 3/8 inches (11 cm). Gauge: 9 stitches and 8 row = 4*4 inches (10*10cm).

β€” Abbreviation :

Infos :

CH - chain stitch. SlSt - slip stitch. SC - single crochet. Inc - increase (2 SC in 1).

β€” Crochet the base(circle) :

Info :

Crochet 2 CH.

Round 1 :

1 row. Crochet 6 SC in the 2nd loop from the hook. In the 1st SC crochet CH like on the video.

Info :

Next, crochet the split single stitch. For that, we need to insert the hook between the legs of each stitch, to split the stitch from the face and from the wrong side.

Round 2 :

2 row. 1 Inc*6= 12, CH.

Info :

After crocheting 2nd row, the hole will be formed in the middle. The end needs to be hidden and thus the hole will be removed.

Info :

Pull the end through all the stitches of the 1st row from the wrong side. Tighten, strengthen, hide and cut the end of the thread.

Info :

The hole is gone.

Round 3 :

3 row. (1 SC, 1 Inc)*6 = 18, CH.

Round 4 :

4 row. (2 SC, 1 Inc)*6 = 24, CH.

Round 5 :

5 row. (3 SC, 1 Inc)*6 = 30, CH.

Round 6 :

6 row. (4 SC, 1 Inc)*6 = 36, CH. Don't cut the thread. Steam the circle with an iron through a damp cloth at high setting. T-shirt yarn can withstand high temperatures. But, need to iron through a damp cloth so that the canvas does not shine.

Round 7 :

7 row. 36 SC, CH.

Round 8 :

8 row. 36 SC. Don't cut the thread.

Info :

Pull the loop under 1st SC, pull out on the wrong side under last SC. Crochet the base trim SlSt in the each loops. Cut the end. Pull the end under 1st SlSt, pull back on the wrong side. Strengthen and hide the end.

Info :

Steam the edge with an iron through a damp cloth.

Info :

Similarly, crochet the second part of the bag.

β€” Assembly :

Info :

Join the 2 parts of the bag with the edges. Insert the hook in the loops of the previous row of both parts of the bag. Pull out the loop. Again, insert the hook in the loops of the previous row of both parts of the bag. Pull out the next loop, crochet SlSt. Each time, insert the hook, first in one part, then in the other. Crochet SlSt, leave unconnected 7-8 inches (18-20 cm). Strengthen and hide both ends of the thread on the wrong side.

Info :

Insert the snap hook-rings in the places where the connecting seam ends.

Info :

Sew on the valve. Sew on the top part of the valve. Then, position the lower part of the valve to where it is supposed to be and sew on it.

Info :

Cut off the piece of the yarn 48 inches (122 cm) long. Pass the piece of the yarn through each link of the chain with the needle with large eyelet. Sew in the ends with the sewing needle and the sewing thread with the color of the yarn.

Info :

Fasten the shoulder strap to the snap hook-rings.

β€” Make the tassel :

Info :

Cut off 20-25 pieces of the yarn 13-14 inches (33-35 cm) long. Intercept with a longer piece in the middle. Put a snap hook on the piece of the yarn.

Info :

Wrap the bundle with a long piece several times.

Info :

Tie the ends, hide them under the turns.

Info :

Spread the tassel with hands, cut off the ends exactly.

Info :

Hang the tassel on any snap hook-ring.

Info :

Congratulations! Your cute bag is readyπŸ‘

Assembly Instructions

  • Join the two crocheted circular parts by inserting the hook into the loops of the previous round on both parts, pulling up a loop and working slip stitches through both pieces, leaving a 7-8 inch (18-20 cm) unconnected gap for the opening; secure and hide ends on the wrong side.
  • Insert snap hook-rings at the places where the connecting seam ends so the shoulder strap can attach securely.
  • Sew the magnetic valve in place: sew the top part of the valve first to the top flap area, then position and sew the lower part of the valve to the body of the bag.
  • Make the chain strap by cutting a 48 inch (122 cm) yarn piece and passing it through each chain link using a needle with a large eyelet; sew in the ends with matching sewing thread.
  • Attach the finished shoulder strap to the snap hook-rings on the bag and check that hardware is secure before use.

Important Notes

  • πŸ’‘Take the yarn from the outside of the bobbin to avoid twisting; pulling from the middle can make the yarn twist and the loops look messy.
  • πŸ’‘When crocheting with t-shirt yarn, hold the hook at an angle and pull the working thread just above the stitch level to avoid holes in the fabric.
  • πŸ’‘Steam/iron the circle through a damp cloth at high setting to shape the base; this prevents the canvas from shining and gives a neat finish.
  • πŸ’‘Use stitch counts shown on each round and do not cut the thread until instructed; saving the working tail helps with joining and finishing.

Thank you for choosing this round bag pattern β€” I hope it becomes one of your favorite quick projects! 🧢 This pattern is perfect for gifting or making a stylish accessory to wear every day. ✨ Enjoy the process, personalize with hardware, and show off your handmade creation with pride! πŸ‘œ

You ask,

we answer.

FAQs

What size will the finished piece be?

The finished bag measures approximately 7-8 inches (18-20 cm) in diameter and about 4 3/8 inches (11 cm) in width when using the recommended t-shirt yarn and a 6 mm hook.

Can I use different yarn weights for this pattern?

Yes, you can use different yarn weights but the final size and structure will change; if you use thinner yarn, choose an appropriately smaller hook and expect a smaller bag.

Do I need prior crochet experience for this pattern?

This pattern is rated Beginner Friendly, so basic knowledge of single crochet and working in rounds is all you need, along with patience for joining and finishing.

How long does this project typically take to complete?

Most crocheters finish this bag in about 2-4 hours depending on speed and familiarity with t-shirt yarn handling.