🧢 Beautiful ✨ Detailed πŸ’ Adorable

Rac the Raccoon Amigurumi Pattern

Rac the Raccoon Amigurumi Pattern
4.4β˜… Rating
5-7 Hours Time Needed
2.5K Made This
βœ‚οΈ

Intermediate Level

Ideal for those with basic crochet experience, featuring slightly more advanced stitches and techniques to expand your skills.

⏱️

Weekend Treat

Takes 5-7 hours, making it an enjoyable project to finish over a couple of days.

🧸

Cute Companion

An adorable friend to cherish, handcrafted with love to bring comfort and joy for years to come.

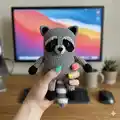
About This Rac the Raccoon Amigurumi Pattern

This pattern creates a stretchy raccoon toy with a square body, movable long limbs, a striped tail, and adorable facial features. You will crochet each limb and body panel, then join and decorate the toy for a playful finished piece. The design emphasizes simple shaping and clever assembly to create the stretchy limb effect.

Rac the Raccoon Amigurumi Pattern crochet pattern - detailed view of completed project

Follow clear rounds for all parts: arms/legs, ears, snout, eyes, tail and body, plus step-by-step assembly. Ideal for gifting or play, this toy measures about 27 cm from ears to feet using the recommended yarn.

Why You'll Love This Rac the Raccoon Amigurumi Pattern

I absolutely love this pattern because it combines simple amigurumi techniques with a playful stretchy-limb concept that kids adore. I enjoy how the square body and long limbs give the raccoon a quirky, huggable personality. I love that each part is small and quick to make, yet comes together to form a charming finished toy. I also appreciate the pattern's clear instructions for joining panels and inserting limbs which makes assembly satisfying and reliable.

Rac the Raccoon Amigurumi Pattern step 1 - construction progress Rac the Raccoon Amigurumi Pattern step 2 - assembly progress Rac the Raccoon Amigurumi Pattern step 3 - details and accessories Rac the Raccoon Amigurumi Pattern step 4 - final assembly and finishing

Switch Things Up

I love how easy it is to change the personality of this raccoon by switching colors; try pastel greys or warm browns for a softer look.

I often use a slightly thicker yarn and larger hook to make a chunkier, cuddlier version for a bigger gift.

You can make a mini version using finer yarn and a 1.75–2.0 mm hook for keychain-sized raccoons.

I sometimes embroider different facial expressions or add tiny crocheted eyebrows to change the mood of the toy.

Try swapping safety eyes for embroidered eyes if you are making the toy for very young children to keep it toy-safe.

For posable limbs, insert a short length of flexible wire into the limb shafts before stuffing to allow gentle posing.

Add small accessories like a crocheted scarf, hat, or tiny vest to personalize the raccoon for gifts or holidays.

Experiment with striping patterns on the tail β€” narrower or wider stripes change the visual impact significantly.

Use variegated yarn for a marbled body effect, or contrast the inner ear color for extra detail.

I recommend trying different stuffing levels in the limb shafts to see how it affects the stretch and playability; lighter stuffing equals more stretch.

Common Mistakes & How to Fix Them

βœ— Skipping stitch markers during assembly can make panel alignment difficult; place markers at corner stitches and key joining points to keep edges matched. βœ— Overstuffing the limbs will make them stiff and reduce stretch; stuff the round ends firmly but leave the long grey shafts barely stuffed for elasticity. βœ— Changing yarn color without securing the previous tail can cause unraveling; weave in or secure color joins before continuing to avoid loose ends. βœ— Forgetting to count rows when placing eyes and snout results in misplaced facial features; mark rows 12-13 for the snout and rows 16-22 for eye placement before sewing. βœ— Crocheting too tightly on the long limb shafts may prevent smooth stretching; maintain a relaxed, consistent tension for the shafts so they remain flexible.

Rac the Raccoon Amigurumi Pattern

Make a playful, stretchy raccoon toy that encourages fine motor skills and imaginative play. This pattern guides you through crocheting a squishy square-bodied raccoon with long stretchable limbs and striped tail. You will love the fun assembly and personality-packed details that make this raccoon unique. Suitable for makers who know basic crochet stitches and want a charming handmade gift.

Intermediate 5-7 Hours

Materials Needed for Rac the Raccoon Amigurumi Pattern

β€” Main Fabric

  • 01
    YarnArt Jeans 50gr/160 m; 55% cotton; 45% acrylic; shades: 80 (grey), 28 (black), 62 (white)
  • 02
    Alize Cotton Gold 100gr/330 m; 55% cotton; 45% acrylic; 87 (dark grey)
  • 03
    Fiber filler (polyester stuffing) for head, tail, and limb ends
  • 04
    8 mm safety eyes (2 pieces) for the raccoon eyes

β€” Tools Required

  • 01
    Crochet hook size 2 mm
  • 02
    Crochet hook size 3 mm
  • 03
    Scissors
  • 04
    Large eye needle for sewing
  • 05
    Stitch markers
  • 06
    Yarn needle for weaving ends
  • 07
    Pins for assembly (optional)

Progress Tracker

0% Complete

β€” Supplies :

Infos :

2- and 3-mm hooks. Yarn: YarnArt Jeans 50gr\160 m; 55% cotton; 45 % acrylic: shades: 80 (grey), 28 (black), 62 (white). Alize Cotton Gold 100gr\330 m; 55% cotton; 45 % acrylic; 87 (dark grey). Fiber filler. 8 mm safety eyes. Scissors, large eye needle, markers if necessary.

β€” Notes :

Info :

The finished toy size from the recommended materials is 27 cm from ears to feet. Please note: this pattern does not contain crocheting lessons. You should master basic crocheting skills to create this toy. Enjoy your crocheting!

β€” Abbreviations :

Infos :

MR – magic/amigurumi ring. CH – (turning) chain. DEC - decrease. INC - increase. SC – single crochet. SL ST – slip stitch. (...) *n - repeat n times the sequence in brackets. (...) – number of stitches in a row/rnd.

β€” Arms and Legs (make 2) :

Info :

Arms and legs are crocheted in one piece. Begin crocheting in black with 2 mm hook.

Round 1 :

6 MR (6)

Round 2 :

INC *6 (12)

Round 3 :

(1 SC, INC)*6 (18)

Round 4 :

(2 SC, INC)*6 (24)

Round 5 :

(3 SC, INC)*6 (30)

Round 6-9 :

4 rnds straight: 30 SC

Round 10 :

(DEC, 3 SC)*6 (24)

Round 11 :

(DEC, 2 SC)*6 (18)

Round 12 :

(DEC, 1 SC)*6 (12)

Info :

Stuff tightly.

Round 13 :

(DEC, 4 SC)*2 (10).

Info :

Switch to grey yarn. Go on crocheting.

Info :

Don’t stuff the grey piece.

Round 14-65 :

52 rnds straight: 10 SC

Info :

Switch to black yarn.

Round 66 :

(INC, 4 SC)*2 (12)

Round 67 :

(1 SC, INC)*6 (18)

Round 68 :

(2 SC, INC)*6 (24)

Round 69 :

(3 SC,INC)*6 (30)

Round 70-73 :

4 rnds straight: 30 SC

Round 74 :

(DEC, 3 SC)*6 (24)

Round 75 :

(DEC, 2 SC)*6 (18)

Round 76 :

(DEC, 1 SC)*6 (12)

Info :

Stuff the piece.

Round 77 :

DEC*6 fasten off.

β€” Ears (make 2) :

Info :

Work in grey with 2 mm hook.

Round 1 :

6 MR (6)

Round 2 :

(1 SC, INC*)3 (9)

Round 3 :

1 rnd straight: 9 SC (9)

Round 4 :

(2 SC, INC)*3 (12)

Round 5 :

(3 SC, INC)*3 (15)

Round 6 :

1 rnd straight: 15 SC

Round 7 :

(4 SC, INC)*3 (18)

Round 8 :

1 rnd straight: 18 SC

Info :

Fold in half and single crochet 9 through both edges. Leave a long yarn tail for sewing.

β€” Snout (nose) :

Info :

Work in white with 2 mm hook.

Round 1 :

6 MR (6)

Round 2 :

INC*6 (12)

Round 3 :

INC*12 (24)

Round 4-6 :

3 rnds straight: 24 SC

Info :

Leave a long yarn tail for sewing.

Info :

Stuff the piece.

β€” Eyes (make 2) :

Info :

Work in dark grey with 2 mm hook. Chain 4 as if into MR, but do not join in the round, work in turning rows. Make 1 turning CH at the end of each row.

Round 1-2 :

2 rows straight: 4 SC

Round 3 :

INC, 2 SC, INC (6)

Round 4-5 :

2 rows straight: 6 SC

Info :

Leave a long yarn tail for sewing.

β€” Tail :

Info :

Then alternate grey and black yarn every 3 rounds. Use 2 mm hook. Stuff the tail gradually. In black:

Round 1 :

6 MR (6)

Round 2 :

(1 SC, INC*)3 (9)

Round 3 :

1 rnd straight: 9 SC (9)

Round 4 :

INC*9 (18)

Round 5 :

1 rnd straight: 18 SC (18). Switch to grey.

Round 6 :

(1 SC, INC*)9 (27)

Round 7-8 :

2 rnds straight: 27 SC . Switch to black.

Round 9-11 :

3 rnds straight: 27 SC. Switch to grey.

Round 12-14 :

3 rnds straight: 27 SC. Switch to black.

Round 15 :

(1 SC, DEC)*9 (18)

Round 16-17 :

2 rnds straight: 18 SC. Switch to grey.

Round 18-20 :

3 rnds straight: 18 SC. Switch to black.

Round 21-23 :

3 rnds straight: 18 SC. Switch to grey.

Round 24-25 :

2 rnds straight: 18 SC

Round 26 :

(1 SC, DEC)*6 (12). Switch to black.

Round 27-29 :

3 rnds straight: 12 SC in black.

Info :

Fold in half and single crochet 6 through both edges.

Info :

Leave a long yarn tail for sewing.

β€” Body (make 2) :

Info :

Work in grey with 3 mm hook. Chain 25, and starting into the 2nd stitch from hook work 24 SC.

Round 1-19 :

19 rows straight: 24 SC, make 1 turning CH at the end of each row.

Round 20 :

1 SC, DEC, 18 SC, DEC, 1 SC (22)

Round 21 :

1 rnd straight: 22 SC

Round 22 :

1 SC, DEC, 16 SC, DEC, 1 SC (20)

Round 23-25 :

3 rnds straight: 20 SC.

Info :

Fasten off and cut yarn.

β€” Assembly :

Info :

Begin joining the body parts together from the right upper corner using 2 mm hook. Put the two parts together and work 19 SC through both parts’ stitches, work 2 SC to the corner stitch. Get to the side edge. You are going to insert the arm-leg piece here. It should go between rows 11 and 15. I worked 10 SC through both parts’ stitches, then 3 SC across the front part of the body only (skip 3 stitches on the back body part), put the arm-leg piece and go on crocheting across both body parts 11 SC, 2 SC to the corner stitch. Get to the bottom edge. 5 SC through both parts’ stitches, 3 SC across the front part only, put the arm-leg piece, 6 SC across both body parts, 3 SC across the front part only, put the second arm-leg piece, 5 SC, 2 SC to the corner stitch. Stuff the body. Work the other side alike (11 SC across both body parts, 3 SC across the front part only, stuff the body, 10 SC through both parts’ stitches).

β€” Decoration :

Info :

Ears: Sew on the ears on outer corners.

Info :

Eyes: Install safety eyes in the second row. Sew on between rows 16 - 22 in the middle. Make eye whites with white yarn. Sew on the snout in the middle below the eyes at the level of rows 12 - 13.

Info :

Nose: Embroider a nose in black.

Info :

Tail: Attach the tail on the back in the middle.

Assembly Instructions

  • Begin joining the body panels from the right upper corner with a 2 mm hook and work 19 SC through both body parts' stitches, then 2 SC to the corner stitch to start the seam.
  • Insert each arm-leg piece between body rows 11 and 15 while crocheting the side seam, securing each limb by crocheting through both body parts and the limb base as you continue.
  • When you reach the front panel sections, crochet 3 SC only into the front part to create the opening for the limb, then continue joining the panels across both layers for stability.
  • Stuff the body as you complete the seams: after attaching limb pieces and closing the bottom edge, stuff firmly but avoid overfilling to preserve the square shape.
  • Sew ears to the outer corners of the top panel, position and install safety eyes between rows 16-22, sew the snout centered below the eyes at rows 12-13, and embroider the nose in black.

Important Notes

  • πŸ’‘Use stitch markers to match body panel corners and key joining points so panels align correctly when you work seams.
  • πŸ’‘Stuff limb ends firmly and the long shafts very lightly to allow the stretchy movement effect without bulkiness.
  • πŸ’‘Switch yarn colors cleanly at the indicated rounds and weave in ends as you go to avoid large tails during assembly.
  • πŸ’‘Install safety eyes before sewing on the snout and other facial elements so positioning is accurate and secure.

This stretchy raccoon was designed to be playful and tactile, perfect for little hands and big imaginations. It combines simple crochet techniques with a clever stretchy-limb design that makes play extra fun. Create one for a child, a friend, or your cozy shelfβ€”each raccoon is a unique handmade friend. 🧢🧸

You ask,

we answer.

FAQs

What size will the finished piece be?

The finished toy size from the recommended materials is approximately 27 cm from ears to feet.

Can I use different yarn weights for this pattern?

Yes, but changing yarn weight will alter the final size and drape; use an appropriate hook and be prepared for a larger or smaller toy.

Do I need prior crochet experience for this pattern?

This pattern is rated intermediate, so basic knowledge of single crochet, increases, decreases, working in rounds and turning rows is recommended.

How long does this project typically take to complete?

Most crocheters complete this project in 5-7 hours, depending on experience and how quickly you assemble and stuff pieces.

Are the limbs safe for small children?

If making for small children, avoid small detachable parts and ensure safety eyes are secured properly or embroidered instead to reduce choking hazards.