🧢 Beautiful ✨ Detailed πŸ’ Adorable

Rabbit Amigurumi Pattern

Rabbit Amigurumi Pattern
4.2β˜… Rating
8-10 Hours Time Needed
4.1K Made This
βœ‚οΈ

Intermediate Level

Ideal for those with basic crochet experience, featuring slightly more advanced stitches and techniques to expand your skills.

⏱️

All-Day Adventure

Requires 8-10 hours, ideal for a full day of immersive crocheting.

🧸

Cute Companion

An adorable friend to cherish, handcrafted with love to bring comfort and joy for years to come.

About This Rabbit Amigurumi Pattern

This pattern teaches you how to crochet an expressive rabbit with a shaped head, body, ears, muzzle and tummy, worked in parts and assembled. It includes step-by-step rounds, precise stitch counts, and clear photos to guide placement of eyes, nose and embroidery. Techniques include color changes, working in rounds, BPSC and simple embroidery for facial features.

Rabbit Amigurumi Pattern crochet pattern - detailed view of completed project

You'll make eye whites, a shaped muzzle, inner and outer ears and a tummy panel to sew in place. The pattern also explains placement of eyes, how to stitch the smile, and how to attach the ears securely.

Why You'll Love This Rabbit Amigurumi Pattern

I absolutely love this pattern because it brings a lot of character to a simple amigurumi shape; the expressive eyelids and embroidered eyebrows give each rabbit personality. I enjoy the way head and body are crocheted as one piece β€” it creates a smooth silhouette and makes assembly easier. The pattern balances clear technical instructions with creative finishing steps like whiskers and hair so you can personalize your rabbit. Working this project feels rewarding from the first rounds to the final embroidered smile.

Rabbit Amigurumi Pattern step 1 - construction progress Rabbit Amigurumi Pattern step 2 - assembly progress Rabbit Amigurumi Pattern step 3 - details and accessories Rabbit Amigurumi Pattern step 4 - final assembly and finishing

Switch Things Up

I love how easy it is to change the personality of this rabbit by altering colors; try pastel shades for a sweet nursery toy or bright greens and pinks for a whimsical character.

To make the rabbit larger or smaller, change the yarn weight and hook size β€” bulky yarn and a bigger hook create a cuddly plush while finer yarn makes a small pocket-sized friend.

I often swap the tummy yarn for a fluffy textured yarn to add tactile contrast; this creates a cozy plush belly that kids love to touch and hold.

Try different eye sizes; smaller safety eyes with embroidered pupils give a delicate look, while larger eyes create a cuter, cartoon expression.

You can add removable accessories like a tiny scarf, carrot, or hat by crocheting small separate pieces and safety-pin attaching them for play variations.

If you want posable ears, slip a thin wire into the seam before closing and shape the ears gently to keep a chosen pose.

For a more realistic look, embroider or needle-felt highlights around the muzzle and eyelids rather than using felt pieces.

I sometimes add stitched blush with a tiny dab of pink yarn or a bit of fabric-safe chalk to give a gentle cheek color for extra charm.

Experiment with the eyelid angle and eyebrow placement to change the rabbit's mood β€” slightly angled eyelids create a sleepy expression while higher brows produce a surprised look.

Don't be afraid to combine techniques: crochet hair loops, add knot hair, or attach plush yarn tufts for unique textures and finishes on the head and ears.

Common Mistakes & How to Fix Them

βœ— Skipping the stitch marker on the beginning of rounds causes misaligned increases and decreases; always mark the start of the round and adjust it as instructed to align shaping. βœ— Forgetting to stuff gradually results in lumps and uneven shaping; stuff small amounts at a time and shape with your fingers to keep cheeks and neck even. βœ— Pulling yarn too tight during color changes or BPSC creates distortions in the fabric; maintain relaxed, consistent tension while changing yarn or working post stitches. βœ— Not positioning eye whites and safety eyes accurately changes expression; measure three rounds above the pupil for the upper eyelid and keep 4 SC between the eye whites for the intended look.

Rabbit Amigurumi Pattern

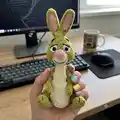
Create a charming hand-crocheted rabbit with this detailed pattern that guides you through every step from the head to tiny ears and the tummy. You will learn shaping, color changes, and facial embroidery techniques to give your rabbit personality. Clear photos and precise stitch counts help you stay on track while you crochet. Perfect as a handmade gift or a cozy addition to your amigurumi collection.

Intermediate 8-10 Hours

Materials Needed for Rabbit Amigurumi Pattern

β€” Main Fabric

  • 01
    YarnArt JEANS / Alize Cotton Gold semi-cotton yarn (360 yds/3.5 Oz.) - main shade consumption ~1.8 Oz. (used with 2 mm hook for standard rabbit)
  • 02
    Himalaya Dolphin Baby / YarnArt Dolce (131 yds/3.5 Oz.) - main shade consumption ~1.5 skein (used with 3.5 mm hook for plush version)
  • 03
    White yarn - eye white (small amounts)
  • 04
    Ivory yarn - muzzle, tummy, tail (small amounts)
  • 05
    Pink yarn - inner ear, nose (small amounts)
  • 06
    Green yarn - main body and parts (quantities per model)
  • 07
    Black yarn/thread - eyebrows and details (small amount)
  • 08
    Optional textured/fluffy yarn (e.g., YarnArt Mink, Nako Paris, Alize Softy) for tummy or plush variations

β€” Tools Required

  • 01
    Crochet hook size 2.0 mm (for YarnArt Jeans version)
  • 02
    Crochet hook size 3.5 mm (for plush or Dolphin Baby version)
  • 03
    A pair of safe plastic eyes 5-6 mm (standard version)
  • 04
    Safety eyes 10-12 mm (for plush version)
  • 05
    Thin black thread for embroidering facial features
  • 06
    Thin black sewing thread for whiskers
  • 07
    Needle for sewing body parts and embroidering features
  • 08
    Stitch markers
  • 09
    Pins with large head for positioning details
  • 10
    Scissors
  • 11
    Fiber filling
  • 12
    Synthetic/tooth thread for thread mount (for whiskers or special mounting)
  • 13
    Yarn needle for weaving ends

Progress Tracker

0% Complete

β€” Eye white :

Info :

*make 2 details. *white yarn

Round 0 :

Chain 4

Round 1 :

start in the 2nd chain from the hook: 2 SC, 4 SC into the last chain from the hook, on the other side: 2 SC (7)

Info :

join the oval with straight line or SS

Info :

fix the thread, leave a long ending for sewing and withdraw it to the wrong side

Info :

insert the eyes in the lower side of the oval so that they are shifted to the center (don't fix the plug on the eye from the back, if it is available in the kit)

β€” Head-Body :

Info :

*head and body are crocheted as one detail. *green yarn. *stuff in process

Round 1 :

6 SC in MR

Round 2 :

6 INC

Round 3 :

(SC, INC)*6 (18)

Round 4 :

(2 SC, INC)*6 (24)

Round 5 :

24 SC

Round 6 :

(3 SC, INC)*6 (30)

Round 7 :

(4 SC, INC)*6 (36)

Round 8-9 :

2 rounds of 36 SC

Info :

in Rd. 10 mark the beginning of the Rd. with stitch marker or a thread and don't remove it, because it will be the middle of the back of the rabbit's head and we will align the beginning of the Rd. in the places indicated below in the pattern, so that the pattern of INC and DEC coincides

Info :

the beginning of the Rd. shifts to the right (for a right-handed person) as you knit, or doesn't shift at all, which depends on your crocheting technique (the method and strength of the thread tension, the position of the thread relative to the canvas)

Round 10 :

5 SC, (SC, INC)*4, 9 SC, (SC, INC)*4, 6 SC (44)

Round 11 :

5 SC, (2 SC, INC)*4, 10 SC, (INC, 2 SC)*4, 5 SC (52)

Round 12-14 :

3 rounds of 52 SC

Info :

at this stage, we insert the eyes between Rd. 9 and Rd. 10 at a distance of 6 SC

Info :

fix the plug on the wrong side; for safety fastening, you can melt the plastic eye on the wrong side and flatten it

Info :

sew the eye whites with the left end of the thread: the upper edge of the eye white should be 3 rounds above the pupil, the lower edge of the eye white - a round below, the distance between the eye whites is 4 SC

Round 15 :

5 SC, (2 SC, DEC)*4, 10 SC, (DEC, 2 SC)*4, 5 SC (44)

Round 16 :

5 SC, (SC, DEC)*4, 9 SC, (SC, DEC)*4, 6 SC (36)

Round 17 :

(4 SC, DEC)*6 (30)

Round 18 :

(3 SC, DEC)*6 (24)

Round 19 :

(2 SC, DEC)*6 (18)

Info :

pay attention to the shape of the head in the photo: well stuffed on the sides (cheeks) and slightly flat in front and back (triangle shape)

Info :

shift the stitch (align the beginning of the Rd.) to the middle of the back of the head, if needed

Round 20-22 :

3 rounds of 18 SC

Round 23 :

(5 SC, INC)*3 (21)

Round 24 :

(6 SC, INC)*3 (24)

Info :

shift the stitch marker to the middle of the back (coincides with the middle of the back of the head), if needed

Round 25 :

6 SC, (SC, INC)*6, 6 SC (30)

Round 26-29 :

4 rounds of 30 SC

Info :

shift the stitch marker to the middle of the back, if needed

Round 30 :

2 SC, (SC, INC)*2, (2 SC, DEC)*4, SC, (SC, INC)*2, 3 SC (30)

Round 31 :

30 SC

Round 32 :

3 SC, (2 SC, INC)*3, 6 SC, (INC, 2 SC)*3, 3 SC (36)

Round 33 :

36 SC

Info :

shift the stitch marker to the middle of the back, if needed

Round 34 :

3 SC, (3 SC, INC)*3, 6 SC, (INC, 3 SC)*3, 3 SC (42)

Round 35-48 :

14 rounds of 42 SC

Round 49 :

(5 SC, DEC)*6 (36)

Round 50 :

(4 SC, DEC)*6 (30)

Round 51 :

(3 SC, DEC)*6 (24)

Round 52 :

(2 SC, DEC)*6 (18)

Round 53 :

(SC, DEC)*6 (12)

Round 54 :

6 DEC

Info :

tighten the hole, fix the thread and hide the end inside the body

β€” Muzzle :

Info :

*start with ivory yarn

Round 1 :

8 SC in MR

Round 2 :

(SC, 3 SC in the same St)*4 (16)

Round 3 :

10 SC, 3 SC in the same St, 3 INC, 3 SC in the same St, SC (23)

Info :

change thread color to green

Round 4 :

10 SC, change thread color to ivory, 13 SC (23)

Info :

change thread color to green

Round 5 :

10 SC, change thread color to ivory, fix the green thread and leave a long end to sew, 12 SC, SS (23)

Info :

fix the thread and leave a long end to sew

β€” Nose :

Info :

*pink yarn. *don't stuff

Round 0 :

Chain 4

Round 1 :

start in the 2nd chain from the hook: 2 SC, 3 SC into the last chain from the hook, on the other side: 3 SC in the same St, INC (10)

Round 2 :

BLO: 10 SC

Round 3 :

10 SC

Info :

finish with a straight line, leave a long end to sew

Info :

sew the nose on the muzzle, as shown in the photo (above the MR on the muzzle)

Info :

stuff muzzle a bit and sew it in the area of Rd. 10-17

β€” Nose embroidery and facial finishing :

Info :

embroider the eyelids with green thread (the expression of the rabbit's face depends on the angle of the eyelid)

Info :

embroider the lower edge of the eyelid with a thin black thread

Info :

embroider a smile on the muzzle with a thin black thread: fix the curve of the smile with stitches at the two lower points

Info :

embroider the whiskers with a thin black thread

Info :

embroider the eyebrows with a black thread several times in the area of Rd. 4-6, so that they are "thick"

β€” Ears :

Info :

Inner part: *make 2 details *pink yarn *make a turn and work a turning CH at the end of each row

Round 0 :

Chain 2

Round 1 :

in the 2nd chain from the hook: INC (2)

Round 2 :

2 SC

Round 3 :

INC, SC (3)

Round 4 :

3 SC

Round 5 :

INC, 2 SC (4)

Round 6-14 :

9 rows of 4 SC

Info :

fix and cut the thread; hide the initial and the end threads along one side of the detail between the loops

Info :

External part + assembly of the details: *make 2 details *green yarn *make a turn and work a turning CH at the end of each row

Round 0 :

Chain 2

Round 1 :

in the 2nd chain from the hook: INC (2)

Round 2 :

2 SC

Round 3 :

INC, SC (3)

Round 4 :

3 SC

Round 5 :

INC, 2 SC (4)

Round 6-14 :

9 rows of 4 SC

Info :

don't cut the thread, hide the initial thread between the loops

Info :

work a CH, attach the pink inner part of the ear with hidden threads inside and crochet two details together with SC along the contour, working 3 SC in the same St in the corners of the details

Info :

work a CH, fold the detail in half and work both sides with 3 SS

Info :

fix the thread, leave a long end to sew, withdraw it to the base of the ear

Info :

sew the ears on the top of the head in the area of Rd. 3-4 of the head (you can change the place of attachment of the ears)

β€” Tummy :

Info :

*ivory yarn. *make a turn and work a turning CH at the end of each row. *semi-cotton yarn can be replaced with textured (fluffy) yarn of the same thickness, e.g. YarnArt Mink, Nako Paris, Alize Softy

Round 0 :

Chain 3

Round 1 :

in the 2nd chain from the hook: 2 SC

Round 2-4 :

3 rows of 2 SC

Round 5 :

2 INC (4)

Round 6 :

INC, 2 SC, INC (6)

Round 7 :

INC, 4 SC, INC (8)

Round 8-9 :

2 rows of 8 SC

Round 10 :

skip a St, 5 SC, DEC (6)

Round 11 :

6 SC

Round 12 :

INC, 4 SC, INC (8)

Round 13 :

INC, 6 SC, INC (10)

Round 14-27 :

14 rows of 10 SC

Round 28 :

skip a St, 7 SC, DEC (8)

Round 29 :

skip a St, 5 SC, DEC (6)

Round 30 :

skip a St, 3 SC, DEC (4)

Info :

work a CH, crochet the detail with SC along the contour, work 3 SC in the same St in the upper corners

Info :

finish with a straight line, leave a long end to sew

Assembly Instructions

  • Sew the eye whites to the head with the upper edge 3 rounds above the pupil and lower edge one round below; distance between the eye whites is 4 SC.
  • Insert and secure safety eyes between Rd. 9 and Rd. 10 at a spacing of 6 SC, fasten the plug on the wrong side and flatten or melt if necessary for safety.
  • Sew the muzzle to the head aligning the base around rounds 10-17, stuff the muzzle lightly and secure with pins before sewing.
  • Attach ears to the top of the head at area of Rd. 3-4, adjusting placement for desired expression, then secure firmly by sewing through base.
  • Sew tummy panel to the front of the body aligning top to the neck opening and stitch around the contour with hidden thread for a neat finish.

Important Notes

  • πŸ’‘Use stitch markers to track the beginning of each round and shift the marker when instructed to align shaping and symmetry.
  • πŸ’‘Stuff gradually and evenly during shaping β€” especially at the cheeks and neck β€” to achieve the triangular head profile.
  • πŸ’‘Keep consistent tension throughout, especially during color changes and BPSC stitches to avoid distortion of the fabric.
  • πŸ’‘Hide and weave thread ends between stitches as instructed to leave a clean finish on the inside and outside of details.
  • πŸ’‘Measure placements (eyes, muzzle, ears) before sewing and use pins to hold parts while checking expression and alignment.

This friendly rabbit pattern is filled with character and personality, from its expressive eyelids to the little embroidered smile. Make one for a loved one or create a whole family of bunnies in different colors and sizes. Enjoy the step-by-step process and celebrate the handmade charm of your new cuddly friend. 🧢🐰

You ask,

we answer.

FAQs

What size will the finished piece be?

The finished rabbit measures approximately 7.9"/20 cm tall when using YarnArt Jeans with a 2 mm hook; using plush yarn and a 3.5 mm hook will yield a taller plush version (around 14.6"/37 cm as noted).

Can I use different yarn weights for this pattern?

Yes, you can use different yarn and hook sizes; a heavier yarn and larger hook will make a larger, softer plush while finer yarn yields a smaller firmer toy. Adjust eye size and stuffing accordingly.

Do I need prior crochet experience for this pattern?

This pattern is rated Intermediate, so basic knowledge of single crochet, increases, decreases, BPSC and working in rounds is recommended for best results.

How long does this project typically take to complete?

Most crocheters complete this project in 8-10 hours, though time may vary depending on experience, customization, and assembly complexity.

Where should I place the eyes for the correct expression?

Insert the eyes between Rd. 9 and Rd. 10 spaced 6 SC apart. Sew the eye whites so the upper edge is 3 rounds above the pupil and the lower edge one round below for the intended expression.