🧢 Beautiful ✨ Detailed πŸ’ Adorable

Pumpkin for Halloween Amigurumi Pattern

Pumpkin for Halloween Amigurumi Pattern
4.5β˜… Rating
2-4 Hours Time Needed
1.2K Made This
βœ‚οΈ

Intermediate Level

Ideal for those with basic crochet experience, featuring slightly more advanced stitches and techniques to expand your skills.

⏱️

Bite-Sized Project

Finishes in 2-4 hoursβ€”perfect for an afternoon of creative relaxation.

🎁

Tiny Treasure

Small, sweet, and gift-worthy creations that fit perfectly in the palm of your hand with detailed charm.

About This Pumpkin for Halloween Amigurumi Pattern

This pattern teaches you how to crochet a small amigurumi pumpkin with a carved-face effect and a textured drip. It includes color-change guidance, surface shaping (BLO/FLO), and step-by-step photos to help you follow along. The finished pumpkin measures approximately 10 cm tall using the suggested hook and yarn.

Pumpkin for Halloween Amigurumi Pattern crochet pattern - detailed view of completed project

Techniques used include single crochet, half double crochet, increases and decreases, and working in back/front loops. The pattern is compact and great for making multiple pumpkins in different colors.

Why You'll Love This Pumpkin for Halloween Amigurumi Pattern

I absolutely love this pattern because it transforms simple stitches into a charming Halloween accent. I enjoy how the FLO/BLO technique creates a carved look without sewing separate pieces. I also love how quick it is to make, so you can whip up a set in an afternoon. The combination of color changes and the little drip details makes each pumpkin feel unique and playful.

Pumpkin for Halloween Amigurumi Pattern step 1 - construction progress Pumpkin for Halloween Amigurumi Pattern step 2 - assembly progress Pumpkin for Halloween Amigurumi Pattern step 3 - details and accessories Pumpkin for Halloween Amigurumi Pattern step 4 - final assembly and finishing

Switch Things Up

I love how easily you can customize this pumpkin by changing yarn colors; I often swap orange for pastel tones to create a whimsical set.

I sometimes use bulky yarn and a larger hook to make a chunky, decorative pumpkin version that fills a table centerpiece.

I also enjoy making tiny versions with thinner thread and a 1.5 mm hook to create keychain-sized pumpkins for gifts.

I like to embroider additional lines or ridges to mimic real pumpkin segments for extra texture and realism.

I often add beads or tiny safety eyes behind the FLO face for a different glowing effect when placed over a candle jar light.

I sometimes replace the drip with little crocheted leaves or a curled vine for a natural, autumn look.

I will occasionally stuff the stalk more firmly and bend it slightly to give each pumpkin a unique posture and silhouette.

I recommend trying different hook sizes to experiment with the final scale; a larger hook softens the shape, while a smaller hook tightens it up.

I sometimes add a removable little felt bottom to make the pumpkin sit more stably on different surfaces.

I encourage you to mix yarn textures (matte and slightly shiny) to make the carved-face detail pop visually.

Common Mistakes & How to Fix Them

βœ— Skipping the BLO/FLO instruction will ruin the carved effect; be sure to switch to BLO or FLO exactly when indicated to get correct surface shaping. βœ— Not stuffing evenly causes the pumpkin to bulge or flatten in the wrong places; stuff gradually from the center outward and adjust to keep an even round shape. βœ— Changing color without securing tails can cause messy joins; weave in or secure yarn tails as you change colors to keep edges tidy. βœ— Forgetting to count stitches after increases or decreases leads to incorrect shaping; count your stitches at the end of each round to confirm the correct total.

Pumpkin for Halloween Amigurumi Pattern

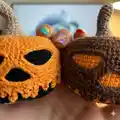
Make a spooky-sweet crocheted pumpkin perfect for Halloween decor or a tiny handmade gift. This clear pattern guides you through shaping, color changes, and surface details so you can create a neat jack-o-lantern effect. With step-by-step rounds and photos, youll finish a charming pumpkin that sits on a shelf or fits in the palm of your hand.

Intermediate 2-4 Hours

Materials Needed for Pumpkin for Halloween Amigurumi Pattern

β€” Main Fabric

  • 01
    Sport weight / 4-ply yarn (YarnArt Jeans 50g / 160m) - Orange (main color) approximately 20-40g
  • 02
    Sport weight / 4-ply yarn (YarnArt Jeans 50g / 160m) - Brown (top/face overlay) approximately 20-40g
  • 03
    Sport weight / 4-ply yarn (YarnArt Jeans 50g / 160m) - Light brown (stalk) small amount
  • 04
    Small amounts of black or contrasting color for inner face details (optional)
  • 05
    Extra yarn for embroidery/sewing and small details

β€” Tools Required

  • 01
    Crochet hook 1.75 mm (or preferred small hook)
  • 02
    Fiberfill stuffing
  • 03
    Scissors
  • 04
    Needle for embroidery and sewing pieces (tapestry/large-eye needle)
  • 05
    Pins for attaching details
  • 06
    Markers (stitch marker)

Progress Tracker

0% Complete

β€” Pumpkin :

Round 1 :

8 sc in MR

Round 2 :

8 inc (16)

Round 3 :

(1 sc, inc) * 8 (24)

Round 4 :

1 sc, inc, (2 sc, inc) * 7, 1 sc (32)

Round 5 :

(3 sc, inc) * 8 (40)

Round 6 :

2 sc, inc, (4 sc, inc) * 7, 2 sc (48)

Round 7 :

(5 sc, inc) * 8 (56)

Round 8 :

3 sc, inc, (6 sc, inc) * 7, 3 sc (64)

Round 9 :

(7 sc, inc) * 8 (72)

Round 10-12 :

72 sc (3 rounds) (photo 1)

Info :

Change color to orange.

Round 13 :

BLO: 72 sc (photo 2, 3)

Round 14-27 :

72 sc (14 rounds) (photo 4)

Round 28 :

(7 sc, dec) * 8 (64)

Round 29 :

3 sc, dec, (6 sc, dec) * 7, 3 sc (56)

Round 30 :

(5 sc, dec) * 8 (48)

Round 31 :

2 sc, dec, (4 sc, dec) * 7, 2 sc (40)

Round 32 :

(3 sc, dec) * 8 (32)

Info :

Stuff the toy, spread the fiberfill inside from the center to the sides. Then add fiberfill if you need.

Round 33 :

1 sc, dec, (2 sc, dec) * 7, 1 sc (24)

Round 34 :

(1 sc, dec) * 8 (16)

Round 35 :

8 dec (8)

Info :

Fasten off, leaving a long thread for the pumpkin lift. (photo 5, 6)

Info :

Insert the thread into the needle. Insert the needle into the base of the pumpkin and exit from the opposite side, tighten the thread. (photo 7, 8)

Info :

Again insert the needle into the base of the pumpkin and exit from the opposite side, tighten the thread. (photo 9-12) Repeat twice. Fasten off, hide the yarn tail. (photo 13)

β€” Pumpkin (FLO surface and openings) :

Step 1 :

Go back to the 12th round, continue to sc on FLO using the brown thread (the tip of the hook is pointing down): 72 sc (photo 14, 15)

Step 2 :

26 sc, make chain 12, skip 8 sc, 4 sc, make chain 12, skip 8 sc, 26 sc (80) (photo 16-18)

Step 3 :

26 sc, 12 sc on the chain, 4 sc, 12 sc on the chain, 26 sc (80) (photo 19)

Step 4 :

80 sc

Step 5 :

37 sc, make chain 7, skip 8 sc, 35 sc (79)

Step 6 :

37 sc, 7 sc on the chain, 35 sc (79) (photo 20)

Info :

Do not cut the thread. Next, we will crochet the drip on the pumpkin.

β€” Drip :

Drip 1 :

Make chain 5, start to crochet on the second chain from the hook: 4 hdc, sl st to the next one, 2 sc. (photo 21, 22)

Drip 2 :

Make chain 6, start to crochet on the second chain from the hook: 5 hdc, sl st to the next one, 2 sc. (photo 23)

Drip 3 :

Continue crocheting in a circle, alternating chains of different lengths from 3 to 7 ch. Fasten off, leaving a long thread for sewing. (photo 24, 25)

Info :

Use pins to secure the eyes, the nose and the drips on the pumpkin and sew. (photo 26-29)

β€” Pumpkin stalk :

Round 1 :

Start crocheting with light brown thread. 6 sc in MR

Round 2 :

(1 sc, inc) * 3 (9)

Round 3-6 :

9 sc (4 rounds)

Round 7 :

4 sl st, 5 sc (9)

Round 8 :

9 sc

Round 9 :

4 sl st, 5 sc (9)

Round 10 :

9 sc

Round 11 :

(2 sc, inc) * 3 (12)

Round 12 :

12 sc

Round 13 :

(1 sc, inc) * 6 (18)

Round 14 :

18 sc

Round 15 :

(2 sc, inc) * 6 (24)

Round 16 :

24 sc (photo 30)

Info :

Fill in the stalk with fiberfill. Fasten off, leaving a long thread for sewing. Sew the stalk to the pumpkin. (photo 31, 32)

Info :

Your pumpkin is ready! Thank you for taking advantage of these crochet instructions. Pin or sew all details securely and hide ends.

Assembly Instructions

  • Use pins to position the orange inner face pieces (eyes and nose) behind the brown FLO overlay and sew them in place securely.
  • Pin the drip elements around the bottom edge where indicated, then sew each drip using the long yarn tails left from finishing; hide the tails when finished.
  • Sew the light brown stalk to the center top of the pumpkin using the long thread left from the stalk, securing firmly with whipstitch and knotting inside.
  • After stuffing, use the long thread left at the top to pull through the base and create the pumpkin lift, repeating the pass-throughs to shape and secure before hiding the yarn tail.

Important Notes

  • πŸ’‘Work the BLO/FLO rounds carefully and switch to front or back loops only exactly as instructed to achieve the carved-face look.
  • πŸ’‘Stuff gradually and evenly from the center outward to maintain a round shape and avoid lumps or flat spots in the pumpkin.
  • πŸ’‘Always leave long tails when instructed for sewing and shaping so you can pull, sew, and hide ends neatly after assembly.

This little Pumpkin for Halloween is a perfect handmade accent that adds seasonal charm to any shelf or gift pile. πŸŽƒπŸ§Ά The pattern is compact but full of detail, giving you a carved-jack-o-lantern effect with simple techniques. 😍 Make a set in different colors for a cozy, spooky display β€” theyre quick, delightful, and wonderfully giftable. ✨

You ask,

we answer.

FAQs

What size will the finished piece be?

The finished amigurumi pumpkin measures approximately 3.94 inches (10 cm) in height when using the recommended yarn (YarnArt Jeans) and a 1.75 mm hook.

Can I use different yarn weights for this pattern?

Yes, you can use different yarn weights, but expect a change in final size. Choose an appropriate hook for the yarn weight and adjust stuffing accordingly to maintain shape.

Do I need prior crochet experience for this pattern?

This pattern is rated intermediate: basic knowledge of single crochet, increases, decreases, chain, BLO and FLO is recommended to follow shaping and surface techniques.

How long does this project typically take to complete?

Most crocheters complete this project in 2-4 hours, depending on experience and whether you make additional decorative drips or multiple pumpkins.