🧢 Beautiful ✨ Detailed πŸ’ Adorable

Nemo The Clown Fish Amigurumi Pattern

Nemo The Clown Fish Amigurumi Pattern
4.3β˜… Rating
5-7 Hours Time Needed
3.3K Made This
βœ‚οΈ

Intermediate Level

Ideal for those with basic crochet experience, featuring slightly more advanced stitches and techniques to expand your skills.

⏱️

Weekend Treat

Takes 5-7 hours, making it an enjoyable project to finish over a couple of days.

🧸

Cute Companion

An adorable friend to cherish, handcrafted with love to bring comfort and joy for years to come.

About This Nemo The Clown Fish Amigurumi Pattern

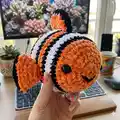
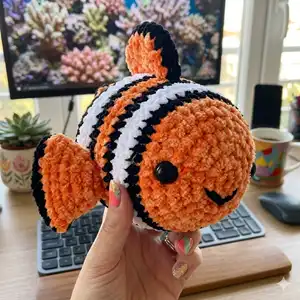
This pattern creates a soft, striped Nemo clown fish amigurumi using velvet yarn for a plush finish. Youll work continuous spiral rounds and change colors to create the iconic stripes. The pattern includes body shaping, side fins, upper fin, tail placement, and simple face embroidery. Photos and step notes help guide assembly and finishing.

Nemo The Clown Fish Amigurumi Pattern crochet pattern - detailed view of completed project

Suitable for crocheters comfortable with increases, decreases and color changes. The finished fish measures approximately 20-24 cm depending on yarn tension and hook size.

Why You'll Love This Nemo The Clown Fish Amigurumi Pattern

I absolutely love this pattern because it captures the cheerful character of a clown fish with just a few simple shapes and color changes. I enjoy using velvet yarn for the plush texture that makes Nemo irresistibly soft to hold. The stripe sequence and small sewn fins let me personalize each fish while keeping construction straightforward. Sewing and embroidery bring the face and fins together in a satisfying finish that always makes me smile when the toy is complete.

Nemo The Clown Fish Amigurumi Pattern step 1 - construction progress Nemo The Clown Fish Amigurumi Pattern step 2 - assembly progress Nemo The Clown Fish Amigurumi Pattern step 3 - details and accessories Nemo The Clown Fish Amigurumi Pattern step 4 - final assembly and finishing

Switch Things Up

I love how easy it is to customize this Nemo pattern by changing yarn colors for different fish varieties or a softer palette.

I sometimes use a thinner yarn and smaller hook to create mini keychain versions for gifts and market stalls.

If you want a chunkier, cuddlier Nemo, switch to a bulkier velvet yarn and a larger hook for a plush result.

I like to experiment with eye sizes β€” using slightly smaller or larger safety eyes can change the expression dramatically.

I often add little embroidered details such as blushing cheeks or an extra smile line to give more personality.

Try making the fins slightly larger or adding an extra row for a different silhouette and more dramatic pose.

I recommend reinforcing fin seams with extra stitches if the toy will be handled frequently, especially for children.

For a posable version, I sometimes add thin wire into the fins so they can be shaped and adjusted after sewing.

I also enjoy creating a whole family of fish by varying stripe sequences and color repeats to build a mini reef collection.

If youd like to make a waterproof bath toy, consider using cotton or acrylic yarn (not velvet) and secure eyes with strong backing or embroidered eyes for safety.

Common Mistakes & How to Fix Them

βœ— Skipping stitch markers during continuous spiral rounds causes lost counts and uneven shaping; place a marker at the start of each round and move it up as you work to maintain accurate stitch counts. βœ— Changing colors without securing tails neatly leads to messy joins and loose ends; carry the color when possible, weave in ends as you go, and leave long sewing tails where the pattern instructs for neater joins. βœ— Stuffing too late or unevenly results in lumps and poor shape; stuff gradually, especially when narrowing the body, and adjust stuffing while closing to keep the form smooth. βœ— Forgetting to place safety eyes at the recommended rows may give the face the wrong expression or placement; attach safety eyes between the 5th and 6th row as instructed and check symmetry before fastening. βœ— Pulling the velvet yarn too tightly creates tight, distorted stitches and a firmer fabric; maintain consistent, moderate tension with velvet yarn to preserve the plush appearance and correct sizing.

Nemo The Clown Fish Amigurumi Pattern

Make your own cuddly Nemo the Clown Fish with this step-by-step crochet pattern. Youll enjoy the textured velvet yarn and playful stripes that bring this little fish to life. The pattern includes clear round-by-round instructions, fin and tail assembly, and finishing touches so you can complete a charming handmade toy. Perfect as a gift or a cheerful addition to your amigurumi collection.

Intermediate 5-7 Hours

Materials Needed for Nemo The Clown Fish Amigurumi Pattern

β€” Main Fabric

  • 01
    Himalaya Velvet Yarn - Orange 90016 (bulky velvet texture, approx 100g)
  • 02
    Himalaya Velvet Yarn - White 90001 (approx 50g)
  • 03
    Himalaya Velvet Yarn - Black 90011 (approx 25g)
  • 04
    Small amount of black amigurumi thread for smiling face embroidery
  • 05
    Polyester stuffing for filling

β€” Tools Required

  • 01
    Crochet hook size 4 mm
  • 02
    Safety eyes 16 mm (2 pieces)
  • 03
    Tapestry needle
  • 04
    Scissors
  • 05
    Stitch markers
  • 06
    Yarn needle for sewing
  • 07
    Polyester stuffing

Progress Tracker

0% Complete

β€” Body :

Info :

Start with orange

Round 1 :

6 sc into the magic ring (6)

Round 2 :

(inc) * 6 (12)

Round 3 :

(sc, inc) * 6 (18)

Round 4 :

sc, inc, (2 sc, inc)* 5, sc (24)

Round 5 :

(3 sc, inc)* 6 (30)

Round 6 :

2 sc, inc, (4 sc, inc) * 5, 2 sc (36)

Round 7 :

sc, inc, (3 sc, inc) * 8, 2 sc (45)

Round 8 :

45 sc (B) (45)

Round 9-10 :

45 sc (W) 2 rows (45)

Round 11 :

45 sc (B) (45)

Round 12-13 :

45 sc (O) 2 rows (45)

Round 14 :

45 sc (B) (45)

Round 15-17 :

45 sc (W) 3 rows (45)

Round 18 :

45 sc (B) (45)

Round 19-20 :

45 sc (O) 2 rows (45)

Round 21 :

sc, dec, (3 sc, dec)* 8, 2 sc (O) (36)

Round 22 :

2 sc, dec, (4 sc, dec)* 5, 2 sc (B) (30)

Round 23 :

(3 sc, dec)* 6 (W) (24)

Round 24 :

(2 sc, dec)* 6 (B) (18)

Round 25 :

(sc, dec)* 6 (O) (12)

Round 26 :

(dec)* 6 (O) (6)

Info :

1 Slst to next empty stitch, pull 1 chain. F.O. Stuff. Cut the yarn short and hide.

Info :

Safety eyes will be attached between the 5th and 6th row.

β€” Side Fin (x2) :

Info :

With orange thread

Round 1 :

6 sc into the magic ring (6)

Round 2 :

(inc)* 6 (12)

Round 3 :

(3 sc, inc)* 3 (15)

Round 4 :

(4 sc, inc)* 3 (18)

Round 5 :

(5 sc, inc)* 3 (21)

Round 6 :

(6 sc, inc)* 3 (24)

Info :

Leave the orange thread long for sewing and cut.

With black thread :

Take opposite stitches and crochet 12 sc as you can see in the pics.

Info :

1 Slst to next empty stitch, pull 1 chain. F.O. Cut the yarn short and hide.

β€” Upper Fin (x2) :

Info :

With orange thread. Pull 4 chains. Start to crochet in second chain. All rows will be HDC.

Round 1 :

3 HDC, turn and Ch1 (3)

Round 2 :

2 HDC, inc HDC, turn and Ch1 (4)

Round 3 :

4 HDC, turn and Ch1 (4)

Round 4 :

4 HDC, turn and Ch1 (4)

Round 5 :

Dec HDC, 2 HDC, turn and Ch1 (3)

Round 6 :

HDC, Dec HDC (2)

Info :

1 Slst to next empty stitch. Leave the thread long for sew.

β€” Tail and Assembly Notes :

Info :

The tail will be sewn last 2 rows of the body.

Info :

Sewing the tail: The tail will be sewn last 2 rows of the body.

Info :

Sewing the upper fin: The upper fin will be sewn between the 11th and 20th rows of the body.

Smiling face embroidery :

Use a small amount of black amigurumi thread to embroider a smiling face as shown in the pictures.

Info :

Attach safety eyes between the 5th and 6th row before stuffing fully and continue embroidering the mouth with black thread.

Assembly Instructions

  • Attach safety eyes between the 5th and 6th row of the body before closing the head to ensure correct placement and symmetry.
  • Sew the tail to the body by aligning the tail with the last two rows of the body and whipstitch or ladder stitch securely, hiding the yarn tail inside.
  • Position and sew the upper fin between the 11th and 20th rows of the body, centering it along the top of the fish and stitching firmly so it lies flat.
  • Place side fins on either side of the body and sew using the long orange thread left from the fin; reinforce the seam with several passes for durability.
  • Embroider the smiling face with black amigurumi thread after eyes are attached, using reference photos to shape a gentle curved smile.

Important Notes

  • πŸ’‘All rounds are worked in a continuous spiral; avoid joining rounds with slst unless the pattern explicitly directs otherwise.
  • πŸ’‘You may find it useful to use a stitch marker for counting your rounds so you dont lose track during increases and decreases.
  • πŸ’‘While stuffing take care to give each part a nice shape by adding stuffing gradually, especially in narrow sections to avoid lumps.
  • πŸ’‘Knit using the crossed stitch and maintain consistent tension for even-looking stitches and accurate sizing.

This cheerful Nemo the Clown Fish is a fluffy, stripey amigurumi perfect for play or display. The velvet yarn gives it a luxurious, soft feel and bright, true-to-character colors. Make one as a gift or for your collection β€” it always brings smiles and cozy charm. 🧢🐠

You ask,

we answer.

FAQs

What size will the finished piece be?

Using the given yarn and 4 mm hook, the finished Nemo Clown Fish will measure approximately 20 cm - 24 cm (7.87 inches - 9.45 inches) depending on tension.

What materials and hook size are required?

This pattern uses Himalaya Velvet Yarn in Orange 90016, White 90001 and Black 90011, and a 4 mm crochet hook. You will also need 16 mm safety eyes, stuffing, a tapestry needle and scissors.

Where should I place the safety eyes?

Attach safety eyes between the 5th and 6th rows of the body before finishing the head to ensure proper facial placement.

Can I change yarn weight or hook size to alter the finished size?

Yes, changing yarn weight or hook will affect the final size; use a larger hook and bulkier yarn for a bigger fish, or finer yarn and smaller hook for a mini version.

Is this pattern suitable for beginners?

This pattern is rated intermediate due to continuous spiral work, multiple color changes, and sewing pieces together, so basic experience with increases, decreases and finishing is recommended.