🧢 Beautiful ✨ Detailed πŸ’ Adorable

Pua Poa Beach Swimsuit Coverup Pattern

Pua Poa Beach Swimsuit Coverup Pattern
4.1β˜… Rating
5-7 Hours Time Needed
1.5K Made This
βœ‚οΈ

Intermediate Level

Ideal for those with basic crochet experience, featuring slightly more advanced stitches and techniques to expand your skills.

⏱️

Weekend Treat

Takes 5-7 hours, making it an enjoyable project to finish over a couple of days.

πŸ‘•

Casual Chic

Relaxed style with a modern twist, perfect for everyday wear while maintaining that handcrafted uniqueness.

About This Pua Poa Beach Swimsuit Coverup Pattern

This pattern makes a lightweight, lengthwise coverup crocheted in two identical panels then seamed together to create a V-neck opening for the head. It uses a foundation double crochet starting chain and a simple dc mesh stitch pattern for drape and breathability. The design includes instructions for a removable crochet cord belt and clear assembly guidance for side and center seams.

Pua Poa Beach Swimsuit Coverup Pattern crochet pattern - detailed view of completed project

Sizes from XS to 5XL are included with a sizing grid and yarn requirements listed per size. The pattern is written in US terms and recommends checking gauge and trying on as you go for best fit.

Why You'll Love This Pua Poa Beach Swimsuit Coverup Pattern

I absolutely love this pattern because it captures that easy beachy vibe with very little fuss, letting you make a stylish coverup in a few evenings. I designed it while living in Kauai and the airy stitches remind me of warm ocean breezes and sandy shores. I also love how customizable it is β€” you can easily change length, waist placement, and even sleeve fit as you assemble. Making the two panels is soothing and repetitive, and the assembly steps let you try on and adjust the opening and V depth for a perfect fit.

Pua Poa Beach Swimsuit Coverup Pattern step 1 - construction progress Pua Poa Beach Swimsuit Coverup Pattern step 2 - assembly progress Pua Poa Beach Swimsuit Coverup Pattern step 3 - details and accessories Pua Poa Beach Swimsuit Coverup Pattern step 4 - final assembly and finishing

Switch Things Up

I love experimenting with different yarns for this coverup; switch to a linen blend for extra drape and a more breathable summer garment.

I often change the length to make a tunic or a maxi by adding more dc rows to each panel before seaming.

Try using variegated or striped yarns for a fun color effect β€” the simple mesh stitch showcases color changes beautifully.

I sometimes add a crocheted scallop or picot hem for a decorative finish at the bottom edge for a feminine touch.

To make the sleeves longer or cap-like, simply work additional rows on the shoulder edges before seaming the sides.

I also like to replace the crochet cord belt with a braided leather cord or ribbon for a different look and texture contrast.

For a child-sized version, reduce the foundation dc count proportionally and shorten the panel length to create a cute kid coverup.

Add a small pocket to one side by crocheting a rectangular panel and sewing it onto the finished coverup for function and style.

I sometimes embroider a small motif or add tassels to the belt ends to personalize each piece I make.

If you want more coverage, seam further toward the center before creating the head opening; for a deeper V, seam less and test as you go.

Common Mistakes & How to Fix Them

βœ— Not making a gauge swatch; measure and make a 4x4 swatch to ensure the garment will fit as intended and adjust hook size if necessary. βœ— Skipping a read-through of the entire pattern before starting; read the pattern completely so you can visualize shaping, length, and where to seam before you begin. βœ— Seaming panels without pinning or trying on; always pin and try on the coverup while seaming to ensure the neckline and slit placement are as you want them. βœ— Cutting the belt yarn too short; measure and cut a long length, then multiply by seven as instructed to allow for cord making and finishing. βœ— Overstuffing or pulling stitches too tight when blocking hems; keep tension even and lightly steam or block to shape the hem without stretching the mesh too much.

Pua Poa Beach Swimsuit Coverup Pattern

Make a breezy, lightweight swimsuit coverup perfect for beach days and vacations. This pattern creates a drapey, openwork coverup worked in two panels with simple double crochet mesh for a flattering V-neck and easy fit. Youll enjoy quick, repetitive rows and a straightforward assembly that lets you customize length and waist placement. Ideal for gifting or keeping for sunny adventures by the water.

Intermediate 5-7 Hours

Materials Needed for Pua Poa Beach Swimsuit Coverup Pattern

β€” Main Fabric

  • 01
    Lion Brand Pima Cotton Yarn - Weight 4/Worsted/Medium - 186 yds / 100g per ball
  • 02
    Vintage color - XS: 4 balls
  • 03
    Vintage color - S: 5 balls
  • 04
    Vintage color - M: 5 balls
  • 05
    Vintage color - L: 5 balls
  • 06
    Vintage color - XL: 6 balls
  • 07
    Vintage color - 2XL: 6 balls
  • 08
    Vintage color - 3XL: 6 balls
  • 09
    Vintage color - 4XL: 6 balls
  • 10
    Vintage color - 5XL: 7 balls

β€” Tools Required

  • 01
    Crochet hook size 5.5 mm
  • 02
    Tapestry needle
  • 03
    Stitch markers
  • 04
    Measuring tape
  • 05
    Scissors
  • 06
    Optional: pins for assembly

Progress Tracker

0% Complete

β€” Panel - make 2 :

Infos :

The coverup is crocheted in turning rows, lengthwise from top to bottom. The turning chain of 3 counts as your first dc stitch of each row. You will crochet 2 sides and then seam them together, leaving a hole in the middle for your head.

Row 1 :

FDC 216(218, 220, 222, 224)(226, 228, 230, 232), ch 3, turn

Row 2 :

sk next st, (dc in next st, ch 1, sk 1) x across, ch 3, turn

Row 3 :

(dc in next ch sp, ch 1) x across
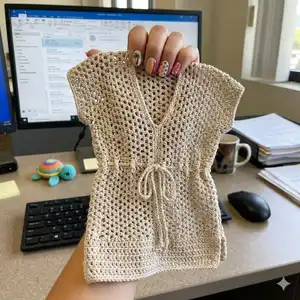
Row 4-17 :

(21, 25, 29, 33)(37, 41, 45, 49): repeat row 3, ch 2, turn (PHOTO 01 & 2 on row 15)

Row 18 :

(22, 26, 30, 34)(38, 42, 46, 50): dc in each st across PHOTO 04

Info :

PHOTO 02 = close-up of FDC & stitches

Info :

Fasten off and weave in end.

β€” Belt :

Infos :

The belt is made with a crochet cord. There are plenty of YouTube tutorials on how to make a crochet cord if you need additional help.

Step 1 :

Determine how long you want your belt to be and cut a length of yarn that is SEVEN (7) times that long. If you need help determining how long you need your belt, try this: Borrow a long length of yarn and wrap it around your waist and tie it in a bow leaving the bow and it's dangly legs however long you like. Then, measure that length of yarn and multiply it by 7 to get the length of yarn you need for these steps.

Step 2 :

From your yarn ball, take a long strand of yarn per the above instructions.

Step 3 :

Fold the strand of yarn to where one side is about 1/3 longer than the other side.

Step 4 :

Slip knot into your hook at the fold you just made.

Step 5 :

Take the shorter end of the yarn to the back and into your hand as your working end. The longer end will dangle forward towards you.

Step 6 :

Next, yarn over from the non-working-hand yarn strand (the one dangling forward towards you) from front to back over your hook PHOTO 05-A.

Step 7 :

Next, yarn over with your working side of the yarn strand just like a normal yarn over PHOTO 05-B and pull through both loops on the hook PHOTO 05-C.

Step 8 :

Repeat steps 5 & 6 until the entire yarn strand has been used up.

Step 9 :

When complete, pull both yarn ends through the final loops and tie off.

β€” Assembly - center seaming :

Step 1 :

Lay the panels lengthwise, side by side with the final dc row together in the middle PHOTO 06.

Step 2 :

Choose which side you want to be the wrong side and be sure it is facing out.

Step 3 :

From the edge of the coverup, moving toward the center, seam the sides together by passing the tapestry needle through the back two loops only of each side for 20". This will be the front of the coverup. Secure and weave in end. PHOTO 07.

Step 4 :

Repeat on the opposite end, for 27". The hole you've just created in the middle is the neckline where your head will go through. Before tying off, try on the coverup and make sure you are happy with the opening and the V it creates front and back. If you want the V deeper or more closed, do so now. Secure and weave in end. PHOTOS 08, 09 & 10.

Step 5 :

You are done with the center seam. The hole in the middle is where your head will go.

β€” Assembly - side seaming :

Step 1 :

Fold the coverup in half from top to bottom (still wrong side out), leaving a 6"(6", 6", 8", 8")(8", 9", 9", 9") off-set between the front and back, with the back being the longer side. Alternatively, decide how much longer you want the back to be (if any) and arrange the garment as-so right now. (PHOTO 11 AT THE LEG ILLUSTRATES THIS)

Step 2 :

Measure 7"(7", 7", 8", 8")(8", 9", 9", 9") from the shoulder. This will be the arm opening. Alternatively, decide how big you want the arm hold to be (if different than the suggested measurements above) and arrange the garment as-so right now. Introduce your tapestry needle at the end of this measurement and whip stitch through 3 stitches down towards the hem.

Step 3 :

From here, count 14 stitches down and whip stitch through the next 3 stitches. PHOTO 12

Step 4 :

Repeat step 3 until you get to the end of the side seam, allowing for a final gap on the outer thigh PHOTO 11 & 12.

Step 5 :

Weave in all ends.

Step 6 :

Weave the belt through every other loop around the middle of the coverup at the height you like!

Step 7 :

Try on the cover-up and flaunt your gorgeous body!

Assembly Instructions

  • Lay the two panels lengthwise, match the final dc row together in the middle, and seam inward 20" from one edge for the front opening before repeating on the opposite end for 27" to create the head opening.
  • When seaming the center, pass the tapestry needle through the back two loops only for a neat seam and try on the coverup before finishing to adjust V depth.
  • Fold the garment lengthwise and mark arm openings at 7" (sizes vary as stated), then whip stitch through sets of 3 stitches to secure the side seams from shoulder downward.
  • Count 14 stitches down from the arm opening and whip stitch through the next 3 stitches, repeating until reaching the hem while leaving the desired side slit/gap at the thigh.
  • Weave in all ends, then thread the crochet cord belt through every other loop around the middline to cinch the waist and customize fit.

Important Notes

  • πŸ’‘This pattern is written in US terms; read through the entire pattern before you begin to visualize construction.
  • πŸ’‘Make a gauge swatch: 4"x4" = 8 stitches x 8 rows (1 stitch = dc + ch) and adjust hook if needed for proper drape.
  • πŸ’‘Use stitch markers or pins while seaming and trying on to ensure symmetry and correct neckline size before fastening off.
  • πŸ’‘Weave in ends securely and block lightly if desired to even out mesh and hem edges.
  • πŸ’‘Try on the garment as you seam to adjust V depth and slit length for your preferred fit.

This breezy Pua Poa Beach Swimsuit Coverup was designed for sunny days and seaside adventures. The open mesh gives beautiful drape and breathability while remaining stylish and simple to make. Customize the length, waist placement, and belt to make a coverup thats truly your own. 🧢🌊

You ask,

we answer.

FAQs

What size will the finished piece be?

The pattern includes sizes XS through 5XL with a sizing grid; the model pictured wears size XS with a bust of 33" and height 5'4" for reference.

Can I use a different yarn weight or fiber?

Yes, you can substitute a similar worsted (#4) weight yarn; changing yarn weight or hook size will change the drape and final measurements so make a swatch and adjust accordingly.

Is this pattern suitable for beginners?

This pattern is rated intermediate due to the foundation double crochet, turning-row construction, and seaming steps; basic knowledge of dc, fdc, and seaming is recommended.

How long will this project take to complete?

Most crocheters will finish in about 5-7 hours depending on experience, size made, and how much time you spend adjusting fit during assembly.