🧢 Beautiful ✨ Detailed πŸ’ Adorable

Claude the Cloud Amigurumi Pattern

Claude the Cloud Amigurumi Pattern
4.7β˜… Rating
2-3 Hours Time Needed
2.8K Made This
βœ‚οΈ

Beginner Friendly Level

Perfect for those just starting their crochet journey, with clear instructions and simple techniques

⏱️

Bite-Sized Project

Finishes in 2-4 hoursβ€”perfect for an afternoon of creative relaxation.

🧸

Cute Companion

An adorable friend to cherish, handcrafted with love to bring comfort and joy for years to come.

About This Claude the Cloud Amigurumi Pattern

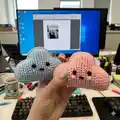
Claude the Cloud is a small, no-sew amigurumi worked in rows to create a charming three-dimensional cloud shape. You will crochet two identical pieces and join them together while stuffing to get a soft rounded finish. The pattern uses simple single crochet shaping and is perfect for practicing basic increases and decreases.

Claude the Cloud Amigurumi Pattern crochet pattern - detailed view of completed project

Designed to be made with DK/light worsted yarn and a 3 mm hook, this pattern yields a cuddly 7 x 13 cm cloud. It includes materials, abbreviations and full row-by-row instructions so you can start right away.

Why You'll Love This Claude the Cloud Amigurumi Pattern

I absolutely love this pattern because it turns basic stitches into a delightful little character with so little effort. I enjoy how quickly a cloud comes together β€” it feels so rewarding to finish one in an afternoon. The no-sew construction is one of my favorite features because it saves time and makes assembly easy for beginners. I also love that you can customize the colors and expressions to create a whole family of clouds.

Claude the Cloud Amigurumi Pattern step 1 - construction progress Claude the Cloud Amigurumi Pattern step 2 - assembly progress Claude the Cloud Amigurumi Pattern step 3 - details and accessories Claude the Cloud Amigurumi Pattern step 4 - final assembly and finishing

Switch Things Up

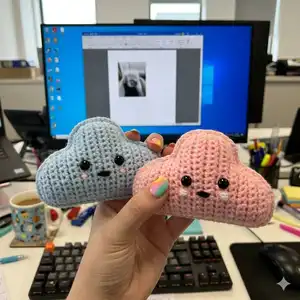
I love how easy it is to customize Claude the Cloud with different colors; try soft pastels for a nursery set or bold neons for a playful shelf display.

If you want a larger cloud, I recommend using a bulkier yarn and a larger hook β€” just keep the same proportions and the shape will stay true.

I sometimes swap safety eyes for embroidered eyes for a softer, baby-safe option; this also lets me change facial expressions easily.

Try adding a small loop at the top to turn the cloud into an ornament or keychain; use a sturdy yarn tail and knot securely.

I like to vary the stuffing density to change the look β€” firmer stuffing creates a more sculpted cloud, while softer filling makes it squishier.

For extra detail, I add tiny crocheted raindrops or a mini rainbow to the underside and stitch them on for a themed set.

You can embroider freckles or a smile to give each cloud a different personality; experiment with eye spacing and mouth shape before securing.

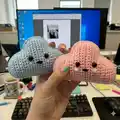
Consider making a pair in coordinating colors as a gift set β€” mixing a blue and a pink cloud looks adorable on a nursery shelf.

If you knit, try creating a knitted panel with the same shaping and use the same assembly method for a different texture.

I also enjoy using textured or variegated yarn for subtle color variation; this can make small details like cheeks and edges pop.

Finally, I sometimes fasten a small bell or rattle inside when making it for a baby-friendly toy, making sure the insert is secured and safe.

Common Mistakes & How to Fix Them

βœ— Skipping stitch markers when working turning chains can make you lose track of rows; always place a marker in the last stitch of each row and move it up as you turn. βœ— Not stuffing evenly will create flat or lumpy areas in the cloud; add stuffing gradually while you crochet the pieces together and especially pad the three corners for a rounded shape. βœ— Forgetting to check safety eye placement can result in a wonky face; insert the safety eyes between rows 11-12 and 17-18 and verify they are at the same height and centered vertically before securing. βœ— Cutting yarn too early makes finishing difficult; keep the yarn attached on the back-piece and crochet both pieces together, hiding ends only after joining and stuffing is complete. βœ— Pulling decreases too tight will distort shaping; work decreases with even tension and check stitch counts after each decrease to maintain proportions.

Claude the Cloud Amigurumi Pattern

Make a sweet, no-sew cloud amigurumi you will love to gift or display. This easy pattern walks you through two identical pieces worked in rows and how to crochet them together while stuffing. With clear materials, abbreviations, and step-by-step rounds, you can crochet Claude in a single afternoon. Perfect for creating cute nursery decor or tiny handmade presents.

Beginner Friendly 2-3 Hours

Materials Needed for Claude the Cloud Amigurumi Pattern

β€” Main Fabric

  • 01
    DK / Light worsted weight yarn (Number 3), 120-150m per 50g skein - blue/white/rose or any color you prefer
  • 02
    Black yarn or embroidery floss for mouth - small amount
  • 03
    Rose or pink yarn or embroidery floss for cheeks - small amount
  • 04
    Polyester stuffing - small amount to firmly fill cloud
  • 05
    Safety eyes 9 mm (2 pieces)

β€” Tools Required

  • 01
    Crochet hook size 3.0 mm
  • 02
    Stitch markers (use a stitch marker in the last stitch of each row)
  • 03
    Safety eyes 9 mm (2 pieces)
  • 04
    Embroidery needle
  • 05
    Yarn needle
  • 06
    Scissors
  • 07
    Polyester stuffing
  • 08
    Black and rose yarn or embroidery floss for mouth and cheeks

Progress Tracker

0% Complete

β€” Cloud Front-Piece :

Round 1 :

Ch 9, turn (9)

Round 2 :

Inc, 7 sc, turn (9)

Round 3 :

Ch 1, 8 sc, inc, turn (10)

Round 4 :

Ch 1, inc, 9, turn (11)

Round 5 :

Ch 1, 10 sc, inc, turn (12)

Round 6 :

Ch 1, 12 sc, turn (12)

Round 7 :

Ch 1, 12 sc, turn (12)

Round 8 :

Ch 1, inc, 11 sc, turn (13)

Round 9 :

Ch 1, 13 sc, ch 6, turn (19)

Round 10 :

1 sc, in second ch from hook, and next 17 sc (18)

Round 11 :

Ch 1, 17 sc, inc, turn (19)

Round 12-18 :

Ch 1, 19 sc, turn (19)

Round 19 :

Ch 1, 17 sc, dec turn (18)

Round 20 :

Ch 1, dec, 16 sc (17)

Round 21 :

Ch 1, 13 sc, keeping the last 4 stitches unstitched (13)

Round 22 :

Ch 1, dec, 11 sc, turn (12)

Round 23 :

Ch 1, 12 sc, turn (12)

Round 24 :

Ch 1, dec, 10 sc, turn (11)

Round 25 :

Ch 1, 9 sc, dec, turn (10)

Round 26 :

Ch 1, dec, 8 sc, turn (9)

Round 27 :

no chain, 7 sc, dec, turn (8)

Round 28 :

no chain, dec, 6 sc (7)

Info :

Cut yarn. Hide yarn ends.

β€” Cloud Back-Piece :

Info :

Make the back-piece the same way as the front-piece, but don't cut the yarn.

Info :

Once the second piece is finished, hide the other yarn end.

Info :

Add the safety eyes in one of the pieces, between row 11 and 12 and 17 and 18. Check that the eyes are on the same height and vertically in the middle of the piece.

Info :

Lay the pieces flat onto each other. Now crochet them together with a sc. We begin where we made the last stitch. Continue to stuff the cloud while crocheting along.

Info :

Make sure, the cloud is very firmly stuffed, especially add stuffing at the three corners. This way the cloud gets the cute round three-dimensional shape that we want.

Info :

Cut a piece of black yarn or embroidery-floss and embroider on the mouth. Then embroider on the cheeks with a few stitches.

Info :

Cut yarn and hide ends.

Assembly Instructions

  • Insert the safety eyes into the front piece between rows 11 and 12 and again between rows 17 and 18; verify both eyes are level and vertically centered before securing the backs.
  • Lay the front and back pieces flat together with right sides out, align edges and begin crocheting them together using single crochet starting where you left off on the back piece.
  • Continue to crochet around the edge and stuff the cloud gradually through the opening; add extra stuffing to the three corner bulges to create a round three-dimensional shape.
  • When you reach the end, fasten off, hide yarn tails and weave in ends with a yarn needle for a neat finish.
  • Use black yarn or embroidery floss to embroider a small mouth and use pink yarn or floss to embroider cheeks with a few small stitches for a cute expression.

Important Notes

  • πŸ’‘Use a stitch marker in the last stitch of each row and move it up as you go to keep track of the turning point and ensure even shaping.
  • πŸ’‘Do not cut the yarn at the end of the back piece; keep the yarn attached to join both pieces together by single crochet.
  • πŸ’‘Stuff the cloud firmly but in stagesβ€”especially pad the three corner bulges to achieve the rounded cloud shape.
  • πŸ’‘Check eye placement before tightening safety eyes; ensure they are aligned horizontally and vertically in the center of the face.
  • πŸ’‘Turning chains are not counted as stitches in this pattern, so follow the row stitch counts as written.

Claude the Cloud is a tiny, joyful amigurumi designed to brighten any shelf or nursery. Make a pair in pastel blues or pinks and create a whole sky of cuddly clouds. Share your creation with others and enjoy the simple magic of handmade gifts. 🧢☁️

You ask,

we answer.

FAQs

What size will the finished piece be?

The finished cloud measures approximately 7 cm x 13 cm when using recommended DK weight yarn and a 3.0 mm hook.

Can I use different yarn weights for this pattern?

Yes, you can use different yarn weights but the final size will change; use an appropriate hook for your yarn and expect proportions to remain similar but dimensions to vary.

Do I need prior crochet experience for this pattern?

This pattern is beginner friendly and uses basic single crochet, increases and decreases, so basic crochet knowledge is recommended for best results.

How long does this project typically take to complete?

Most crocheters finish this bite-sized project in about 2-3 hours, depending on experience and how much time you spend on stuffing and finishing.