🧢 Beautiful ✨ Detailed πŸ’ Adorable

Plush Booties with Pompoms Pattern

Plush Booties with Pompoms Pattern
4.9β˜… Rating
2-4 Hours Time Needed
2.7K Made This
βœ‚οΈ

Beginner Friendly Level

Perfect for those just starting their crochet journey, with clear instructions and simple techniques

⏱️

Bite-Sized Project

Finishes in 2-4 hoursβ€”perfect for an afternoon of creative relaxation.

πŸ‘•

Casual Chic

Relaxed style with a modern twist, perfect for everyday wear while maintaining that handcrafted uniqueness.

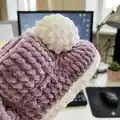
About This Plush Booties with Pompoms Pattern

This pattern shows how to crochet plush velvet baby booties with cute pompoms and ties. You will work from the sole up, change colors for the cuff, and shape the front (muzzle) for a snug fit. The instructions include stitch counts, placement photos, and finishing tips so you can make matching pairs easily.

Plush Booties with Pompoms Pattern crochet pattern - detailed view of completed project

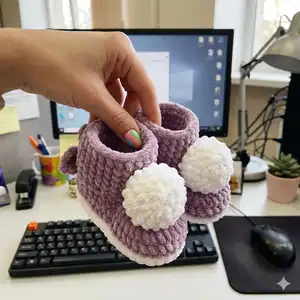
Ideal for making quick gifts or newborn accessories, these booties are soft and warm. The pattern uses super-bulky velvet yarn and simple single crochet shaping.

Why You'll Love This Plush Booties with Pompoms Pattern

I absolutely love this pattern because it turns cozy velvet yarn into a tiny, wearable keepsake that feels luxurious. I enjoy how quickly a pair comes together, making it perfect for last-minute gifts. The step-by-step photo guide makes each step clear and friendly, so I feel confident recommending it to newer crocheters. Sewing on the pompoms at the end always brings a smile and a satisfying finishing touch.

Plush Booties with Pompoms Pattern step 1 - construction progress Plush Booties with Pompoms Pattern step 2 - assembly progress Plush Booties with Pompoms Pattern step 3 - details and accessories Plush Booties with Pompoms Pattern step 4 - final assembly and finishing

Switch Things Up

I love customizing these booties by changing yarn colors to match a nursery or outfit; try soft pastels for a classic baby look.

To make the booties larger or smaller I change yarn weight and hook size - bulky yarn with a larger hook makes a chunky cozy pair, while a finer yarn makes minis.

I often swap the pompoms for tiny crocheted flowers or buttons for a different look that is safer for younger babies.

I sometimes add a non-slip sole by sewing on small dots of fabric paint or a thin felt sole for better traction on smooth floors.

Try embroidering initials or a small heart on the heel for a personalized gift that feels extra special.

If you want ankle support, increase the number of rounds for the top cuff or work a ribbed cuff using front and back loops for stretch.

I also experiment with faux fur yarn for the cuff edge to create a luxurious trim that looks delightful and stays soft.

For safety-conscious variations, use securely sewn small pompoms or embroidered motifs rather than glued decorations to ensure durability when washing.

I sometimes make matching hats or mittens using the same yarn and color scheme to create a coordinated newborn set.

When gifting, I like to present the pair with a handmade tag that lists yarn, hook size, and washing instructions so the recipient can appreciate the care that went into the project.

Common Mistakes & How to Fix Them

βœ— Skipping stitch markers when marking the center for the muzzle leads to uneven shaping; place markers and double-check alignment before crocheting from marker to marker. βœ— Not weaving in the starting tail on the foundation chain can make the sole edge look untidy; weave the yarn tail into the stitches as instructed after the first row. βœ— Pulling stitches too tightly when using velvet yarn will distort the plush texture and make stitching difficult; maintain relaxed, even tension and adjust hook size if needed. βœ— Forgetting to change to back loop only when instructed will flatten the cuff detail; attach new color at the heel and work in back loops as written for proper cuff shaping. βœ— Cutting ties too short or not singeing the ends causes fraying or insufficient length; chain the full length (Ch65) and carefully singe the ends with a lighter before attaching.

Plush Booties with Pompoms Pattern

Make adorable plush baby booties with fluffy pompoms using super-bulky velvet yarn. This cozy pattern gives you step-by-step photo guidance and clear instructions so you can create a soft, wearable gift. Perfect for a handmade newborn present or a cute nursery accessory you will love to make.

Beginner Friendly 2-4 Hours

Materials Needed for Plush Booties with Pompoms Pattern

β€” Main Fabric

  • 01
    Super Bulky / Super Chunky / 14ply velvet yarn - Himalaya Dolphin Baby (100g / 120m) - main color (approx 1 skein)
  • 02
    Super Bulky / Super Chunky / 14ply velvet yarn - Himalaya Dolphin Baby (100g / 120m) - contrast color (approx 1 skein)
  • 03
    Yarn Art Dolce (100g / 120m) can be used as an alternative to Himalaya Dolphin Baby
  • 04
    Pompoms size 3.5-5 cm (2 pieces) - contrasting color
  • 05
    Strong sewing thread for attaching pompoms and ties

β€” Tools Required

  • 01
    Crochet hook size 3.5 mm (recommended)
  • 02
    Crochet hook size 4.0 mm (optional alternative)
  • 03
    Pompoms size 3.5-5 cm (2 pcs)
  • 04
    Needle for sewing pompoms and weaving ends
  • 05
    Scissors
  • 06
    Strong sewing thread for sewing pompoms
  • 07
    Lighter (to singe tie ends)
  • 08
    Stitch markers
  • 09
    Yarn needle for finishing

Progress Tracker

0% Complete

β€” Sole :

Round 1 :

ch14. Starting on the second chain from the hook: 12 sc; 4 sc in the last chain; on the other side of the chain: 11 sc (weave in the yarn tail into the stitches); inc in the first chain ( 29)

Round 2 :

12 sc, 4 inc, 11 sc, 2 inc ( 35)

Round 3 :

Sc, inc, 9 sc, (sc, inc)*4, 12 sc, inc, 2 sc, inc, sl st (42)

Info :

Cut the yarn. The sole is ready.

β€” Change color and work in back loops :

Round 4 :

attach the yarn to the heel and crochet around with sc in back loops (42 sc)

Round 5-6 :

42 sc (42)

β€” Crochet the front part of the bootie (muzzle) :

Info :

Fold the bootie in half. Then in half again. With a hook find the middle and mark it with stitch markers on both sides. And crochet this part from marker to marker. IMPORTANT: you may get a different number of stitches, I have 22sc. Just crochet this part alternating sc and dec.

Round 7 :

I have: (sc, dec)*7, sc (15)

Round 8 :

ch1, crochet decreases along the inner side to the end of row (7 dec and 1sc) - you can have another number of decreases. (8)

Round 9 :

ch1, sc8tog.

β€” Go to the top of the bootie :

Round 10-16 :

sc around (7 rounds) (25)

Info :

Crochet the sole around with sl st in front loops.

β€” Now sew on pompoms :

Info :

Sew pompoms securely to the front of each bootie using strong sewing thread and a needle.

β€” Ties (make 2) :

Round 17 :

Ch65. Singe the ends with a lighter and attach it to the booties as shown in the photo, using a hook, threading through 1 stitch and tying it on a bow on the heel.

Info :

That's all, your booties are ready! Thank you for crocheting with me!

Assembly Instructions

  • Sew each pompom to the front center of the bootie using strong sewing thread; secure with multiple passes and hide the thread tail inside the bootie.
  • Attach ties by threading each Ch65 cord through one stitch at the heel using a hook, then tie into a bow and singe the cut ends to prevent fraying.
  • Align the sole and upper edges carefully before slip stitching the front loops around the sole; pin or use stitch markers to keep edges even while joining.
  • Weave in all loose ends with a yarn needle and trim any excess; hide knots on the inside of the bootie for a neat finish.
  • Before final attachment of pompoms and ties, try the bootie on a baby-sized form or measure to ensure proper placement and symmetry.

Important Notes

  • πŸ’‘According to the pattern, booties will be from 8 to 13 cm; size depends on crochet density, hook size, and foundation chain length.
  • πŸ’‘Do not make a foundation chain less than 10 chains or more than 18 chains to avoid sizing issues; the pattern author used ch14 for a ~10 cm leg.
  • πŸ’‘Use stitch markers to mark the center when folding for the muzzle to ensure even shaping and consistent decreases.
  • πŸ’‘Work with consistent tension especially when using velvet yarn; overly tight stitches will make joining and shaping more difficult.

These plush booties are a cozy little project that makes an ideal handmade gift for newborns and little ones. 🧢 The soft velvet yarn and fluffy pompoms add a luxurious touch that feels special and wearable. ✨ Happy crocheting β€” I cant wait to see your adorable pairs! πŸŽ€

You ask,

we answer.

FAQs

What size will the finished piece be?

According to the pattern, booties will be from 8 to 13 cm depending on your crochet density and hook size; the sample measures about 10 cm using ch14 with a 3.5 mm hook.

Can I use different yarn weights for this pattern?

Yes, you can use different yarn weights, but the finished size will change; adjust your hook accordingly and consider a gauge swatch to check size.

Do I need prior crochet experience for this pattern?

This pattern is beginner friendly and uses basic stitches like single crochet, increases and decreases, so some basic crochet knowledge is helpful.

How long does this project typically take to complete?

Most crocheters finish a pair of these plush booties in about 2-4 hours, depending on experience and whether you make ties and sew on pompoms by hand.