About This Pets Balaclava Pattern
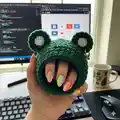
This pattern teaches you how to crochet a plush balaclava shaped for an average cat or a small dog, with openings for the muzzle and charming round ears. It uses plush baby-style yarn and a 4 mm hook to produce a soft, warm texture that is comfortable for pets. The instructions include step-by-step row directions, ear construction details, and assembly tips for a polished finish.
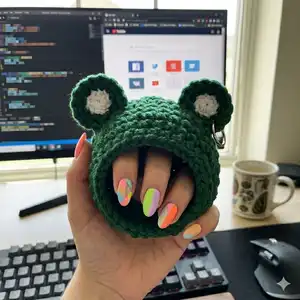
The finished balaclava measures approximately 17 cm along the bottom edge and is ideal for gifting or photography props. Clear photos and a reference video link are included to help you through the process.
Why You'll Love This Pets Balaclava Pattern
I absolutely love this pattern because it transforms simple stitches into a cute, wearable accessory for pets that looks professional and cozy. I enjoy how quickly it comes together thanks to the plush yarn and straightforward rows. The ear detail adds so much personality and is fun to customize with color choices. I also appreciate that this pattern is beginner-friendly but still produces a satisfying, polished result I would happily gift.
Switch Things Up
I love customizing this pattern by changing yarn colors for the ears and body; you can make a frog-style hat, a bear look, or a simple solid color version depending on your pet's personality.
I often switch up yarn weight and hook size to make different sizes: use a bulky plush yarn with a larger hook for a chunkier, warmer hat, or a lighter yarn and smaller hook for a tighter, smaller fit.
I sometimes add a soft lining inside the muzzle opening for extra comfort — a strip of fleece sewn in can reduce rubbing on sensitive fur.
Try adding embroidered details or tiny felt shapes on the ears to create unique characters; embroidery changes the whole expression of the balaclava.
If you want a removable decoration, attach the small ring or a brooch to one ear so you can change accessories without reworking the hat itself.
I recommend experimenting with placement of the muzzle opening: move the 13 CH section slightly if your pet has a larger or narrower muzzle until the fit is perfect before finishing the edges.
For a seasonal twist, use holiday-themed yarns or metallic threads as trim — these small changes make the hat festive and fun for photos.
I also sometimes add a thin piece of wire inside the ear edge to make the ears slightly poseable; if you do this, wrap the wire and secure it well so it won't bother your pet.
If you want to make a set, change the stitch counts proportionally and test fit frequently; taking notes of hook size and yarn used helps me reproduce sizes later.
Don't hesitate to combine plush yarn with a contrasting textured yarn for a rim or decorative line; I find that a small contrasting trim adds a professional touch and frames the muzzle opening nicely.
Common Mistakes & How to Fix Them
✗ Skipping the foundation chain count can make the muzzle opening the wrong size; count your initial 8 CH and ensure you work the correct number of SC into the chain.
✗ Not turning the canvas consistently will make your rows misaligned and uneven; always turn the work after each row as instructed to keep edges straight.
✗ Forgetting to place the marker when beginning the spiral will make increases difficult to track; place a stitch marker in the 1st SC and move it each round to maintain the correct stitch count.
✗ Cutting ends too short at the ear stage makes sewing difficult later; leave a long tail (about 40 cm / 16 in) for sewing and hiding before tightening and finishing.