🧢 Beautiful ✨ Detailed πŸ’ Adorable

Molly Boho Bag Pattern

Molly Boho Bag Pattern
4.6β˜… Rating
5-7 Hours Time Needed
3.2K Made This
βœ‚οΈ

Intermediate Level

Ideal for those with basic crochet experience, featuring slightly more advanced stitches and techniques to expand your skills.

⏱️

Weekend Treat

Takes 5-7 hours, making it an enjoyable project to finish over a couple of days.

✨

Stylish Touch

An elegant detail to elevate any look, combining traditional techniques with contemporary design sensibilities.

About This Molly Boho Bag Pattern

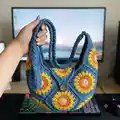
This pattern teaches you to crochet the decorative floral squares and join them into the Molly Boho Bag shown. It uses DK weight yarn and simple motifs repeated to create an eye-catching boho style. Techniques include cluster/puff stitches, changing colours each round and crocheting the strap with a textured bead row.
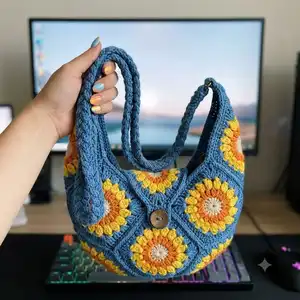
Molly Boho Bag Pattern crochet pattern - detailed view of completed project

You will make 11 squares and join them to form a 3D bag shape, then add a strap with hardware. Photographs and step-by-step notes are included for assembly and finishing.

Why You'll Love This Molly Boho Bag Pattern

I absolutely love this pattern because it celebrates colour and texture in such a playful way. I love how each little square becomes part of something bigger β€” it makes using scraps and mixing shades so rewarding. The construction is clever: when you stitch the squares together the bag forms its own curved shape, which always impresses me. I also enjoy customizing the strap length and hardware to make each bag truly unique.

Molly Boho Bag Pattern step 1 - construction progress Molly Boho Bag Pattern step 2 - assembly progress Molly Boho Bag Pattern step 3 - details and accessories Molly Boho Bag Pattern step 4 - final assembly and finishing

Switch Things Up

I love how easily this design adapts to different colours β€” switch to a monochrome palette for a sophisticated look or use bright scraps for a playful festival bag.

To make a smaller bag, choose fingering weight yarn and a smaller hook; for a chunkier statement bag use aran or bulky yarn with larger hooks.

Change the edge colour to a contrasting shade to make the square motifs pop, or use the same colour for a subtle, uniform finish.

Experiment with different centre colours in each square to create a mosaic effect β€” random centres give a charming scrappy finish.

Try adding a lining for more structure and to protect contents; pick a cotton fabric and machine-stitch the lining to match the bag opening.

Make the strap adjustable by adding buttonholes and sewing on a button so it can be worn as a shoulder or crossbody bag.

I sometimes add a small internal pocket by sewing a rectangle of fabric or crocheting a pocket and attaching it inside before finishing the lining.

Swap the single crochet join for a flat slip-stitch join if you prefer a less visible seam; try different joining methods to see which you prefer visually.

Add decorative elements like tassels, pom-poms or a crocheted flower to the flap for extra personality and texture.

You can also replace hardware clips with sewn loop ends and rivets for a more vintage or minimalist look β€” adapt the finishing to your personal style.

Common Mistakes & How to Fix Them

βœ— Skipping stitch markers while working rounds can make it hard to find the start of each round; place a marker at the beginning of every round to stay accurate. βœ— Not closing the magic ring tightly will leave a hole at the centre of your square; gently pull the ring closed and secure with a slip stitch before continuing. βœ— Inconsistent tension when working cluster or puff stitches can cause uneven petal shapes; practice the cluster/puff technique and keep your tension even across each stitch. βœ— Joining squares back-to-back without aligning stitch counts will create gaps or bulky seams; pin and align both squares carefully and check stitch placement before single crocheting them together.
Molly Boho Bag Pattern

Make a beautiful boho-inspired bag from individual floral squares and assemble them into a slouchy, stylish shoulder bag. You will love experimenting with colourways β€” use 1-5 DK yarn colours or scraps for a wonderfully textured, handmade finish. The pattern includes full step-by-step instructions for the squares, joining, shaping, strap and hardware finishing so you can create a professional-looking bag.

Intermediate 5-7 Hours

Materials Needed for Molly Boho Bag Pattern

β€” Main Fabric

  • 01
    DK weight yarn (light worsted) - use 1-5 colours depending on your colourway
  • 02
    Photographed sample used 4 colours with the cream colour repeated twice (use scrap DK yarn if preferred)
  • 03
    Contrast yarn for joining/border - small amount of DK
  • 04
    Optional additional DK for strap (approx same weight as squares)

β€” Tools Required

  • 01
    Crochet hook 6mm (J) for the main squares
  • 02
    Crochet hook 5mm (H) for strap foundation and first rows
  • 03
    Tapestry/yarn needle for sewing and weaving ends
  • 04
    Scissors
  • 05
    Bag hooks / swivel clips or hardware for strap ends
  • 06
    Stitch markers
  • 07
    Measuring tape (optional) to set strap length

Progress Tracker

0% Complete

β€” Square :

Round 1 :

Using the 6mm J hook Magic Ring, Chain 3 (counts as first stitch) Double crochet 15 stitches more (16 stitches total). Pull magic circle closed, slip stitch into first stitch.

Round 2 :

Change Colour. Chain 2 (counts as first stitch). Cluster stitch into each stitch (16 total). Slip stitch closed.

Info :

Cluster stitch: Start a Double crochet but only pull through the first loop leaving the second loop on the hook, yarn over and double crochet into same stitch and only pull through the first loops ending up with 3 loops on the hook (for the first cluster, the following clusters will have 4 loops on the hook), pull through all 3 loops and chain 1. 3 stitches per cluster, 16 clusters total.

Round 3 :

Change colour, Chain 2. As before cluster stitches but this time its 4 stitches per cluster and chain 2 between each. Slip stitch closed.

Round 4 :

Change Colour, Chain 2 (counts as first Double). 1. Double crochet 3 times into the same stitch. 2. Half Double crochet 3 times into the next stitch. 3. Double crochet 3 times into the next stitch. 4. Treble crochet 3 times into the next stitch. 5. Chain 1 Treble crochet 3 times into the same stitch as the first set of trebles creating a corner. Repeat 1-5 all around.

Round 5 :

Change Colour, Chain 2 (counts as first Double stitch). Double crochet 3 times into each stitch. Once you get to the corner Double crochet 3 times, chain 1, Double crochet 3 times again into the same corner stitch, continue round.

Info :

You need to make 11 of these squares.

β€” Layout & Joining :

Item Name (P1) :

Start with 8 of the 11 squares and lay them out as shown in the diagram to form the base layout for the bag.

Round 1 :

Its time to start to stitch the squares together. Using Single crochet in the back stitch only of the squares. I find placing the squares back to back helps this.

Info :

I have used a contrasting colour but you can use the same colour if you don't want it to be as visible.

Round 2 :

Fold in half. You now need to stitch the bag along these lines. The bag will start to take on its 3D shape and not sit flat anymore.

Round 3 :

Now you add 2 more squares at the top corners, these will be folded in half.

Round 4 :

The last Square will need a little manipulation again adding to the 3D shape of the final bag, Stitch it to the back of the bag so it can be folded over the front.

Round 5 :

Now all the squares are joined. Single crochet around the whole of the edge of the bag. Once you reach the point of the flap chain 8 and slip stitch back into the same stitch.

Round 6 :

Continue Single crochet around until you reach each corner (marked with yellow stars on the picture). Chain 5 and slip stitch into the same stitch.

Round 7 :

Single crochet around again and add 8 stitches into the chain loop for the button hole and 5 stitches into the chain loops at the sides of the bag.

Round 8 :

Choose your button and pick the best spot to place it on your bag, stitch it on.

β€” Strap :

Round 1 :

Using a size 5mm H hook start by making a row of Single crochet foundation chain. Make this row as long as you like in multiples of 2; sample used 100 stitches. Going down a hook size for the foundation row helps to keep it neat and tidy.

Round 2 :

Going back to the 6mm J hook, chain 1, turn work, Single crochet along the whole row. Chain 4, turn work.

Round 3 :

Skip 1 stitch and Double crochet. This row is a bead stitch row so you are going to essentially be doing a sideways puff stitch onto the Double crochet you have just made.

Info :

Loop over the hook 4 times before pulling the working yarn through and chain 1. Skip 1, Double crochet, Bead stitch, Skip 1... continue. On the last stitch leave it as a Double.

Round 4 :

Chain 1, turn work. Single crochet into each stitch along, one on top of each bead and one between as shown. Single crochet twice into the last stitch space, chain 1 and turn work.

Round 5 :

Single crochet along every stitch, chain 1 and turn work, repeat for a third time. Cut and weave in your ends.

Round 6 :

Take a needle and length of yarn and simply sew your bag clips to the ends of your strap.

Round 7 :

Clip it to your bag and wear with pride!

Assembly Instructions

  • Lay out the 11 squares in the pictured arrangement, beginning with 8 squares for the base layout and placing the remaining squares as directed for the flap and top corners.
  • Join squares using single crochet through the back loops only, placing the squares back-to-back to align stitches and create a neat seam.
  • Fold the joined set in half and stitch along the indicated lines to form the 3D curved shape of the bag; manipulate the final square so it can fold over the front as a flap.
  • Single crochet around the entire bag edge, creating chain loops for the flap (chain 8, slip stitch) and buttonhole (8 stitches in loop), and add 5-stitch loops at the sides for strap attachment.
  • Sew a button to the front flap in the chosen position and test the buttonhole fit before finishing.
  • Sew swivel bag clips to the strap ends using a yarn needle and strong yarn, then clip the strap to the bag hardware loops.

Important Notes

  • πŸ’‘This bag is made from 5-row squares; you can use 1-5 colours to create different looks β€” the sample used 4 colours with cream twice.
  • πŸ’‘Place stitch markers at the start of rounds and when creating chain loops for the flap and strap placement so you can easily find them when joining.
  • πŸ’‘When joining squares, work single crochet into the back loop only to create a defined seam and neater edge for shaping the bag.
  • πŸ’‘Block or lightly steam squares before joining if you want perfectly even edges; this helps matching corners when seaming.

This delightful Molly Boho Bag pattern celebrates colour, texture and the joy of small motifs joined to make something big and beautiful. Use leftovers or select a fresh palette to make a bag that reflects your style. Follow the clear step-by-step instructions to build, shape and finish the bag with hardware and a comfy strap. πŸ§Άβœ¨πŸ‘œ

You ask,

we answer.

FAQs

What size will the finished bag be?

The finished bag size will vary with yarn and tension, but using DK yarn and the recommended hooks produces a medium slouchy shoulder bag approximately similar to the photographed sample.

How many squares do I need to make?

You need to make 11 squares in total: 8 for the central layout and 3 additional squares (two top corner squares folded in half and the manipulated flap square).

Can I change the yarn weight or hook size?

Yes, you can use a different yarn weight, but this will change the finished bag size; adjust hook sizes accordingly and make a gauge square to estimate final dimensions.

Is this pattern suitable for beginners?

This pattern is rated intermediate β€” you should be comfortable with basic stitches (DC, SC, HDC, TR) and confident with colour changes and joining motifs.

How do I attach the strap hardware?

Sew the bag clips to the ends of your strap using a tapestry needle and strong yarn, securing the clip through the strap end and back through multiple times.