🧢 Beautiful ✨ Detailed πŸ’ Adorable

Magic Potion Amigurumi Pattern

Magic Potion Amigurumi Pattern
4.6β˜… Rating
2-3 Hours Time Needed
2.4K Made This
βœ‚οΈ

Beginner Friendly Level

Perfect for those just starting their crochet journey, with clear instructions and simple techniques

⏱️

Bite-Sized Project

Finishes in 2-4 hoursβ€”perfect for an afternoon of creative relaxation.

πŸ§ͺ

Whimsical Buddy

Playful characters full of personality, designed to spark imagination and become cherished playtime favorites.

About This Magic Potion Amigurumi Pattern

This pattern creates a sweet crochet magic potion bottle with a snug cork stopper and decorative tendrils. It uses medium/worsted yarn and a 3.5mm hook for a sturdy, neat finish. The instructions are written row-by-row with stitch counts at the end of each row for easy tracking. Ideal for a handmade gift, shelf decor, or a fun craft project.

Magic Potion Amigurumi Pattern crochet pattern - detailed view of completed project

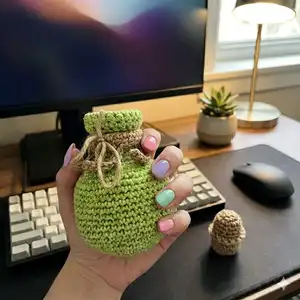
You will crochet the bottle body, a cork stopper, and a small decorative tie piece to wrap around the neck. The pattern includes front and back loop instructions and simple finishing notes to get a tidy top edge. Clear photos in the original pattern help demonstrate key steps.

Why You'll Love This Magic Potion Amigurumi Pattern

I absolutely love this pattern because it combines simple shaping with a lot of charm in a very small project. The little bottle and cork fit together perfectly and the decorative tendrils add personality without complicated stitchwork. I enjoy how quickly it comes together, so you get a satisfying finished piece in just a couple of hours. It is also a great way to practice working in the front and back loops and simple increases and decreases while making something adorable.

Magic Potion Amigurumi Pattern step 1 - construction progress Magic Potion Amigurumi Pattern step 2 - assembly progress Magic Potion Amigurumi Pattern step 3 - details and accessories Magic Potion Amigurumi Pattern step 4 - final assembly and finishing

Switch Things Up

I love customizing the colors of the bottle and cork; try jewel tones for a mystical look or pastels for a fairy-tale vibe.

I like to change yarn weight and hook size to make larger or smaller bottles; bulky yarn gives a chunky statement piece while sport weight makes tiny bottles for charms.

I often swap the decorative tendrils for ribbon or thin twine to create a different neck finish and texture contrast.

I experiment with embroidery on the bottle body to add labels, stars, or sigils that tell a story about the potion inside.

I sometimes add tiny beads to the tendrils or around the neck for sparkle and extra interest when used as gift toppers.

I recommend trying different stuffing levels in the cork to find the perfect snugness for your bottle β€” less stuffing for looser fit, more for a tight seal.

I also enjoy making matching sets in graduated sizes to display on a shelf as a themed collection or for seasonal decorations.

I will occasionally insert a small loop at the top so the bottle can hang as an ornament or keychain β€” perfect for gifting!

I like to make a version with a contrasting brim on the cork by switching colors for the BLO rounds to highlight the stopper edge.

I sometimes replace the cork with a tiny wooden bead or cap for a different aesthetic and easier removal if preferred.

For a luxe option I add metallic thread accents around the neck or tiny stitched labels to personalize each bottle for gifts.

Common Mistakes & How to Fix Them

βœ— Skipping stitch counts when increasing or decreasing can lead to uneven shaping; count your stitches at the end of each row to maintain the correct stitch total. βœ— Forgetting to stuff the cork as you go can cause it to be too loose or too tight in the bottle; stuff gradually and test the fit inside the bottle opening regularly. βœ— Not working in the specified loops (BLO or FLO) will change the appearance of the neck edge; follow the instruction to work in BLO or FLO exactly where indicated. βœ— Pulling yarn too tight when closing the cork can create a lumpy bottom; weave through the front loops gently and pull evenly to flatten the bottom of the stopper. βœ— Failing to leave a long tail for finishing can make assembly difficult; always leave the long tail when fasten off so you can weave and pull to shape and secure pieces.

Magic Potion Amigurumi Pattern

Make a charming Magic Potion bottle and matching cork with this friendly crochet pattern. You will enjoy the simple shaping, decorative tendrils, and a snug cork stopper that fits perfectly. The pattern is written row-by-row with clear stitch counts so you can follow along easily. Perfect for gifts, decor, or a bit of whimsical crafting.

Beginner Friendly 2-3 Hours

Materials Needed for Magic Potion Amigurumi Pattern

β€” Main Fabric

  • 01
    Sheepjes Stonewash XL (or any medium/worsted yarn) - main bottle color (Canada Jade used in sample)
  • 02
    Canada Jade - bottle color (medium/worsted yarn)
  • 03
    Boulder Opal - cork and decoration color (medium/worsted yarn)

β€” Tools Required

  • 01
    Crochet hook size 3.5mm
  • 02
    Yarn scissors
  • 03
    Polyfill stuffing (for cork)
  • 04
    Tapestry needle for weaving and assembly
  • 05
    Stitch markers
  • 06
    Optional: small pins for positioning decoration

Progress Tracker

0% Complete

β€” Bottle :

Row 1 :

6 sc in a magic circle

Row 2 :

Inc in all 6 st (12)

Row 3 :

(inc in next st, sc in next st) repeat 6 times (18)

Row 4 :

(inc in the next st, sc in the next 2 st) repeat 6 times (24)

Row 5 :

(sc in the next 2 st, inc in the next st, sc in the next st) repeat 6 times (30)

Row 6 :

(inc in the next st, sc in the next 4 st) repeat 6 times (36)

Row 7 :

(sc in the next 3 st, inc in the next st, sc in the next 2 st) repeat 6 times (42)

Row 8 :

(inc in the next st, sc in the next 6 st) repeat 6 times (48)

Rows 9-19 :

sc in all 48 st (48)

Row 20 :

(dec in the next st, sc in the next 6 st) repeat 6 times (42)

Row 21 :

(sc in the next 3 st, dec in the next st, sc in the next 2 st) repeat 6 times (36)

Row 22 :

(dec in the next st, sc in the next 4 st) repeat 6 times (30)

Row 23 :

(sc in the next st, dec in the next st, sc in the next 2 st) repeat 6 times (24)

Row 24 :

(sc in the next 6 st, dec in the next st) repeat 3 times(21)

Rows 25-30 :

sc in all 21 st (21)

Row 31 :

sc in the FLO of all 21 st (21) Ex A&B

Rows 32-34 :

sc in all 21 st (21)

Info :

*fasten off and weave in end, roll down top of bottle*

β€” Cork :

Row 1 :

6 sc in a magic circle (6)

Row 2 :

Inc in all 6 st (12)

Rows 3-4 :

sc in all 12 st (12)

Row 5 :

(sc in the next 4 st, inc in the next st). repeat 2 times. Sc in the last 2 st (14)

Row 6 :

sc in all 14 st (14)

Row 7-8 :

sc in the BLO in all 14 st (14) Ex A

Row 9 :

sc in all 14 st (14) *stuff, as you go along you can try the cork in the bottle and stuff more or less for a good fit*

Row 10-11 :

repeat rows 7 and 8 (14) Ex B

Row 12 :

dec in all 14 st (7)

Infos :

*fasten off leaving long tail and using a tapestry needle weave in and out through each front loop and pull to close Ex C&D. Pull the tail up through the center of the bottom through the top and pull to get the flat appearance at the bottom of stopper Ex E&F. Fasten off at top to hold shape and hide inside.*

β€” Decoration :

Info :

In Boulder Opal. *Leave a long starting tail if you want to use it to tie into a bow*

Row 1 :

ch 26 starting in the second chain from the hook HDC in all 25 st, ch1 and turn (25) Ex A

Row 2 :

we're going to do the following pattern to create the hanging tendrils: sl st in the first st and in the same st ch 10-sl st back along in all 9 st and sl st into the next 4 st repeat until end, 5 times. Ex B&C

Info :

*pull yarn through last sl st and using a needle thread it through to match the other side and either sew ends together around bottle neck or tie them in a bow Ex D*

Assembly Instructions

  • Insert the cork into the bottle opening to check fit while stuffing the cork; stuff more or less until the cork fits snugly but can still be removed.
  • Weave the long tail from the cork through the front loops and pull to close the bottom, then pull the tail up through the center to create a flat bottom; fasten off and hide the tail inside.
  • Wrap the Decoration piece around the bottle neck and either sew the ends together or tie them in a bow using the starting tail, positioning the tendrils evenly around the neck.
  • Roll down the top of the bottle after finishing Row 32-34 to create the neat neck edge and weave in ends securely to hide tails.
  • Pin decoration tendrils into place if needed, then sew or secure them with the tapestry needle so the bow and loops sit neatly on the bottle neck.

Important Notes

  • πŸ’‘Use stitch markers to keep track of round starts and changes, especially when working increases and decreases.
  • πŸ’‘Stuff the cork gradually and test the fit inside the bottle opening as you go to get a snug, removable stopper.
  • πŸ’‘Work in the BLO or FLO exactly where indicated for the correct appearance on the neck and cork brim.
  • πŸ’‘Weave in ends neatly and leave long tails where instructed to allow closing and shaping with a tapestry needle.
  • πŸ’‘Roll down the top edge of the bottle after finishing to achieve the tidy neck finish shown in the photos.

This little Magic Potion bottle pattern is a tiny joy to crochet and makes a perfect whimsical gift or shelf accent. The snug cork and looping tendrils give it character and charm, and it finishes quickly for instant satisfaction. Crochet one as a cute handmade present or collect a set in different colors! 🧢✨

You ask,

we answer.

FAQs

What size will the finished piece be?

The finished bottle measures approximately 6 inches tall and 4 inches wide when using the recommended medium/worsted yarn and a 3.5mm hook.

Can I use different yarn weights for this pattern?

Yes, you can use different yarn weights, but this will change the final size; use an appropriate hook for your chosen yarn and expect to adjust stuffing and fit.

Do I need prior crochet experience for this pattern?

This pattern is beginner friendly but assumes familiarity with single crochet, increases, decreases, working in BLO/FLO, and basic finishing techniques.

How long does this project typically take to complete?

Most crocheters complete this project in 2-3 hours, though time will vary depending on experience and how much finishing and decoration you add.

How do I make the cork sit flat at the bottom?

After finishing the cork rounds, fasten off leaving a long tail and weave through the front loops, pull to close and then pull the tail up through the center to flatten the bottom.