About This Mini Sunflower Turtle Amigurumi Pattern
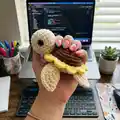
This pattern creates a tiny sunflower-shelled turtle using bulky, velvety yarn for a plush, tactile finish. Youll work small amigurumi pieces — legs, tail, head, and a textured sunflower shell — and assemble them into a cuddly toy. The pattern uses US terms and includes step-by-step rounds and helpful photos for placement.

Perfect for intermediate crocheters who want a quick weekend project with cute results. The sunflower petal round adds charming detail and personality to this mini turtle.
Why You'll Love This Mini Sunflower Turtle Amigurumi Pattern
I absolutely love this pattern because the sunflower shell detail brings so much personality to a classic amigurumi turtle. I enjoyed combining two yarn textures to make the shell and petals stand out while keeping the body soft and cuddly. The shaping is clever but not overwhelming, so I can create a polished little toy in a few focused sessions. I also love that the legs and tail are crocheted and then attached directly, which makes assembly neat and secure. This pattern always makes me smile when the petals pop into place during the color change.
Switch Things Up
I love changing colors to create different moods — try pastel petals for a softer look or bright neons for a playful twist.
I often change yarn weight and hook size to make larger or smaller versions; using a bulky yarn gives a plush, huggable turtle while thinner yarn makes a tiny keychain-friendly version.
I like to swap the safety eyes for embroidered eyes or buttons for a more handmade, washable toy option.
I sometimes embroider a smiling mouth or freckles to give each turtle unique expressions and personality.
For a different texture, I use loop or boucle yarn for the body so the shell looks even more distinct against a fuzzy body.
I add wire to the legs for posability if I want a display piece that can hold a pose on a shelf.
To make a set, I change petal counts and colors so each turtle has a slightly different sunflower — it looks great as a grouped display.
I like to add tiny accessories like a crocheted bow or a miniature scarf to personalize gifts and match seasons.
Sometimes I use metallic or glitter yarn for a subtle sparkle in the petals for a special-occasion version.
I recommend experimenting with eye placement and spacing — moving the eyes slightly can change the face from shy to cheeky, and I try variations before committing to sewing.
Common Mistakes & How to Fix Them
✗ Not using stitch markers with fluffy or chunky yarn can make rounds hard to track; use stitch markers in key rounds to mark the start and any special loop rows for easy counting.
✗ Forgetting to stuff gradually results in lumps or a flat shape; stuff the head and body in small amounts while shaping to achieve smooth, even firmness.
✗ Skipping placement photos or not pinning parts can cause misaligned features; pin pieces in place and check symmetry before sewing to maintain proper positioning.
✗ Not leaving a long tail for the head makes sewing difficult and insecure; leave a long yarn tail (about a foot) when finishing the head so you can sew it securely in place.