🧢 Beautiful ✨ Detailed πŸ’ Adorable

Flower Coasters Pattern

Flower Coasters Pattern
3.9β˜… Rating
1-2 Hours Time Needed
2.4K Made This
βœ‚οΈ

Beginner Friendly Level

Perfect for those just starting their crochet journey, with clear instructions and simple techniques

⏱️

Quick Make

Complete in under 2 hoursβ€”lightning fast fun for instant gratification and quick gifts.

β˜•

Warm Welcome

A comforting piece for home or gifts that brings handmade warmth to everyday moments and special occasions.

About This Flower Coasters Pattern

This pattern creates a pretty flower-shaped coaster approximately 12cm in diameter using two strands of DK yarn held together. It features a small centre, a round of fan stitches and a petal round to create a floral edge. The design is simple, stash-friendly and ideal for making colourful sets for your home or as thoughtful handmade gifts.

Flower Coasters Pattern crochet pattern - detailed view of completed project

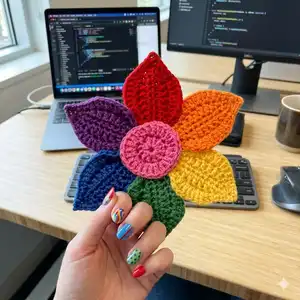
You will work in joined rounds starting from a magic circle and finish with either a slip stitch join or an invisible join. The pattern is written in UK crochet terms and includes full stitch counts for every round.

Why You'll Love This Flower Coasters Pattern

I absolutely love this pattern because it turns leftover yarn into something both useful and beautiful. I enjoy how quickly each coaster comes together β€” you can make several in an evening and mix and match colours for a joyful set. The technique of holding two strands together gives a lovely texture and lets you experiment with colour blends easily. I also love that these coasters are practical, washable, and make thoughtful handmade gifts that brighten someones day.

Flower Coasters Pattern step 1 - construction progress Flower Coasters Pattern step 2 - assembly progress Flower Coasters Pattern step 3 - details and accessories Flower Coasters Pattern step 4 - final assembly and finishing

Switch Things Up

I love experimenting with colour pairings when I make these coasters; try holding a neutral strand with a bright colour for a subtler look or two bold shades together for a vibrant result.

If you want larger coasters, I sometimes use a thicker yarn and a bigger hook to create a chunkier, more robust coaster.

For a mini set or keychain version, use a thinner yarn and a smaller hook to scale the pattern down while keeping the same rounds.

I often add a simple single crochet border in a contrasting colour to give the coaster a neat finished edge and a pop of contrast.

You can embroider a small motif or initial into the centre before finishing to personalise a set for gifting.

Try different stitch substitutions like using double crochet where trebles are written if you prefer different texture, but check your stitch counts carefully.

Experiment with variegated or speckled yarn held with a solid strand to create a tweedy or stained-glass effect as suggested in the pattern notes.

I sometimes block the coasters gently to flatten and shape the petals; a light steam or careful pinning while damp can help keep petals even.

Combine coasters into themed sets by choosing seasonal colours (pastels for spring, warm tones for autumn) to make lovely coordinated gifts.

Dont be afraid to try textured yarns or metallic accents for special occasion coasters; just make sure the fibres are suitable for spot cleaning as recommended.

Common Mistakes & How to Fix Them

βœ— Starting the wrong stitch after the ch 2 can change your stitch height and distort the round; always remember the ch 2 counts as the first treble and work into the correct stitch position. βœ— Failing to close the magic circle tightly leaves a loose centre hole; pull the magic circle closed securely before joining and weaving in the tail. βœ— Not counting stitches after each round can lead to an incorrect stitch count for future rounds; count stitches at the end of every round to ensure accuracy. βœ— Turning the work when told not to on the petal round will flip your petals the wrong way; pay attention to 'Turn work' or 'Do not turn work' instructions for correct shaping.

Flower Coasters Pattern

Make bright, cheerful flower-shaped coasters that are perfect for using up scrap yarn and adding a pop of colour to your home. This pattern uses two strands of DK yarn held together for a textured, sturdy coaster that works up quickly. Clear round-by-round instructions and simple finishing make this a lovely quick project for makers of all skill levels. Great for gifting or creating colourful sets to match any decor.

Beginner Friendly 1-2 Hours

Materials Needed for Flower Coasters Pattern

β€” Main Fabric

  • 01
    DK weight yarn (#3 light) - use two strands held together for each coaster
  • 02
    Approximately 7g of each of two colours per coaster (approx. 7g/21m of each colour when using Stylecraft Special DK 100g/295m as reference)
  • 03
    Suggested: mix a bold colour with a white, grey, cream or black strand for tweedy or stained-glass effects
  • 04
    Use scrap DK yarns to make multiple colourful coasters

β€” Tools Required

  • 01
    5mm Crochet Hook
  • 02
    Scissors
  • 03
    Darning (tapestry) needle for weaving in ends
  • 04
    Optional: stitch marker (to mark round starts)

Progress Tracker

0% Complete

β€” Pattern :

Infos :

You will need: 5mm Crochet Hook. Approximately 7g each of any 2 colours of DK weight yarn per coaster. (I used Stylecraft Special Dk 100g/295m so needed approx. 7g/21m of each colour). Scissors & Darning needle.

Infos :

Notes on Pattern: This pattern is written in UK Crochet Terms and is for 1 Flower Coaster/12cm diameter. A magic circle is used to begin. (Please feel free to use ch 4, slst in 1st ch to form a ring instead). A ch 2 is used as a starting stitch at the beginning of rounds and is counted as 1 st throughout. Chain stitches are included in stitch counts. Stitches within brackets should be worked into the same st or sp together.

Infos :

Stitch abbreviations: Ch/s = chain/s htr = half treble tr = treble slst/s = slip stitch/es sp/s = space/s st/s = stitch/es (2 tr, ch 1, 2 tr) = fan stitch

Info :

Using 2 strands of yarn together, form a magic circle to begin. Work all Round 1 sts into magic circle.

Round 1 :

ch 2 (counts as 1 tr), 8 tr into magic circle. Join with slst into top of ch 2. Close magic circle. Turn work. (9 sts in magic circle)

Round 2 :

ch 2, tr into sp between 1st and last st of round below, ch 1, *2 tr into space between next 2 sts below, ch 1.* Repeat from * to * 7 more times. Join with slst into top of ch 2. Turn work. (27 sts)

Round 3 :

ch 2, tr into ch 1 sp, ch 1, 2 more tr into same ch 1 sp. Skip 2 sts. *fan stitch (2 tr, ch 1, 2 tr) into next ch 1 sp.* Repeat from * to * 7 more times. Join with slst into top of ch 2. Do not turn work. (45 sts)

Round 4 :

(Petal round) Slst into next tr st and ch 1 sp. Ch 2 (counts as 1 htr), (4 tr, htr) into same ch 1 sp. Skip 2 sts. Slst into sp between fan sts. (1st Petal complete). *(htr, 4 tr, htr) into next ch 1 sp. Skip 2 sts. Slst into space between fan sts.* Repeat from * to * 7 more times. (63 sts)

Info :

To finish your last round, join with either a slst into the top of your 1st st, or create an Invisible Join. Snip of yarn tail and pull through top of last st, thread a darning needle and insert front to back through top of 2nd st in round, then back down through top of last st. Weave in behind work.

Info :

AFTER CARE: Hand wash or wipe clean only.

Assembly Instructions

  • Join final round with either a slip stitch into the top of your first stitch or create an Invisible Join as described: pull yarn tail through top of last stitch and thread a darning needle to finish.
  • After joining, insert the needle front to back through the top of the second stitch in the round then back down through the top of the last stitch, and weave in behind the work to secure the join.
  • Close the magic circle tightly at the start so there is no visible hole in the centre before joining the first round.
  • Weave in all yarn tails neatly behind the work so they are not visible on the coaster surface and trim excess yarn.
  • Care: Hand wash or wipe clean only to maintain coaster shape and colour.

Important Notes

  • πŸ’‘This pattern is written in UK crochet terms; please convert to your preferred terminology if needed.
  • πŸ’‘A magic circle is used to begin but you may substitute ch 4 and slst to form a ring if preferred.
  • πŸ’‘A ch 2 at the beginning of rounds counts as the first treble; include chain stitches in stitch counts.
  • πŸ’‘Stitches within brackets should be worked into the same stitch or space together for correct shaping.

These cheerful Flower Coasters are a perfect little project to brighten your home and use up your DK yarn scraps. Make a whole rainbow of coasters to mix and match at gatherings, or gift a pretty set to someone special. They are quick, colourful and practicalβ€”handmade with love to brighten everyday moments. 🧢🌼

You ask,

we answer.

FAQs

What size will the finished piece be?

The finished coaster measures approximately 12 cm in diameter when made with two strands of DK yarn and a 5mm hook.

Can I use different yarn weights for this pattern?

Yes, but changing yarn weight will affect the final size; use an appropriate hook and expect a larger or smaller coaster when using heavier or lighter yarn.

Do I need prior crochet experience for this pattern?

This pattern is beginner friendly and uses basic stitches, but familiarity with the magic circle and UK treble/half treble stitches is helpful.

How long does this project typically take to complete?

Most crocheters complete a single coaster in under 2 hours, depending on experience and yarn handling.

How do I finish the centre neatly?

Pull the magic circle closed tightly, join with a slip stitch or make an Invisible Join, then weave in the tail through the top of the second stitch and back through the last stitch as instructed.