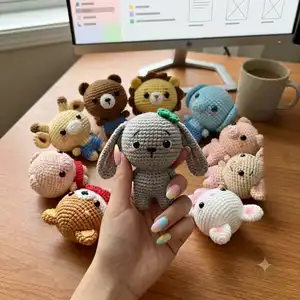
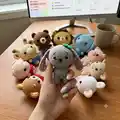
Make a delightful set of tiny amigurumi animals with this step-by-step crochet pattern. You will create rabbits, an elephant, a bear, a giraffe, dogs, a panda and more — each with clear round-by-round instructions. Perfect for gifting, keychains, or a playful handmade collection, the pattern focuses on compact shapes and simple assembly. Follow the rounds exactly and enjoy stitching these charming characters.
Progress Tracker
0% Complete
— Rabbit (white) :
Round 17 :
(3X, A, 3X) * 6
Round 19 :
(2X, A, 2X) * 6
Info :
Slst and fasten off. Leave long tail for sewing to body.
Info :
Just follow the pattern and finish the head. You may refer photo 1.
— Legs (white) :
Round 4 :
Join both two legs: 18X
Info :
You may refer photo 2: How to join legs + body.
— Body (white) :
Round 5-9 :
Magic Ring 18X
Info :
Slst and fasten off.
— Hand (white) :
Info :
Slst and fasten off.
Info :
You may refer photo 3: For tips on hands.
— Ears (white) :
Info :
Sew the ears between R3-5 on the head.
Info :
Place safety eyes between R12 and R13. The distance between both safety eyes is 6 stitches.
— Dress (pink) :
Round 1 :
22CH, slip stitch heads with tail into a circle. Do 22F in circle.
Round 2 :
4X, 5CH, skip 3 stitches, 8X, 5CH, skip 3 stitches, 4X5CH to make 2 shoulder straps.
Info :
You may refer Photo 4: The dress and Photo: 5 How to dress straps.
— Rabbit (grey) :
Round 17 :
(3X, A, 3X) * 6
Round 19 :
(2X, A, 2X) * 6
Info :
Slst and fasten off. Leave long tail for sewing to body.
Info :
Just follow the pattern and finish the head. You may refer photo 1.
— Legs (grey) :
Round 4 :
Join both two legs: 18X
Info :
You may refer photo 2: How to join legs + body.
— Body (grey) :
Round 5-9 :
Magic Ring 18X
Info :
Slst and fasten off.
— Hand (grey) :
Info :
Slst and fasten off.
— Ears (grey) :
Round 1 :
16CH, 6X, 8T, Into 1 stitch: 5T, 8T, 6X, 1CH, Turn over
Round 2 :
6X, 8T, 5TV, 8T, 6X
Info :
Sew the ears on R8.
Info :
Sew the eyebrow above the eyes.
Info :
Place safety eyes between R12 and R13. The space between two holes that you put safety eyes is 7 stitches.
— Leaf (green) :
Round 1 :
10CH, reverse 1 stitch: 2T, X, SL, X, 2T, W, 2T, X, SL, X, 2T, V
— Dress 2 (pink) :
Round 1 :
22CH, 22F in circle
Round 2 :
4X, 5CH, skip 3 stitches, 8X, 5CH, skip 3 stitches, 4X5CH to make 2 shoulder straps.
Info :
You may refer Photo 4: The dress and Photo: 5 How to dress straps.
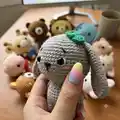
— Elephant (blue) :
Round 17 :
(3X, A, 3X) * 6
Round 19 :
(2X, A, 2X) * 6
Info :
Slst and fasten off. Leave long tail for sewing to body.
Info :
Just follow the pattern and finish the head. You may refer photo 1.
— Legs (blue) :
Round 4 :
Join both two legs: 18X
Info :
You may refer photo 2: How to join legs + body.
— Body (blue) :
Round 5-9 :
Magic Ring 18X
Info :
Slst and fasten off.
— Hand (blue) :
Info :
Slst and fasten off.
Info :
You may refer photo 3: For tips on hands.
— Ears (blue) :
Info :
Note: You have to Chain3, turn over every end of the working piece. (Chain 3= also count as 1 Double Crochet in next R)
Info :
Sew the ears on R6-18.
Info :
Place safety eyes between R12 and R13. The space between two holes that you put safety eyes is 6 stitches.
— Nose :
— Pants (dark blue) :
Round 1 :
11CH, 11X in circle
Info :
R1 & R2 make 2, then join both pieces into 1: 22X
Round 5 :
4X, 5CH, skip 3 stitches, 8X, 5CH, skip 3 stitches, 4X5CH to make 2 shoulder straps.
Info :
You may refer photo 6: The pants and Photo 7: How to strap the pants.
— Bear (brown) :
Round 17 :
(3X, A, 3X) * 6
Round 19 :
(2X, A, 2X) * 6
Info :
Slst and fasten off. Leave long tail for sewing to body.
— Legs (brown) :
Round 4 :
Join both two legs: 18X
Info :
You may refer photo 2: How to join legs + body.
— Body (brown) :
Round 5-9 :
Magic Ring 18X
Info :
Slst and fasten off.
— Hand (brown) :
Info :
Slst and fasten off.
Info :
You may refer photo 3: For tips on hands.
— Ears (brown) :
Info :
Sew the ears on R4-7.
Info :
Place safety eyes between R12 and R13. The space between two holes that you put safety eyes is 6 stitches.
— Mouth (white) :
Info :
Leave long yarn sew to head. Use black yarn sew out the nose.
— Pants (dark blue) :
Round 1 :
11CH, 11X in circle
Info :
R1 & R2 make 2, then join both pieces into 1: 22X
Round 5 :
4X, 5CH, skip 3 stitches, 8X, 5CH, skip 3 stitches, 4X5CH to make 2 shoulder straps.
Info :
You may refer photo 6: The pants and Photo 7: How to strap the pants.
— Giraffe (light brown) :
Round 17 :
(3X, A, 3X) * 6
Round 19 :
(2X, A, 2X) * 6
Info :
Slst and fasten off. Leave long tail for sewing to body.
— Head (light brown) continued :
Info :
Just follow the pattern and finish the head. You may refer photo 1.
— Legs (light brown) :
Round 4 :
Join both two legs: 18X
Info :
You may refer photo 2: How to join legs + body.
— Ears (light brown) :
Info :
Sew the ears on R6-8.
Info :
Place safety eyes between R10 and R11. The space between two holes that you put safety eyes is 6 stitches.
Round (Horn) :
Begin with dark brown. R1-3: Magic Ring 8X. R4-7: Change to yellow, 8X. Sew the horns on R3-5.
— Mouth (light brown) :
Round 1 :
4CH, working on 2nd stitch: 2X, W, X, V (Slip stitch, Chain 1)
Info :
Sew it on R12-16 to head.
— Pants (dark blue) :
Round 1 :
11CH, 11X in circle
Info :
R1 & R2 make 2, then join both pieces into 1: 22X
Round 5 :
4X, 5CH, skip 3 stitches, 8X, 5CH, skip 3 stitches, 4X5CH to make 2 shoulder straps.
Info :
You may refer photo 6: The pants and Photo 7: How to strap the pants.
— Dog (light grey) :
Round 9 :
16X, 6X (white), 3X, 6X (white), 17X
Round 10 :
15X, 7X (white), 3X, 7X (white), 16X
Round 11 :
14X, 8X (white), 3X, 8X (white), 15X
Round 12 :
13X, 21X (white), 14X
Round 13-16 :
12X, 23X (white), 13X
Round 17 :
3X, A, 6X, [white: A, 6X, A, 6X, A, 5X], X, A, 6X, A, 3X
Round 18 :
5X, A, 4X, [white: X, A, 5X, A, 5X, A, X], 4X, A, 5X, A
Round 19 :
2X, A, 4X, A, [white: 4X, A, 4X, A, 2X], 2X, A, 4X, A, 2X
Round 20 :
3X, A, 3X, A, [white: 3X, A, 3X, A], 3X, A, 3X, A
Round 21 :
X, A, 2X, A, 2X, [white: A, 2X, A], 2X, A, 2X, A, X
Info :
Slst and fasten off. Leave long tail for sewing to body.
Info :
Just follow the pattern and finish the head. You may refer photo 1.
— Body & Legs (light grey) :
Info :
R1-R3 Make 2, fasten off 1 leg.
Round 4-8 :
Join both legs into 1: 18X
Info :
You may refer photo 2: How to join legs + body.
— Hand (light grey) :
Info :
Slst and fasten off.
Info :
You may refer photo 3: For tips on hands.
— Ears (light grey) :
Round 2 :
2V, white: V, 2X
Round 3 :
4X, white: 2V, 4X
Round 4 :
3X, V, [white: 4X], V, 3X
Round 5 :
X, V, X, V, X, [white: V, 2X, V], X, V, X, V, X
Round 6 :
7X, white: 6X, 7X
Info :
Place safety eyes between R12 and R13. The space between two holes that you put safety eyes is 8 stitches.
— Mouth (white) :
Round 1 :
6CH, reverse 4 stitches: W, 3X, V
Round 2 :
V, 3X, W, 3X, 2V
— Pants (light blue) :
Round 1 :
11CH, 11X in circle
Info :
R1 & R2 make 2, then join both pieces into 1: 22X
Round 5 :
4X, 5CH, skip 3 stitches, 8X, 5CH, skip 3 stitches, 4X5CH to make 2 shoulder straps.
Info :
You may refer Photo 8 : Dress 2 and Photo 9: how to Dress 2 straps.
— Dog (light brown) :
Round 1 :
NOTE: R1-11: light brown, R12-21: white. R1: Magic Ring 6X
Round 17 :
(3X, A, 3X) * 6
Round 19 :
(2X, A, 2X) * 6
Info :
Slst and fasten off. Hide the yarn.
— Legs (light brown) :
Round 4 :
Join both two legs: 18X
Info :
You may refer photo 2: How to join legs + body.
— Body (light brown) :
Round 5-9 :
Magic Ring 18X
Info :
Slst and fasten off.
— Hand (light brown) :
Round 1 :
6X in Magic circle
Info :
Slst and fasten off.
Info :
You may refer photo 3: For tips on hands.
— Ears (light brown) :
Info :
Sew the ears on R6-8.
Info :
Place safety eyes between R10 and R11. The space between two holes that you put safety eyes is 6 stitches.
— Horn * 2 :
Round 4-7 :
Change to yellow, 8X
Info :
Sew the horns on R3-5
— Mouth (white) :
Round 1 :
4CH, working on 2nd stitch: 2X, W, X, V
— Dress 2 (pink) :
Round 1 :
22CH, 22X in circle
Round 2 :
3X, 4V, 7X, 4V, 4X
Info :
5CH to make 2 shoulder straps.
Info :
You may refer Photo 8 : Dress 2 and Photo 9: how to Dress 2 straps.
— Panda (white) :
Round 17 :
(3X, A, 3X) * 6
Round 19 :
(2X, A, 2X) * 6
Info :
Slst and fasten off. Leave long tail for sewing to body.
This charming mini amigurumi collection brings a set of tiny animal friends to life with simple rounds and sweet details. Each character is designed to be quick to crochet and easy to assemble, perfect for gifts or a playful display. Make a whole family of pocket-sized pals and share handmade joy with friends and family. 🧶✨