About This Kirby Hello Kitty Amigurumi Pattern
This pattern creates a tiny Kirby-meets-Hello-Kitty amigurumi approximately 2 inches (5 cm) tall using DK yarn and a 3 mm hook. The plush is crocheted in continuous rounds and finished with simple embroidery for the face. It includes separate instructions for ears, arms, legs, and a tiny bow so you can assemble a complete character.
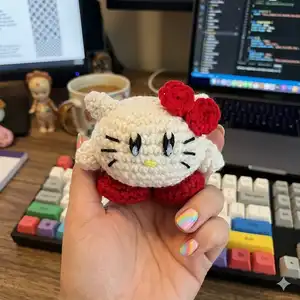
Perfect for quick makes and gifts, the pattern uses basic stitches and clear step-by-step photos. Materials are minimal and substitutions are easy to make based on what you have.
Why You'll Love This Kirby Hello Kitty Amigurumi Pattern
I absolutely love this pattern because it brings two cute icons together in a tiny, squeezable form that is quick to make. I enjoy how the simple rounds and small pieces produce a very expressive face with just a few embroidery stitches. The pattern is forgiving and perfect for practising consistent tension and finishing skills. I also love that it uses minimal yarn so it's a great way to use up scraps and try new color combinations.
Switch Things Up
I love how easy it is to customize this pattern by changing colors; I often swap the red for pastel pink or use rainbow scraps for a playful look.
I sometimes make this larger by using worsted weight yarn and a 4.5mm hook to create a chunkier, huggable version.
I also enjoy making tiny keychain versions by using finer yarn and a 2.5mm hook, then adding a small keyring to the top.
I add felt details for eyes instead of embroidery when I want a cleaner, non-fuzzy look; glue or sew them on securely.
I experiment with different bow styles — try a felt bow or embroider a small flower instead for seasonal variations.
I sometimes place safety eyes if the toy is for adults only, but for a child-safe option I use embroidery as in the pattern.
I like to adjust facial expressions by moving the eye placement up or down a stitch to change the character's look.
I occasionally add a small wire inside the arms for posability; I wrap it carefully and secure to prevent poking out.
I make matching sets in different colorways to create tiny collectible families or themed gifts for holidays.
I also love combining different yarn textures — a fluffy yarn for the body and smooth DK for details gives a fun contrast.
Common Mistakes & How to Fix Them
✗ Skipping the stitch marker while working continuous rounds causes lost count and irregular shaping; place a marker at the start of each round to keep your rounds accurate.
✗ Forgetting to stuff as you go leads to uneven filling and lumps in the piece; add small amounts of stuffing gradually and shape as you work for smooth results.
✗ Pulling your yarn too tight when closing the final stitches can pucker and distort the piece; keep even tension and pull gradually to close the opening smoothly.
✗ Embroidering the face without marking placement risks misaligned eyes and nose; mark the levels (rounds 6-7) first and try the placement before locking stitches in place.


