🧢 Beautiful ✨ Detailed πŸ’ Adorable

Mash Bag Triangles Pattern

Mash Bag Triangles Pattern
4.7β˜… Rating
2-4 Hours Time Needed
3.3K Made This
βœ‚οΈ

Beginner Friendly Level

Perfect for those just starting their crochet journey, with clear instructions and simple techniques

⏱️

Bite-Sized Project

Finishes in 2-4 hoursβ€”perfect for an afternoon of creative relaxation.

✨

Stylish Touch

An elegant detail to elevate any look, combining traditional techniques with contemporary design sensibilities.

About This Mash Bag Triangles Pattern

This pattern teaches you to crochet a fashionable mash bag made from twisted raffia yarn using triangular motifs. You will learn how to form the round base, build the repeating triangles, assemble the flat base and add sturdy handles. The instructions include steaming and shaping tips so the triangles hold their form for a polished finish.

Mash Bag Triangles Pattern crochet pattern - detailed view of completed project

Clear photo references and a diagram accompany each section, making the process easy to follow. The finished bag measures approximately 12 x 14 inches with 22 inch handles.

Why You'll Love This Mash Bag Triangles Pattern

I absolutely love this pattern because it transforms simple raffia yarn into a chic, reusable market bag with lots of personality. I enjoy how quick each step feels β€” the triangular motif grows fast and looks intricate without complicated stitches. I also love that the bag is practical and environmentally friendly, perfect for shopping or gifting. The shaping and steaming steps let me add a professional finish that I am proud to gift or sell.

Mash Bag Triangles Pattern step 1 - construction progress Mash Bag Triangles Pattern step 2 - assembly progress Mash Bag Triangles Pattern step 3 - details and accessories Mash Bag Triangles Pattern step 4 - final assembly and finishing

Switch Things Up

I love experimenting with colors, so I often swap the natural raffia for dyed raffia or combine two shades to create an ombre triangle effect.

I sometimes change the yarn weight and hook size to make a larger or smaller bag; using a bulkier raffia and larger hook gives a chunkier, more rigid tote.

I add a fabric lining and inner pockets to make the bag more durable and to stop small items from slipping through the triangles β€” I sew the lining by hand or machine and then slip it inside before finishing the trim.

I adjust handle length depending on how I plan to use the bag: shorter handles for a handheld tote or longer handles for a shoulder bag.

I like to add decorative trims such as tassels, fringe, or a crocheted flower to one corner to personalize the bag for gift giving.

Sometimes I combine raffia with a cotton cord worked together for the handles to make them stronger and more comfortable on the shoulder.

I recommend testing a small sample to check gauge and triangle size before committing to the full project when changing yarns or hook sizes.

I also try different finishing techniques like a single-row edging versus a tighter SlSt trim to change the bag's silhouette slightly.

For extra stability I sometimes insert a thin plastic or cardboard base inside the bottom before adding the base trim to help the bag hold shape when carrying heavier items.

Finally, I like to embroider initials or a small motif onto the lining or add a button closure to customize functionality and style.

Common Mistakes & How to Fix Them

βœ— Not unwinding twisted raffia into balls before starting causes tangles and inconsistent tension; unwind the raffia into balls and secure with a rubber band before you begin. βœ— Failing to separate and glue the ends of new raffia balls when joining leads to frayed joins that come apart; cut the ends diagonally, overlap by about 5 mm, glue, wait to dry, then twist the ribbons back together. βœ— Skipping marking or counting triangle repeats will result in uneven edges and mismatched motifs; place markers at the beginning and at specified stitch counts to ensure symmetry. βœ— Not shaping and steaming the triangles makes them floppy and undefined; shape each triangle by hand and steam with an iron on both sides for crisp points and even layout.

Mash Bag Triangles Pattern

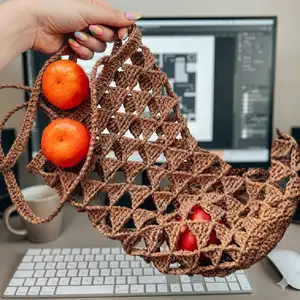
Make a trendy, eco-friendly mash bag using twisted raffia yarn and simple crochet stitches. This pattern guides you step-by-step through the triangle motif, base construction, handles and finishing touches. Perfect for everyday shopping, farmers markets, or as a handmade gift. Follow the clear photos and instructions to create a durable, stylish bag.

Beginner Friendly 2-4 Hours

Materials Needed for Mash Bag Triangles Pattern

β€” Main Fabric

  • 01
    Paper twisted raffia yarn, 100 gr / 220 yards (200 m) per ball (use as main material for the entire bag)

β€” Tools Required

  • 01
    Crochet hook size 3.0 mm (approx. 3 mm hook specified)
  • 02
    Scissors
  • 03
    Stitch markers (for marking handle placement and repeats)
  • 04
    Measuring tape or ruler (for checking loop lengths and finished dimensions)
  • 05
    Glue (for joining new raffia strands when the thread runs out)
  • 06
    Iron for steaming and shaping triangles
  • 07
    Yarn needle for hiding ends and securing joins
  • 08
    Pins (optional, for holding pieces when steaming/ shaping)

Progress Tracker

0% Complete

β€” Materials :

Infos :

Paper twisted raffia yarn, 100 gr/220 yards (200 m). 3 mm hook. Scissors. Gauge: 16 stitches and 4-5 row = 4*4 inches (10*10cm). Finished mash bag from the specified materials: width - 12 inches (30 cm), height - 14 inches (36 cm), length of the handles - 22 inches (55 cm).

β€” Crochet the Bottom :

Info :

Crochet 4 CH.

Info :

Join to the circle with SlSt.

Round 1 :

1 row. Pull up the loop 20 mm long. Twist the hook clockwise to create a loop. Pull up another loop. Crochet the two loops on the hook together, then another two. This is a false DC, which is also the first DC of the row. 14 DC in the hole, SlSt (=15).

Info :

Crochet the end in this row, cut off the excess.

Round 2 :

2 row. Pull up the loop 20 mm long. Make the false DC, DC in the same loop, 14 Inc, SlSt (=30).

Round 3 :

3 row. Pull up the loop 20 mm long. Make the false DC, Inc, (DC, Inc)*14, SlSt (=45).

Round 4 :

4 row. (4 CH, SC from the 2nd loop from the hook, 2 DC, skip 2 loops, SlSt)*15, 4 SlSt on the back loop only of the 1st triangle.

Info :

Shape each triangle with your hands before steaming.

Round 5 :

5 row. (5 CH, SC from the 2nd loop from the hook, 2 DC, TC, SlSt)*15, 5 SlSt on the back loop only of the 1st triangle.

Round 6 :

6 row. (6 CH, SC from the 2nd loop from the hook, 2 DC, TC, DTC, SlSt)*15, 6 SlSt on the back loop only of the 1st triangle.

Round 7 :

7 row. (6 CH, HDC from the 2nd loop from the hook, DC, TC, DTC, DDTC, SlSt)*15, 6 SlSt on the back loop only of the 1st triangle.

Info :

Steam with an iron on the front and wrong sides. Shape the triangles with your hands.

β€” Crochet the Base :

Info :

The diameter of the circle after steaming is about 10 7/8 inches (27-28 cm).

Round 8 :

8 row. (6 CH, HDC from the 2nd loop from the hook, DC, TC, DTC, DDTC, SlSt)*15, 6 SlSt on the back loop only of the 1st triangle.

Rounds 9-14 :

9-14 rows. (6 CH, HDC from the 2nd loop from the hook, DC, TC, DTC, DDTC, SlSt)*15, 6 SlSt on the back loop only of the 1st triangle.

Info :

Steam with an iron 8-14 rows on the front side. Shape the triangles with your hands.

Round 15 :

15 row. (6 CH, SlSt)*15 (=105).

Info :

Measure the end of the thread 3.5 yards (3 m) long for the base trim, cut off.

Round 16 :

16 row. Pull up the loop 20 mm long. Make the false DC, 104 DC, SlSt.

β€” Crochet the Handle (*2) :

Info :

Crochet 82 CH for each handle (make 2 handles).

Round 17 :

Crochet 80 DC from the 3rd loop from the hook.

Info :

Cut the thread, pull out the end. Tie the knot. Hide the ends on the wrong side. Similarly crochet the 2nd handle.

β€” Base Trim :

Info :

Count 15 and 38 loops from the beginning of the row, place the markers.

Step :

Crochet 13 SlSt along the edge to the marker. Crochet 3 SlSt on the 3rd post of the handle.

Step :

Crochet 18 SlSt, stop 2 loops before the next marker. Crochet 3 SlSt on the 3rd post of the other end of the handle.

Step :

Then 29 SlSt to the 3rd marker. Crochet 3 SlSt on the 3rd post of the 2nd handle.

Step :

Crochet 18 SlSt, stop 2 loops before the next marker. Crochet 3 SlSt on the 3rd post of the other end of the 2nd handle.

Step :

Crochet 14 SlSt to the end of the row. Cut the thread, pull out the end. Close the row with the end. Strengthen and hide the ends on wrong side.

Info :

Steam with an iron the last row of the bag and handles.

β€” Finishing :

Info :

Congratulations! Your trendy mash bag is ready. Follow social links for video tutorials and the diagram of rows 1-8 in the appendix.

Assembly Instructions

  • Attach the two handles to the top of the bag by aligning each handle end with the marked positions (count 15 and 38 loops from the start) and secure with 3 SlSt into the 3rd post of the handle, then weave in and hide ends on the wrong side.
  • Place the base trim markers at the counted loops, then crochet the SlSt edging in sequence: 13 SlSt to first marker, 3 SlSt around handle post, 18 SlSt, 3 SlSt on other handle post, 29 SlSt to 3rd marker, 3 SlSt on 2nd handle, finishing with 14 SlSt to the end and fastening off securely.
  • After completing the triangle rows and base construction, shape each triangle with your hands and steam both front and wrong sides with an iron to set the points and flatten the base for even assembly.
  • Reinforce the base trim and handle attachments by tightening and hiding the ends on the wrong side and securing any loose loops with additional SlSt or small whip stitches where needed.
  • Measure and trim ends carefully (the pattern suggests leaving an approx. 3.5 yards / 3 m tail for base trim preparations) and hide or knot ends on the inside/wrong side to ensure a tidy finish.
  • Check alignment of triangles and handles before final steaming; pin or adjust with stitch markers as needed to ensure symmetrical placement, then apply final steam to lock the shape.

Important Notes

  • πŸ’‘Unwind twisted raffia into balls before starting to prevent tangles and keep consistent tension while crocheting.
  • πŸ’‘When joining a new ball of raffia, separate fibers, cut ends diagonally, overlap about 5 mm, glue and wait to dry before twisting the ribbons back together for a secure join.
  • πŸ’‘Use stitch markers to mark handle positions and repeats (count 15 and 38 loops) to ensure even placement and symmetry during base trimming.
  • πŸ’‘Shape each triangle with your hands and steam with an iron on both sides to achieve crisp, stable points for a professional finish.

This modern mash bag pattern pairs natural raffia texture with a geometric triangle motif for a stylish, sustainable accessory. The project is quick to make and makes a beautiful gift or a practical everyday bag. Enjoy shaping, steaming, and personalizing your new favorite market companion! 🧢✨

You ask,

we answer.

FAQs

What size will the finished piece be?

The finished mash bag measures approximately 12 inches (30 cm) wide by 14 inches (36 cm) high with handles about 22 inches (55 cm) long when using the specified raffia yarn and 3 mm hook.

Can I use a different yarn instead of raffia?

Yes, you can substitute other yarns, but the look and stiffness will change; choose a similar weight and test gauge, and expect differences in drape and final size.

Do I need any special tools for finishing?

You will need basic finishing tools such as scissors, a yarn needle to hide ends, stitch markers for placement, and an iron for steaming and shaping the triangles.

Is this pattern suitable for beginners?

Yes, the pattern is labeled beginner friendly; it uses basic stitches (DC, HDC, SC, etc.) and provides photo instructions and a diagram to guide you step-by-step.

How long does the project typically take?

Most crocheters finish this mash bag in about 2-4 hours, depending on experience and how much time you spend on shaping and finishing.