About This Bunny Hand Puppet Amigurumi Pattern
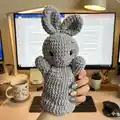
This pattern creates a soft Bunny Hand Puppet using super-bulky plush yarn for a squishy, child-friendly toy. It includes full round-by-round crochet instructions for the head, ears, arms and body, plus finishing tips. You will also find step instructions for inserting and indenting eyes and simple embroidered facial features.

Perfect for making as a playful gift or a classroom puppet, the pattern uses accessible stitches and clear photo guidance. The finished puppet measures approximately 28 cm (11") tall.
Why You'll Love This Bunny Hand Puppet Amigurumi Pattern
I absolutely love this pattern because it turns simple stitches into a charming, tactile puppet that kids adore. I enjoy how the plush yarn creates an irresistibly soft texture that is great for little hands. The design is compact yet expressive, and adding embroidered features lets me personalize each bunny's character. I also appreciate that the pattern teaches useful finishing techniques like eye indentation and invisible seaming that improve every amigurumi I make.
Switch Things Up
I love customizing this bunny by changing yarn colors to match seasons or nursery themes — try pastel pinks for a baby gift or bright spring hues for playful puppets.
I often swap the plush yarn for a chunky chenille to make an extra-soft cuddle puppet; adjust the hook size accordingly to maintain stitch definition.
I sometimes make mini versions by using thinner yarn and a smaller hook to create pocket-sized keychain puppets or zipper charms.
I like to embroider different expressions by adjusting eyebrow and mouth placement — a small change can make the bunny look curious, sleepy, or joyful.
Want to add clothing? Crochet small removable scarves, hats or tiny vests using sport or DK weight yarn to create outfits and change the character.
I recommend adding a little felt accessory or tiny crocheted carrot for a playful prop to enhance pretend play sessions.
If you want posable ears, sew a short length of thin craft wire into the ear seam before closing and wrap the ends to prevent poking.
For safety when giving to young children, replace plastic eyes with securely embroidered eyes, or follow the indentation method then weave ends securely inside the head.
Try using variegated yarn for a unique textured finish — the plush yarn will give subtle color shifts that look charming on the finished puppet.
I also like to gift sets of different animal puppets using the same body template and swapping head/ear shapes to build a small puppet theater collection.
Common Mistakes & How to Fix Them
✗ Placing safety eyes too low or too high on the head causes disproportionate facial features; measure and fix eyes between rounds 10 and 11 with a distance of 9 sc to keep symmetry.
✗ Failing to stuff gradually leads to uneven shaping and lumps; stuff the head little by little and shape as you go to achieve smooth, consistent curves.
✗ Skipping stitch markers when joining pieces or tracking rounds can cause miscounts and misaligned seams; use a marker at the start of each round and when joining arms to the body.
✗ Pulling the yarn too tight while indenting eyes may distort facial shape; tighten both threads gradually until the eyes are sunken and then tie a secure knot.
✗ Forgetting to leave sewing tails on ears or body results in hard-to-attach pieces later; always leave a long tail for sewing and cut only after placement is confirmed.