🧢 Beautiful ✨ Detailed πŸ’ Adorable

Mash Bag Pattern

Mash Bag Pattern
4.7β˜… Rating
5-7 Hours Time Needed
2.9K Made This
βœ‚οΈ

Beginner Friendly Level

Perfect for those just starting their crochet journey, with clear instructions and simple techniques

⏱️

Weekend Treat

Takes 5-7 hours, making it an enjoyable project to finish over a couple of days.

✨

Stylish Touch

An elegant detail to elevate any look, combining traditional techniques with contemporary design sensibilities.

About This Mash Bag Pattern

This pattern shows you how to crochet a Mash Bag made with soutache cord and loop stitches for a delicate, airy texture. It includes step-by-step instructions for the bottom, wall-side, loop motif, and handles. The design is beginner-friendly and includes finishing tips like steaming and hiding ends. You will learn how to use a plastic card to make consistent loops and how to attach handles securely.

Mash Bag Pattern crochet pattern - detailed view of completed project

Perfect for making a small stylish tote with round handles, the pattern includes material lists, abbreviations, and helpful photos. The finished bag measures approximately 24 x 10 x 28 cm with the recommended materials.

Why You'll Love This Mash Bag Pattern

I absolutely love this pattern because it transforms simple soutache cord into a light, lacy bag with beautiful texture. I enjoy how the loop-stitch motif creates an elegant, repeating arc pattern that looks intricate but is easy to make. I also love how versatile the design is β€” you can change cord color, handles, or size to create very different looks. The process of using a plastic card for consistent loops is satisfying and gives professional results every time.

Mash Bag Pattern step 1 - construction progress Mash Bag Pattern step 2 - assembly progress Mash Bag Pattern step 3 - details and accessories Mash Bag Pattern step 4 - final assembly and finishing

Switch Things Up

I love using different cord colors to change the mood of the bag; try pastel shades for a soft look or bold colors for a modern statement.

I often switch the cord thickness and adjust the hook size to make a larger or smaller bag; using a thicker cord creates a sturdier, chunkier bag while thinner cord makes a delicate mini version.

I sometimes replace round handles with wooden or bamboo handles for a boho feel, or use a long crocheted strap to turn the bag into a shoulder bag.

I like to add a fabric lining for extra durability and to make the bag items-safe; you can sew a simple cotton lining with a zipper for security.

Try adding beads or small tassels to the arcs for sparkle and personalized flair; attach them with small jump rings or secure with matching thread.

For a more structured base, consider adding a thin cardboard insert between lining layers or using small metal feet instead of plastic legs.

I sometimes change the number of arc repeats to alter the bag height β€” add or remove pairs of rows to customize size while maintaining pattern proportions.

Embroider small motifs or initials on the top border before attaching handles for a custom gift-ready touch.

I also experiment with metallic or variegated cords to introduce subtle texture changes; these add visual interest without changing the technique.

Finally, consider creating a matching tassel or pendant and attaching it to the handle ring to finish the look and make the bag uniquely yours.

Common Mistakes & How to Fix Them

βœ— Not placing markers at the four corners of the bottom can lead to uneven corners; place 4 markers in the middle loops at each corner to maintain shape and alignment. βœ— Cutting the working thread too early will unravel your work and complicate joining; do not cut the working thread after row 27 and only cut when the pattern instructs. βœ— Removing loops from the card incorrectly may create uneven loop sizes; hold the plastic card in front of your work and remove loops only when there is no space left on the card to keep loops consistent. βœ— Skipping steam-blocking steps results in a saggy or misshapen bag; steam the bottom and bag with an iron through a damp cloth at medium setting to set the shape. βœ— Failing to tighten handle joins will make handles loose over time; after slip-stitching handles to the bag, pull the long tail to tighten and secure the ends on the wrong side.

Mash Bag Pattern

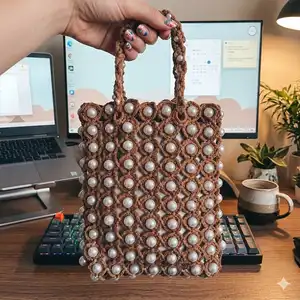
Make a delicate, stylish Mash Bag using soutache cord and a simple loop-stitch motif. This beginner-friendly pattern guides you step-by-step with clear instructions and photos so you can create a unique handmade accessory. Perfect for gifts or to elevate your everyday look with a handcrafted touch.

Beginner Friendly 5-7 Hours

Materials Needed for Mash Bag Pattern

β€” Main Fabric

  • 01
    Soutache cord (any cotton cord, polyester cord or jute) 3 mm, 300 yards (300 meter) - example: Maccaroni Ayaz SUPRA
  • 02
    Plastic card (width 2 2/8 inches / 5.5 cm) to form loop stitches
  • 03
    2 round handles, diameter 4 1/2 inches (11 cm)
  • 04
    4 legs (optional) for bag base stability

β€” Tools Required

  • 01
    Crochet hook N6 - 6 mm (recommended)
  • 02
    Crochet hook N4 - 4 mm (optional, to hide ends)
  • 03
    Plastic card (approx 5.5 cm width)
  • 04
    2 round handles (approx 11 cm diameter)
  • 05
    4 markers
  • 06
    Lighter
  • 07
    Scissors
  • 08
    Small Phillips screwdriver (if using legs)
  • 09
    Stitch markers

Progress Tracker

0% Complete

β€” Materials and tools :

Infos :

Soutache cord (any cotton cord, polyester cord or jute) 3 mm, 300 yards (300 meter). In example, I using soutache cord Maccaroni Ayaz SUPRA; Hook N6 - 6 mm (also, you can used the hook N4=4 mm, to hide the ends); Plastic card (width 2 2/8 inches (5,5 cm)); Any 2 handles circle, diameter 4 1/2 inches (11 cm); 4 legs (optional); Lighter; Scissors; 4 markers; Small Phillips screwdriver, if using the legs.

β€” Abbreviation :

Infos :

CH - chain stitch, SlSt - slip stitch, SC - single crochet, LS - loop stitch, Inc - increase (2 SC in 1).

β€” Crochet the bottom :

Info :

Crochet 9 CH.

Row 1 :

8 SC from the 2nd loop on the hook, CH. Turn.

Info :

Insert the hook through the last SC, pull out the end of the thread. Crochet in the end of the thread in the next row.

Next :

Turn the canvas after each row.

Row 2 :

8 SC, CH.

Row 3 :

8 SC, CH.

Row 4 :

8 SC, CH.

Rows 5-26 :

8 SC, CH.

Row 27 :

8 SC. Don’t cut the working thread.

Trim :

Crochet 2 SC in the last loop, 24 SC in the each row. Crochet 3 SC in 1 in the corner of bottom, 6 SC, 3 SC in 1, 24 SC, 1 SC in corner. Cut the thread, pull out from the loop. Insert the hook under the 1st loop, pull the end and tighten the back. There are 72 loops in this row now. Place 4 markers in the middle loops at each corner of the bottom.

Info :

Strengthen and hide the ends.

β€” Crochet the wall-side :

Info :

Steam the bottom with an iron trough a damp cloth at medium setting.

Row 1 :

Insert the hook on the back loop and jumper only, where the marker is.

Info :

Pull out the loop, crochet CH. In the same loop crochet SC. Next, crochet this row on the back loop and jumper only.

Row 1 (stitches) :

26 SC, 3 SC in 1, 8 SC, 3 SC in 1, 26 SC, 3 SC in 1, 8 SC, 2 SC in 1. Bind off the row with the end of the thread. Strengthen and hide the end. Process with fire. There are 80 loops in this row now.

Install the legs :

Count 2 SC and 2 rows from the corners. Insert the screw between the legs of the SC. Tighten with your fingers, then tighten with a small Phillips screwdriver.

Row 2 :

Insert the hook under the last loop of the previous row. Pull out the loop, crochet CH.

Info :

Take the plastic card. Crochet this row with the 80 loop stitches: Hold the card in front of work. Make the yarn over the card, crochet SC. Remove the loops from the card in the right, when there is no space left on it.

Finish :

Finish the row with SlSt.

Tip :

Tie-in a new piece of the thread, in case if you run out of the end that is binding off the rows.

Row 3 :

Crochet 5 CH. Take the 1st 5 LS. Turn over 90 degrees counterclockwise. Crochet 5 SC trough LS. Take the 2nd 5 LS, turn over. Insert the hook through 1st LS, pull out the loop. Then, insert the hook through 2nd LS and pull out the loop. There are 3 loops on the hook now. Crochet it. Next, crochet 5 SC trough 2nd 5 LS. Repeat to the end of the row. You should have 16 "arcs" of the 5 LS. Finish the row with SlSt. Steam with an iron through a damp cloth at medium setting, after crocheting this row.

Row 4 :

5 LS, skip 1 loop of the previous row, 5 LS, skip 1 loop of the previous row. Repeat to the end of the row. Finish the row with SlSt. Place the marker in the 1st LS of this row. There are 80 LS in this row now.

Row 5 :

Crochet 5 CH. Skip the 1st LS (marked with a marker) of the previous row. Crochet it in the end of this row. Take the 5 LS. Crochet 5 SC. Take the next 5 LS. 1 SC between "arcs". 5 SC trough next 5 LS. 1 SC between "arcs". Repeat to the end of the row. Finish the row with SlSt. There are 16 "arcs" in this row now.

Repeat :

Repeat the pair of the 4th and 5th row 6 times.

Finish :

Cut the thread, pull out from the loop. Insert the hook under 1st loop, pull the end and tighten the back. Strengthen and hide the end on the wrong side. Process with fire.

Info :

Steam the bag with an iron trough a damp cloth at medium setting.

β€” Handles :

Info :

Take the handle. Insert the hook through the handle, yarn over on the hook. Twist clockwise and crochet CH.

Handle :

Crochet 10 SC, crochet in the end. Cut the thread, leaving it about 27-28 inches (70 cm) long. Pull out the end in the loop.

Join :

Turn over the handle crocheting down. Join the handle with the bag in the middle of the top. Insert the hook under loop of the last row of the bag in the 2st loop of the "arc".

Join details :

Pull the long end of the thread. Pull out the loop. Insert hook in the next loop of the bag and 2st loop of the handle. Crochet SlSt, repeat. There are 9 SlSt in this row now. Pull out the end from the loop, tighten back on the wrong side. Strengthen and hide the ends. Process with fire.

Info :

Crochet in the second handle in the same way.

β€” Finishing :

Info :

You can decorate the bag with a pendant-tassel.

Info :

Congratulations! Your cute mash bag is ready.

Assembly Instructions

  • Place 4 markers in the middle loops at each corner of the bottom to mark where the wall-side will be joined and to maintain a square shape.
  • Install the legs by counting 2 SC and 2 rows from the corners, inserting the screw between the legs of the SC and tightening first by hand and then with a small Phillips screwdriver.
  • Join each handle to the top middle of the bag by inserting the hook under the corresponding loop of the last row of the bag and into the 2nd loop of the handle, then make 9 SlSt to secure each handle.
  • After finishing motif rows, cut the thread, pull the end and insert the hook under the first loop to tighten the back; then strengthen and hide ends on the wrong side and process with fire to seal ends.
  • Steam the bottom and the bag through a damp cloth at medium iron setting after specific rows to set the shape and even out the stitches.

Important Notes

  • πŸ’‘Use stitch markers at the four corners of the bottom and at the beginning of the loop rows to keep track of placement and maintain symmetry.
  • πŸ’‘Do not cut the working thread after row 27 when instructed; keep the working tail until you are told to finish and secure it.
  • πŸ’‘When using the plastic card for loop stitches, remove loops from the card only when there is no space left on it to keep consistent loop length and tension.
  • πŸ’‘Steam the bottom and completed motif rows with an iron through a damp cloth at medium setting to block and shape the bag properly.

This Mash Bag pattern helps you create a delicate, lacy handbag using soutache cord and a smart loop technique. Whether you keep it for yourself or gift it to someone special, it is a stylish, handmade accessory that stands out. Happy crocheting β€” enjoy every stitch and make it your own! 🧢✨

You ask,

we answer.

FAQs

What size will the finished piece be?

The finished bag from the specified materials measures approximately length 9 1/2 inches (24 cm), width 4 inches (10 cm), height 11 inches (28 cm).

Can I use a different cord or yarn for this pattern?

Yes, you can use other cords (cotton, polyester or jute) but the finished size and texture will change; use a matching hook size and test gauge before proceeding.

Do I need the plastic card to make the loop stitches?

The plastic card is recommended to create consistent loop sizes; it helps you maintain even loops for the arc motif and a professional finish.

Is this pattern suitable for beginners?

Yes, the pattern is rated beginner friendly and includes clear step-by-step instructions and photos; basic knowledge of single crochet, chain, and slip stitch is helpful.

How long does this project typically take to complete?

Most crocheters complete this bag in about 5-7 hours, depending on experience and speed; blocking and finishing steps add a bit more time.