🧢 Beautiful ✨ Detailed πŸ’ Adorable

Llama No Sew Amigurumi Pattern

Llama No Sew Amigurumi Pattern
4.8β˜… Rating
2-3 Hours Time Needed
1.7K Made This
βœ‚οΈ

Beginner Friendly Level

Perfect for those just starting their crochet journey, with clear instructions and simple techniques

⏱️

Bite-Sized Project

Finishes in 2-4 hoursβ€”perfect for an afternoon of creative relaxation.

🧸

Cute Companion

An adorable friend to cherish, handcrafted with love to bring comfort and joy for years to come.

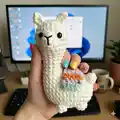
About This Llama No Sew Amigurumi Pattern

This pattern creates a small no-sew llama amigurumi using super bulky yarn for a plush, squishy finish. Youll crochet from the head up to the body in one continuous piece and add a colorful saddle, ears, nose, and embroidered facial details.

Llama No Sew Amigurumi Pattern crochet pattern - detailed view of completed project

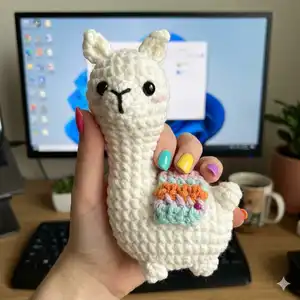
Clear round-by-round instructions and helpful photos guide you through every step, making assembly simple. Great for gifting, decor, or practicing basic amigurumi techniques.

Why You'll Love This Llama No Sew Amigurumi Pattern

I absolutely love this pattern because it transforms simple stitches into an irresistibly cute llama with very little sewing required. I enjoy how quickly the super bulky yarn makes the piece come together and how satisfying the texture looks. The colorful saddle offers a fun chance to play with small color changes. Sharing a pattern that beginners can finish in an afternoon makes me so happy, and I hope you enjoy crocheting this little companion as much as I did.

Llama No Sew Amigurumi Pattern step 1 - construction progress Llama No Sew Amigurumi Pattern step 2 - assembly progress Llama No Sew Amigurumi Pattern step 3 - details and accessories Llama No Sew Amigurumi Pattern step 4 - final assembly and finishing

Switch Things Up

I love how easy it is to customize this llama by changing the saddle colors; try pastels for a softer baby-friendly version or bright jewel tones for a playful pop.

I often make mine larger by using a bulkier yarn and a bigger hook; this creates a chunky cuddle buddy perfect for nursery decor.

You can switch to a lighter weight yarn and a smaller hook to make tiny keychain-sized llamasβ€”just be careful with safety eyes for small items.

I sometimes swap the safety eyes for embroidered eyes to make the toy fully baby-safe and add a stitched expression for personality.

For a different texture, try using a boucle or textured super bulky yarn for the saddle to make it stand out from the body.

If you want a whimsical look, add tiny crocheted accessories like a mini scarf, hat, or tassels on the saddle corners.

I recommend experimenting with placement of the eyes and nose before committing; small shifts change the whole expression and mood of the llama.

Consider adding a small bell or loop at the top to turn it into an ornament or bag charm for gifting.

To create a family set, make several llamas in coordinating colors and vary saddle patterns for a charming display.

I also enjoy embroidering simple patterns on the saddleβ€”tiny hearts or crossesβ€”to personalize each llama for the recipient.

Common Mistakes & How to Fix Them

βœ— Skipping stitch markers during continuous rounds leads to losing the start of round; place a marker at the first stitch and move it each round to stay oriented. βœ— Stuffing too late or all at once can create lumps and uneven shape; stuff gradually while shaping the piece to ensure smooth contours and consistent density. βœ— Failing to switch colors exactly when instructed for the saddle causes jagged edges; change yarn at the end of the correct stitch and carry or weave tails neatly to hide ends. βœ— Pulling stitches too tight on increases and bobbles will distort the shape; maintain even, moderate tension and practice the bobble stitch on a swatch first. βœ— Not connecting the nose in the specified rounds may misposition the feature; attach the nose at the recommended rounds (R13-16) with the described slip stitches for correct placement.

Llama No Sew Amigurumi Pattern

Make a sweet no-sew llama amigurumi using super bulky yarn β€” perfect for quick handmade gifts and cozy decor. This pattern walks you through each round with clear photos and step-by-step guidance so you can crochet head-to-body in one piece, add cute ears, a tiny saddle, and finish with embroidered features. Youll love how fast this charming little llama comes together.

Beginner Friendly 2-3 Hours

Materials Needed for Llama No Sew Amigurumi Pattern

β€” Main Fabric

  • 01
    Super Bulky yarn (Category 6) - White (main color for body)
  • 02
    Super Bulky yarn (Category 6) - Blue (saddle accent)
  • 03
    Super Bulky yarn (Category 6) - Purple (saddle accent)
  • 04
    Super Bulky yarn (Category 6) - Orange (saddle accent)
  • 05
    Fiberfill stuffing

β€” Tools Required

  • 01
    Crochet hook size 3.5mm (E)
  • 02
    Stitch marker
  • 03
    Sewing needle
  • 04
    Scissors
  • 05
    Plastic safety eyes 8mm (2 pieces)
  • 06
    Hot glue gun (adhesive glue)
  • 07
    Polyester stuffing (fiberfill)

Progress Tracker

0% Complete

β€” CROCHET FROM THE HEAD UP TO THE BODY ( NO SEW) :

Info :

Begin with White yarn

Row 1 :

6SC in an MR (6)

Row 2 :

6INC (12)

Row 3 :

(SC, INC) 6 times (18)

Row 4 :

(2SC, INC) 6 times (24)

Row 5-8 :

24SC (24)

Row 9 :

(SC, DEC) 8 times (16)

Row 10 :

(6SC, DEC) 2 times (14)

Info :

*Stuffing*

Row 11-14 :

14SC (14)

Row 15 :

5SC, (SC, INC) 2 times, 5SC (16)

Row 16 :

make 8CH, crochet with the second chain from the hook: INC, 6 SC(of the chains), 16SC(of the body), 6SC, (SC, BO in one st) (of the chains)(32)

Row 17 :

2INC, 28SC, INC, INC into the stitch's BO (36)

Row 18-21 :

36SC (36)

Row 22 :

SC, DEC, 9SC, (SC, DEC) 3 times, 9SC, (SC, DEC) 2 times (30)

Row 23 :

DEC, SC, BO, 6SC, BO, SC, 4DEC, BO, 6SC, BO, DEC (24)

Info :

*Stuffing*

Row 24 :

12 DEC (12)

Row 25 :

6DEC (6)

Info :

Cut the yarn.

β€” NOSE :

Info :

Begin with White yarn

Row 1 :

Crochet 10SLst from rows 5-7 in a circular shape as photo

Row 2 :

Crochet 10 single crochets (SC) into the 10 slip stitches of row 1.

Row 3 :

5DEC

Info :

*Stuffing*

Info :

Cut the yarn.

Info :

Embroider the mouth, attach the eyes, and embroider the pink cheeks.

β€” EARS :

Info :

Begin with White yarn

Row 1 :

Pick up the yarn from row 2: 2CH, DC-picot, 2CH, Slst in one stitch.

β€” LLAMA SADDLE :

Info :

Change colors sequentially in the following order: blue, purple, orange, until you complete row 10.

Info :

Begin with Blue yarn

Row 1 :

5Ch, turn: 4SC, turn (4)

Row 2-10 :

Ch, 4SC, turn (4)

Info :

Cut the yarn

Info :

Secure the saddle on the back with adhesive glue.

Assembly Instructions

  • Attach the nose to the head at rounds 13-16 by connecting with 18 SLST so the nose centers on the snout area securely.
  • Position safety eyes on the head between the suggested rounds and attach plastic safety eyes; then embroider the mouth and add pink cheeks as shown in photos.
  • Pick up yarn from row 2 to form each ear (2CH, DC-picot, 2CH, Slst in one stitch) and secure the ears to the top of the head so they sit symmetrically.
  • Secure the small saddle on the llama's back using adhesive glue, centering it over the top back ribs and smoothing any glue beneath evenly.
  • Weave and hide all yarn ends after assembly and use a sewing needle to tidy and secure any loose stitches or color change tails.

Important Notes

  • πŸ’‘Use a stitch marker to mark the first stitch of every round to avoid losing track during continuous rounds.
  • πŸ’‘Stuff the body gradually and evenly to maintain a smooth, rounded shape that matches the pattern photos.
  • πŸ’‘Attach safety eyes securely and consider placement before fixing them permanently; glue the saddle after positioning to avoid shifting.
  • πŸ’‘Keep consistent tension with super bulky yarn to ensure the shape and stitch count match the pattern instructions.

This adorable Llama amigurumi is designed to be quick, cuddly, and beginner-friendly, making it a perfect handmade gift or a charming shelf sitter. The colorful saddle adds a playful pop while the no-sew construction keeps finishing easy and stress-free. Enjoy creating your new fluffy friend β€” every stitch brings a smile! πŸ§ΆπŸ¦™

You ask,

we answer.

FAQs

What size will the finished piece be?

The finished llama measures approximately 10-14 cm tall depending on your tension and exact yarn; using the recommended super bulky yarn and 3.5mm hook gives a small plush suitable for display or gifting.

Can I use different yarn weights for this pattern?

Yes, you can substitute yarn weights; using thicker yarn and larger hook will make a larger, chunkier llama while thinner yarn will create a smaller, more delicate version. Adjust hook size accordingly and expect changes to stitch counts and final size.

Are safety eyes recommended for this project?

Plastic safety eyes 8mm are recommended as listed, but if you are making this for very small children consider embroidering the eyes instead for a fully soft and child-safe toy.

Do I need to sew the pieces together?

This pattern is designed as no-sew for the most part; the head and body are crocheted in one piece and many elements are attached by crochet or adhesive glue, though a sewing needle is helpful to weave in ends and secure small details.