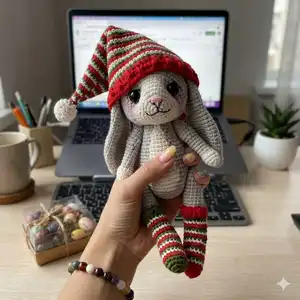
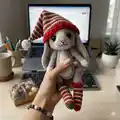
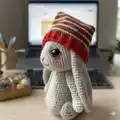
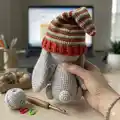
Make a charming Christmas Bunny with this step-by-step amigurumi pattern designed for holiday gifting and cozy decor. You'll create a sweet bunny with long ears, posable limbs, a striped hat and stockings, and embroidered facial details. The pattern includes full stitch-by-stitch rounds, a materials list, and clear assembly instructions so you can follow along easily. Perfect for makers who love detailed, festive toys.
Progress Tracker
0% Complete
— Arms (make 2) :
Info :
Place row marker here. Stuff with fiberfill in the process.
Round 2 :
(1sc, inc) *3 (9)
Round 3 :
(2sc, inc) *3 (12)
Round 5 :
Change color to Gray. BLO (2sc, dec) *3 (9)
Round 6-11 :
9sc (6 rounds)
Round 12 :
3sc, 3inc, 3sc (12)
Round 13-19 :
12sc (7 rounds)
Info :
Fasten off, cut the yarn, weave in the yarn ends.
— Tail :
Info :
Place row marker here.
Round 3 :
(1sc, inc) *6 (18)
Round 5 :
(1sc, dec) *6 (12)
Info :
Stuff with fiberfill. Leave a long tail for sewing.
— Legs (make 2) :
Info :
Place row marker here.
Round 4 :
Change color to Gray. 12sc (12)
Round 5-9 :
12sc (5 rounds)
Info :
Stuff with fiberfill in the process.
Info :
Crochet the heel in rows with Gray yarn: 1. 5sc, turn (5)
Row :
2. ch1, 5sc, turn (5)
Row :
3. ch1, 5sc, turn (5)
Row :
4. ch1, 5sc, turn (5)
Round 10 :
Return to crochet the legs.
Instruction :
dec, sc, 3dec, 5sc, 2dec (12)
Round 12 :
(2sc, dec) *3 (9)
Round 13-14 :
9sc (2 rounds) (9)
Round 15 :
(2sc, inc) *3 (12)
Round 17 :
(3sc, inc) *3 (15)
Round 18-20 :
15sc (3 rounds) (15)
Round 21 :
(4sc, inc) *3 (18)
Round 22-27 :
18sc (6 rounds)
Round 28 :
(1sc, dec) *6 (12)
Info :
Stuff the legs with fiberfill. Fasten off, cut the yarn, weave in the ends.
— Body :
Info :
Place row marker here.
Round 3 :
(1sc, inc) *6 (18)
Round 4 :
(2sc, inc) *6 (24)
Round 5 :
(3sc, inc) *6 (30)
Round 6 :
(4sc, inc) *6 (36)
Round 7 :
(5sc, inc) *6 (42)
Round 8 :
(6sc, inc) *6 (48)
Round 9 :
(7sc, inc) *6 (54)
Round 11 :
Attention! Crochet in jacquard technique from Rnd 11 to 27. Add White yarn (these stitches are highlighted in red) 10sc, 8sc, 36sc (54)
Round 12 :
9sc, 10sc, 35sc (54)
Round 13 :
8sc, 12sc, 34sc (54)
Round 14 :
8sc, 12sc, 34sc (54)
Round 15 :
8sc, 12sc, 9sc, (2sc, dec) *6, 1sc (48)
Round 16 :
9sc, 10sc, 29sc (48)
Round 17 :
9sc, 10sc, 29sc (48)
Round 18 :
9sc, 10sc, 29sc (48)
Round 19 :
6sc, dec, 2sc, 8sc, 1sc, dec, 1sc, dec, (6sc, dec) *3 (42)
Round 20 :
9sc, 8sc, 25sc (42)
Round 21 :
9sc, 8sc, 25sc (42)
Round 22 :
9sc, 8sc, 25sc (42)
Round 23 :
5sc, dec, 3sc, 6sc, dec, 1sc, dec, (5sc, dec) *3 (36)
Round 24 :
9sc, 6sc, 21sc (36)
Round 25 :
9sc, 6sc, 21sc (36)
Round 26 :
4sc, dec, 4sc, 2dec, (dec, 4sc) *3, 4sc (30)
Round 27 :
9sc, 2sc, 19sc (30)
Info :
Stuff the body with fiberfill. Leave a long tail for sewing.
— Head :
Info :
Place row marker here.
Round 3 :
3inc, 3sc, 3inc, 3sc (18)
Round 4 :
(2sc, inc) *6 (24)
Round 5 :
(3sc, inc) *6 (30)
Round 6 :
(4sc, inc) *6 (36)
Round 7-9 :
36sc (3 rounds) (36)
Round 10 :
Change color to Gray. Attention! Crochet in jacquard technique from Rnd 10 to 13. Add white yarn (these stitches are highlighted in red) (5sc, inc) *2, 1sc, inc, 8sc, inc, 1sc, (5sc, inc) *2 (42)
Info :
Insert the eyes between rounds 7-8 at a distance of 10-12 stitches.
Round 11 :
(6sc, inc) *2, 3sc, inc, 6sc, inc, 3sc, (6sc, inc) *2 (48)
Round 12 :
(7sc, inc) *2, 5sc, inc, 4sc, inc, 5sc, (7sc, inc) *2 (54)
Round 13 :
(8sc, inc) *2, 7sc, inc, 2sc, inc, 7sc, (8sc, inc) *2 (60)
Round 14-21 :
With Gray yarn 60sc (8 rounds) (60)
Round 22 :
(8sc, dec) *6 (54)
Round 23 :
(7sc, dec) *6 (48)
Round 24 :
(6sc, dec) *6 (42)
Round 25 :
(5sc, dec) *6 (36)
Round 26 :
(4sc, dec) *6 (30)
Round 27 :
(3sc, dec) *6 (24)
Info :
Stuff the head with fiberfill.
Round 28 :
(2sc, dec) *6 (18)
Round 29 :
(1sc, dec) *6 (12)
Info :
Fasten off, cut the yarn, weave in the ends.
— Ears (make 2) :
Info :
Place row marker here.
Round 4 :
(1sc, inc) *6 (18)
Round 6 :
(2sc, inc) *6 (24)
Round 8 :
(3sc, inc) *6 (30)
Round 9-18 :
30sc (10 rounds) (30)
Round 19 :
(3sc, dec) *6 (24)
Round 20-26 :
24sc (7 rounds) (24)
Round 27 :
(2sc, dec) *6 (18)
Round 28-31 :
18sc (4 rounds) (18)
Round 32 :
(1sc, dec) *6 (12)
Round 33-34 :
12sc (2 rounds)
Info :
Do not stuff. Leave a long tail for sewing.
— Assembly :
Info :
Sew the head to the body. Tighten cheeks following the pictures below.
Info :
Fasten the legs and the arms to the body with a button mount.
Info :
Sew the ears to the head.
Info :
Sew the tail to the body.
Info :
Embroider the nose with pink thread. Embroider the eyelids, the outline of the nose and mouth with black thread.
Info :
Embroider the inside of the ears and cheeks with a black thread with pink pastel. Embroider the claws on the legs with a black thread.
— Stockings (Right) :
Info :
Right stocking With Red yarn.
Info :
Place row marker here.
Round 3 :
(1sc, inc) *6 (18)
Round 5 :
Change color to Minty.18sc (18)
Round 6 :
Change color to Green.18sc (18)
Round 7 :
Change color to Red.18sc (18)
Round 8 :
Change color to Minty.18sc (18)
Round 9 :
Change color to Green.18sc (18)
Round 10 :
Change color to Red. 18sc (18)
Round 11 :
Change color to Minty.18sc (18)
Info :
Change color to Red. Crochet the heel in rows with Red yarn: (do not turn) 8sc, turn (8)
Round 12 :
Change color to Green. Return to crochet the stocking. Work in a spiral: dec, 4sc, 4dec, 6sc, 3dec (18)
Round 13 :
Change color to Red. 18sc (18)
Round 14 :
Change color to Minty.18sc (18)
Round 15 :
Change color to Green.18sc(18)
Round 16 :
Change color to Red.18sc (18)
Round 17 :
Change color to Minty.18sc (18)
Round 18 :
Change color to Green.18sc(18)
Round 19 :
Change color to Red. 18dc, sl st (18)
Round 20 :
ch2, (FPdc, BPdc ) *9, sl st.
Info :
Fasten off, cut the yarn, weave in the yarn ends.
— Stockings (Left) :
Info :
Left stocking With Green yarn.
Info :
Place row marker here.
Round 3 :
(1sc, inc) *6 (18)
Round 5 :
Change color to Red. 18sc (18)
Round 6 :
Change color to Minty.18sc (18)
Round 7 :
Change color to Green. 18sc (18)
Round 8 :
Change color to Red. 18sc (18)
Round 9 :
Change color to Minty. 18sc (18)
Round 10 :
Change color to Green.18sc (18)
Round 11 :
Change color to Red. 18sc (18)
Info :
Change color to Green. Crochet the heel in rows with Green yarn: (do not turn) 8sc, turn (8)
Round 12 :
Change color to Minty. Return to crochet the stocking. Work in a spiral: dec, 4sc, 4dec, 6sc, 3dec (18)
Round 13 :
Change color to Green.18sc (18)
Round 14 :
Change color to Red. 18sc (18)
Round 15 :
Change color to Minty. 18sc (18)
Round 16 :
Change color to Green.18sc (18)
Round 17 :
Change color to Red. 18sc (18)
Round 18 :
Change color to Minty. 18sc (18)
Round 19 :
Change color to Green. 18dc, sl st (18)
Round 20 :
ch2, (FPdc, BPdc) *9, sl st. Fasten off, cut the yarn, weave in the yarn ends.
— Cap :
Info :
With White yarn (Alize Softy).
Info :
Place row marker here.
Round 3 :
(1sc, inc) *6 (18)
Round 4-5 :
18sc (2 rounds) (18)
Round 6 :
(1sc, dec) *6 (12)
Round 8 :
Change color to Green. 6sc (6)
Round 9 :
Change color to Red. 6sc (6)
Round 10 :
Change color to Minty. (1sc, inc) *3 (9)
Round 11 :
Change color to Green. 9sc (9)
Round 12 :
Change color to Red. (2sc, inc) *3 (12)
Round 13 :
Change color to Minty. 12sc (12)
Round 14 :
Change color to Green. (3sc, inc) *3 (15)
Round 15 :
Change color to Red. 15sc (15)
Round 16 :
Change color to Minty. (4sc, inc) *3 (18)
Round 17 :
Change color to Green. 18sc (18)
Round 18 :
Change color to Red. (5sc, inc) *3 (21)
Round 19 :
Change color to Minty. 21sc (21)
Round 20 :
Change color to Green. (6sc, inc) *3 (24)
Round 21 :
Change color to Red. 24sc (24)
Round 22 :
Change color to Minty. (7sc, inc) *3 (27)
Round 23 :
Change color to Green. 27sc (27)
Round 24 :
Change color to Red. (8sc, inc) *3 (30)
Round 25 :
Change color to Minty. 30sc (30)
Round 26 :
Change color to Green. (9sc, inc) *3 (33)
Round 27 :
Change color to Red. 3sc (33)
Round 28 :
Change color to Minty. (10sc, inc) *3 (36)
Round 29 :
Change color to Green. 36sc (36)
Round 30 :
Change color to Red. (11sc, inc) *3 (39)
Round 31 :
Change color to Minty. 39sc (39)
Round 32 :
Change color to Green. (12sc, inc) *3 (42)
Round 33 :
Change color to Red. 42sc (42)
Round 34 :
Change color to Minty. (13sc, inc) *3 (45)
Round 35 :
Change color to Green. 45sc (45)
Round 36 :
Change color to Red. (14sc, inc) *3 (48)
Round 37 :
Change color to Minty. 48 sc (48)
Round 38 :
Change color to Green. (15sc, inc) *3 (51)
Round 39 :
Change color to Red. 51sc (51)
Round 40 :
Change color to Minty. (16sc, inc) *3 (54)
Round 41 :
Change color to Green. 54sc (54)
Round 42 :
Change color to Red. 54sc (54)
Round 43 :
Change color to Minty. (17sc, inc) *3 (57)
Round 44 :
Change color to Green. 57sc (57)
Round 45 :
Change color to Red. 57sc (57)
Round 46 :
Change color to Minty. (18sc, inc) *3 (60)
Round 47 :
Change color to Green. 60sc (60)
Round 48 :
Change color to Red. 60sc (60)
Round 49 :
Change color to Minty. 60sc (60)
Round 50 :
Change color to Green. (19sc, inc) *3 (63)
Round 51 :
Change color to Red. 63sc (63)
Round 52 :
Change color to Minty. 63sc (63)
Round 53 :
Change color to Red. 63sc (63)
Round 54 :
ch2, 62dc, sl st , turn (63)
Round 55 :
ch2, (FPdc, BPdc, FPdc ) *21. Fasten off, cut the yarn, weave in the yarn ends.
You did it — a festive Christmas Bunny ready to bring holiday cheer to your home or to give as a heartfelt gift. This pattern blends tiny amigurumi shaping with playful stripes and embroidered features for a truly handmade keepsake. Share your finished bunnies with loved ones and enjoy the cozy satisfaction of a job well done! 🎄🧶