🧶 Beautiful ✨ Detailed 💝 Adorable

Lily Bunny Amigurumi Pattern

Lily Bunny Amigurumi Pattern
4.1★ Rating
5-7 Hours Time Needed
3.9K Made This
✂️

Intermediate Level

Ideal for those with basic crochet experience, featuring slightly more advanced stitches and techniques to expand your skills.

⏱️

Weekend Treat

Takes 5-7 hours, making it an enjoyable project to finish over a couple of days.

🧸

Cute Companion

An adorable friend to cherish, handcrafted with love to bring comfort and joy for years to come.

About This Lily Bunny Amigurumi Pattern

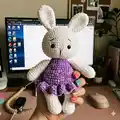
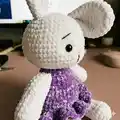
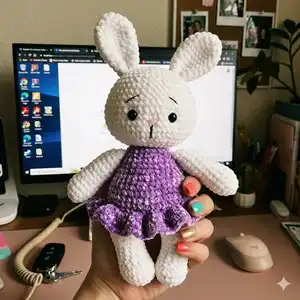
This pattern creates a cuddly Lily Bunny amigurumi worked in soft chenille sport yarn with a charming purple skirt. The design includes step-by-step rounds for head, body, legs, arms, ears and a ruffled skirt, using US terminology. The finished toy is approximately 35 cm tall when made with the recommended yarn and hook. It is written for crocheters who enjoy gentle shaping and simple assembly.

Lily Bunny Amigurumi Pattern crochet pattern - detailed view of completed project

You will crochet each piece in continuous rounds, stuff as you go, then sew the parts together for a neat finish. The pattern is rated easy to medium, making it approachable for experienced beginners and confident intermediates.

Why You'll Love This Lily Bunny Amigurumi Pattern

I absolutely love this pattern because the chenille yarn gives the bunny an irresistibly soft and plush feel that children and adults both adore. I enjoy the simple shaping techniques used throughout — they create a nicely proportioned toy without complicated stitches. The little ruffled skirt adds so much personality and is a fun, quick embellishment you can customize. Sewing the pieces together is satisfying and quick, leaving you with a charming finished toy to gift or keep.

Lily Bunny Amigurumi Pattern step 1 - construction progress Lily Bunny Amigurumi Pattern step 2 - assembly progress Lily Bunny Amigurumi Pattern step 3 - details and accessories Lily Bunny Amigurumi Pattern step 4 - final assembly and finishing

Switch Things Up

I love customizing this bunny by changing the skirt color and yarn texture to suit different looks; try cotton, velvet, or faux fur for varying effects.

For a mini keychain version, use a fingering weight yarn and a smaller hook to scale the pattern down significantly.

If you want a chunkier, cuddlier bunny, switch to bulky chenille or velvet yarn and increase your hook size for a plush result.

Embroider different facial expressions with brown or black thread to give each bunny its own personality and charm.

Try making seasonal outfits — a tiny scarf, a hat, or a little crochet flower to the ear — for holiday-themed variations and gifts.

I sometimes add a tiny bell or ribbon at the neck for a sweet finishing touch; a small safety-sewn button can also serve as a charm.

To make the bunny posable, consider inserting thin wire into the arms and legs before stuffing, securing the ends so they are fully covered by yarn and stuffing.

You can experiment with eye placement and size — smaller eyes give a softer look while larger eyes make the face more expressive.

Play with stitch patterns on the skirt, like shells or picot edges, to create a different ruffle texture and volume for unique skirts.

If you enjoy colorwork, try striping the body or creating little motifs on the skirt for a playful and personalised bunny.

Common Mistakes & How to Fix Them

✗ Forgetting to stuff evenly in limbs and head causes lumpy or misshapen parts; stuff gradually and shape with small amounts of fiberfill to maintain smooth contours. ✗ Skipping stitch markers when joining legs to form the body can lead to misaligned joins; place a marker at the start of the joining round to keep the stitch count accurate. ✗ Pulling stitches too tightly while using chenille yarn can make the fabric stiff and uneven; maintain relaxed, even tension and allow the texture to sit naturally. ✗ Cutting the yarn too early for the right leg before joining to the body will make assembly difficult; follow the instruction to keep the right leg yarn attached when continuing with the body.

Lily Bunny Amigurumi Pattern

Make a sweet Lily Bunny with soft chenille yarn and an adorable ruffled skirt. This pattern guides you through each piece — legs, body, head, ears, arms and skirt — with clear round-by-round instructions. Perfect for gifting or cuddling, the finished toy measures about 35 cm when using the recommended materials. Enjoy a relaxing crochet project that adds a handmade touch to your home.

Intermediate 5-7 Hours

Materials Needed for Lily Bunny Amigurumi Pattern

— Main Fabric

  • 01
    Sport yarn - White (Chenille 01)
  • 02
    Sport yarn - Purple (Chenille 13)

— Tools Required

  • 01
    Brown thread for embroidering eyebrows and muzzle
  • 02
    Pink thread for embroidering the nose
  • 03
    White thread for head sculpting
  • 04
    Safety eyes 14 mm
  • 05
    Crochet hook 5 mm
  • 06
    Stuffing (Polyester fiber fill)
  • 07
    Scissors
  • 08
    Yarn needle for sewing and finishing
  • 09
    Stitch marker

Progress Tracker

0% Complete

— Materials & Tools :

Info :

Sport yarn: - White (Chenille 01) - Purple (Chenille 13). Brown thread to embroider eyebrows and muzzle. Pink thread to embroider the nose. White thread for head sculpting. Safety eyes 14 mm. Crochet hook 5 mm. Stuffing (Polyester fiber fill). If you use these materials, the finished toy is around 35 cm tall. The difficulty level of the pattern is easy to medium. In this pattern is used US terminology

— Arms :

Info :

CCrochet with white yarn. Stuff only 2/3 of the arm.

Round 1 :

6 sc into a magic ring (6)

Round 2 :

6 inc (12)

Round 3 :

(3 sc, inc) * 3 (15)

Round 4-5 :

15 sc (2 rounds)

Round 6 :

(3 sc , dec ) * 3 ( 12 )

Round 7-14 :

8 sc ( 8 rounds )

Round 15 :

( 4 sc , dec ) * 2 ( 10 )

Round 16 :

10 sc

Info :

Fold the arm in half and crochet 5 sc through both sides. Fasten off and cut the yarn, leaving a tail for sewing. Sew the arms two rounds under the beginning of the head.

— Legs :

Info :

Crochet with white yarn. Stuff as you go.

Round 1 :

7 sc into a magic ring (7)

Round 2 :

7 inc (14)

Round 3 :

(sc, inc) * 7 (21)

Round 4-5 :

21 sc (2 rounds)

Round 6 :

7 sc, 4 dec, 6 sc (17)

Round 7 :

7 sc, 2 dec, 6 sc (15)

Round 8-10 :

15 sc (3 rounds)

Round 11 :

(4 sc, inc) * 3 (18)

Round 12 :

18 sc

Round 13 :

For the left leg: crochet only 14 sc Fasten off, cut the yarn.

Round 13 :

For the right leg: 18 sc Don't cut the yarn, we will continue with the body:

— Body :

Round 1 :

Crochet 7 sc on the right leg; make 3 chains; 18 sc on the left leg; 3 sc on the chain; 18 sc on the right leg ; 3 sc on the chain; put the marker here ( 42 )

Round 2 :

(6 sc, inc ) * 6 ( 48 )

Round 3-6 :

48 sc (4 rounds). Change the yarn to pink color:

Round 7 :

48 sc

Round 8 :

back loops only: 48 sc

Round 9 :

( 6 sc, dec ) * 6 ( 42 )

Round 10-11 :

42 sc ( 2 rounds )

Round 12 :

( 5 sc, dec ) * 6 ( 36 ).

Round 13-14 :

36 sc ( 2 rounds )

Round 15 :

( 4 sc, dec ) * 6 ( 30 )

Round 16-17 :

30 sc ( 2 rounds )

Round 18 :

( 3 sc, dec ) * 6 ( 24 ).

Round 19 :

24 sc

Round 20 :

( 6 sc, dec ) * 3 ( 21 )

Info :

Stuff the body firmly, especially in the neck. Cut the pink yarn, we will continue with the head, but first, we need to make the dress.

— Skirt :

Round 1 :

Attach the pink yarn to the back of the body in the front loops of round 8. Crochet with the body turned upside down: 1. ( 2 dc in one stitch ) * 48 ( 96 )

Round 2 :

2.96 dc Fasten off, and cut the yarn. Hide the thread inside the body.

— Head :

Info :

Change the yarn to white color. Stuff as you go.

Round 1 :

21 sc

Round 2 :

21 inc ( 42 )

Round 3 :

( 6 sc, inc ) * 6 ( 48 )

Round 4 :

( 7 sc, inc ) * 6 ( 54 )

Round 5-9 :

54 sc ( 5 rounds ) Insert the safety eyes between rounds 8 and 9 with 8 st between them.

Round 10 :

( 7 sc, dec ) * 6 ( 48 )

Round 11-13 :

48 sc ( 3 rounds )

Round 14 :

( 6 sc, dec ) * 6 ( 42 )

Round 15 :

15.42 Sc

Round 16 :

( 5 sc, dec ) * 6 ( 36 ) ( 30 )

Round 17 :

( 4 sc, dec ) * 6

Round 18 :

( 3 sc, dec ) * 6 ( 24 )

Round 19 :

( 2 sc, dec ) * 6 ( 18 )

Round 20 :

( sc, dec ) * 6 ( 12 )

Round 21 :

6 Dec ( 6 ) Make sure that the head is stuffed firmly. Close the opening and hide the yarn inside. Head sculpting

— Ears :

Info :

Crochet with white yarn .

Round 1 :

6 sc into a magic ring ( 6 )

Round 2 :

6 inc ( 12 )

Round 3 :

( sc , inc ) * 6 ( 18 )

Round 4 :

( 2 sc , inc ) * 6 ( 24 )

Round 5-6 :

24 sc ( 2 rounds )

Round 7 :

( 6 sc , dec ) * 3 ( 21 )

Round 8 :

( 5 sc , dec ) * 3 ( 18 )

Round 9 :

( 4 sc , dec ) * 3 ( 15 )

Round 10-12 :

15 sc ( 3 rounds ) Fasten off and cut the yarn , leaving a tail for sewing. Fold the ear in half and sew the ends together. Sew the ears on the top of the head with 4 stitches between them.

Assembly Instructions

  • Sew the ears on the top of the head with 4 stitches between them, folding each ear in half and sewing the ends together before attaching.
  • Attach the head to the body after stuffing firmly; close the opening and hide the yarn inside, then sculpt the head with white thread as described.
  • Sew the arms two rounds under the beginning of the head after folding each arm and closing the edge with 5 sc through both sides.
  • Position the legs so the right leg remains attached when joining the body; join legs and chains as instructed to form the body round and place a marker at the join.
  • Attach and secure safety eyes between rounds 8 and 9 of the head with 8 stitches between them before closing the head.
  • Hide all yarn tails inside the body and secure loose ends; stuff body and neck firmly before final assembly for best structure.

Important Notes

  • 💡Insert safety eyes between rounds 8 and 9 of the head, spacing them 8 stitches apart before closing the head.
  • 💡Stuff the body and head firmly, especially in the neck area, to ensure a stable and well-shaped amigurumi.
  • 💡When attaching the skirt, work into the front loops of round 8 as directed and hide sewing tails inside the body.

This Lily Bunny is a cozy, handmade companion that makes a thoughtful gift or a soft nursery friend. The chenille texture is fluffy and comforting, while the purple ruffled skirt adds a playful pop of color. Make one in any shade to create a unique, heartfelt present. 🧶💜

You ask,

we answer.

FAQs

What size will the finished piece be?

The finished amigurumi is around 35 cm tall when using the recommended chenille sport yarn and a 5 mm hook.

Can I use different yarn weights for this pattern?

Yes, but changing yarn weight will alter the final size and texture; adjust your hook accordingly and expect a different finished measurement.

Do I need prior crochet experience for this pattern?

This pattern is rated intermediate (easy to medium), so basic knowledge of single crochet, increases, decreases, and working in rounds is recommended.

How long does this project typically take to complete?

Most crocheters finish this bunny in about 5-7 hours, depending on experience, finishing techniques, and assembly time.