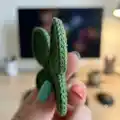
Create a charming set of tiny leaf-spirits with this detailed crochet pattern. You will learn to crochet two body shapes, horns, and decorative leaf masks while practicing color changes and shaping. The pattern includes step-by-step photos, clear stitch counts and helpful tips to guide you through assembly. Perfect for making a whimsical collection or unique handmade gifts.
Progress Tracker
0% Complete
— Body 1 :
Info :
For the body you will use 2 colors of yarn, a darker color and a lighter color of your choosing. Start with the darker yarn.
— Legs :
First leg (Body 1) - Row 1 :
6Sc in magic circle (6)
First leg (Body 1) - Row 2 :
6INC (12)
First leg (Body 1) - Row 3 :
BLO 12Sc (12)
First leg (Body 1) - Row 4-5 :
Sc in each Sc around (12)
First leg (Body 1) - Row 6 :
2Sc (mark the front loops only on these 2 stitches with a colored pen/marker, marked red in my Image 1), then continue crocheting 10Sc
Info :
Cut the yarn, leave a small tail and hide it inside the leg using a needle.
Second leg (Body 1) - Row 1 :
6Sc in magic circle (6)
Second leg (Body 1) - Row 2 :
6INC (12)
Second leg (Body 1) - Row 3 :
BLO 12Sc (12)
Second leg (Body 1) - Row 4-5 :
Sc in each Sc around (12)
Second leg (Body 1) - Row 6 :
2Sc, Sc (mark this stitch with a marker/pin, yellow in my Image 3), 9Sc (12)
Infos :
2Sc, Chain, Turn (2). Skip chain, 2Sc, Chain, Turn (2). Skip chain, 2Sc, Chain, Turn (2). Skip chain, 2Sc, Chain, Turn (2). Skip chain, 2Sc, Chain, Turn (2). Skip chain, 2Sc, Chain, Turn (2). Skip chain, 2Sc, Chain (mark this chain using a marker/pin, orange in my Image 4), Turn (2)
Info :
Take the first leg and connect it with the second leg by crocheting 2Sc. When crocheting these two stitches, Skip the chain, take the back loops only on the second leg (colored in green in my Image 5) and the front loops only on the first leg (the ones you marked with a colored pen, red in my case). I already did the first Sc, and I have one more left to do, using the two stitches I marked, red and green.
— Body :
Body (continue) - Row 1 :
Sc on the first leg (mark this stitch with a marker/pin), 4Sc, INC, 4Sc, (you have now finished the stitches on the first leg), Sc on the marked chain in the last row of the middle part (marked in orange in my case, you can now remove the marker/pin), continue crocheting along the margin of the middle part (I marked the margin with red dots in Image 7) 3Sc, INC, 3Sc, Sc on the marked stitch on the second leg (you can now remove the marker/pin, yellow in my Image 7), continue crocheting on the second leg 4Sc, INC, 4Sc, continue crocheting along the margin of the middle part (I marked the margin with green dots in Image 7) 2Sc, INC, 3Sc (38) Consider this the end of the first row.
Body - Row 2 :
Sc in the marked stitch (you can remove the marker/pin), 4Sc, INC, 7Sc, INC, 4Sc, INC, 6Sc, INC, 3Sc, INC, Sc (44)
Body - Row 3 :
"d"2Sc, "l"11Sc, "d"31Sc (44)
Body - Row 4 :
"d"2Sc, "l"11Sc, "d"15Sc, "l"1Sc, "d"15Sc (44)
Body - Row 5 :
"d"1Sc, "l"4Sc, "d"5Sc, "l"4Sc, "d"14Sc, "l"2Sc, "d"14Sc (44) Attention, next row starts with a stitch in a new color, so remember to change the color in the last single crochet for this row.
Body - Row 6 :
"l"5Sc, "d"5Sc, "l"4Sc, "d"14Sc, "l"3Sc, "d"11Sc, "l"2Sc (44)
Body - Row 7 :
"l"6Sc, "d"3Sc, "l"6Sc, "d"12Sc, "l"5Sc, "d"8Sc, "l"4Sc (44)
Body - Row 8 :
"l"16Sc, "d"10Sc, "l"18Sc (44)
Body - Row 9 :
"l"44Sc around (44)
Body - Row 10 :
"l"5Sc, "d"3Sc, "l"19Sc, "d"3Sc, "l"7Sc, "d"3Sc, "l"4Sc (44)
Body - Row 11 :
"l"5Sc, "d"5Sc, "l"15Sc, "d"6Sc, "l"3Sc, "d"8Sc, "l"2Sc (44)
Body - Row 12 :
"l"4Sc, "d"3Sc, "d"INVDEC, "d"20Sc, "d"INVDEC, "d"13Sc (42) Attention, next row starts with a stitch in a new color, so remember to change the color in the last single crochet for this row.
Body - Row 13 :
"l"3Sc, "d"39Sc (42)
Body - Row 14 :
"d"6Sc, "l"19Sc, "d"17Sc (42)
Body - Row 15 :
"d"7Sc, "l"1INVDEC, "l"16Sc, "d"3Sc, "d"INVDEC, "d"3Sc, "l"9Sc (40) Attention, next row starts with a stitch in a new color, so remember to change the color in the last single crochet for this row.
Body - Row 16 :
"d"8Sc, "l"1Sc, "d"8Sc, "l"6Sc, "d"7Sc, "l"10Sc (40)
Body - Row 17 :
"l"2Sc, "d"5Sc, "d"INVDEC, "d"8Sc, "l"5Sc, "d"5Sc, "d"INVDEC, "l"11Sc (38)
Body - Row 18 :
"l"4Sc, "d"10Sc, "l"5Sc, "d"7Sc, "l"7Sc, "d"5Sc (38)
Body - Row 19 :
"d"1Sc, "l"6Sc, "d"5Sc, "l"6Sc, "d"9Sc, "l"5Sc, "d"6Sc (38)
Info :
Stuff the body. Continue crocheting.
Body - Row 20 :
"d"1Sc, "l"9Sc, "d"2Sc, "l"6Sc, "d"9Sc, "l"4Sc, "d"5Sc, "l"2Sc (38)
Body - Row 21 :
"l"9Sc, "d"4Sc, "l"6Sc, "d"9Sc, "l"3Sc, "d"4Sc, "l"3Sc (38)
Body - Row 22 :
"l"9Sc, "d"5Sc, "l"6Sc, "d"9Sc, "l"2Sc, "d"3Sc, "l"3Sc, "d"1Sc (38)
Body - Row 23 :
"d"16Sc, "l"5Sc, "d"8Sc, "l"2Sc, "d"3Sc, "l"3Sc, "d"1Sc (38)
Body - Row 24 :
"d"18Sc, "l"5Sc, "d"5Sc, "l"3Sc, "d"4Sc, "l"3Sc (38) Attention, next row starts with a stitch in a new color, so remember to change the color in the last single crochet for this row.
Body - Row 25 :
"d"10Sc, "l"6Sc, "d"4Sc, "l"4Sc, "d"3Sc, "l"3Sc, "d"6Sc, "l"2Sc (38)
Body - Row 26 :
"l"1Sc, "d"8Sc, "l"8Sc, "d"5Sc, "l"7Sc, "d"8Sc, "l"1Sc (38)
Body - Row 27 :
"l"18Sc, "d"5Sc, "l"5Sc, "d"10Sc (38) Attention, next row starts with a stitch in a new color, so remember to change the color in the last single crochet for this row.
Body - Row 28 :
"l"19Sc, "d"5Sc (mark the last stitch, red in my Image 31), "l"3Sc, "d"11Sc (38) mark the end of the row with a marker pin – orange in my Image 32
Body - Row 29 :
"d"1Sc (you can cut the darker yarn you will not need it in the next rows). All the next stitches will be done with lighter yarn ("l") 6Sc (mark this last stitch with a marker/pin, yellow in my Image 33), 2Sc, 2INC, 3Sc, connect to the marked stitch (yellow in my Image 34, do not remove the marker, you will need it later) by making 1Sc. Consider this last stitch as the end of the row. You will now continue crocheting the first horn.
— Horns (Body 1) :
First horn (Body 1) - Row 1 :
Continue crocheting in spiral, with lighter yarn ("l"). INVDEC, Sc, INC, Sc, INVDEC, Sc, INVDEC
First horn (Body 1) - Row 2 :
INVDEC, Sc, INC, 2Sc, INVDEC
First horn (Body 1) - Row 3 :
3INVDEC
Info :
Cut the yarn. Use a needle to guide the yarn tail inside the horn. Cut the excess yarn off.
Second horn (Body 1) - Introduction :
In the first marked stitch in row 28 (red in my Image 41) connect darker colored yarn ("d"). Make 1Sc in the next stitch. Move the marker/pin (red in my case) to this stitch (Image 43). Continue crocheting in spiral with the darker colored yarn ("d").
Second horn (Body 1) - Row 1 :
3Sc, 2INC, 4Sc, Chain 2 (Image 44), Connect to the marked stitch (red marker in my Image 45) by making 1Sc.
Second horn (Body 1) - Row 2 :
2INVDEC, 2INC, 2INVDEC, Sc, BLO 3Sc (mark the last Sc with a marker/pin, red in my Image 46)
Second horn (Body 1) - Row 3 :
3Sc (mark the last Sc with a marker/pin, blue in my Image 47), 2INC, 2Sc, Chain 1, connect to marked stitch (blue marker in my case, Image 49 & 50) by making 1Sc. You can remove the marker.
Second horn (Body 1) - Row 4 :
2Sc, 3INVDEC. Fasten off. Cut the yarn, hide the tail inside the horn using a needle.
Third horn (Body 1) - Row 1 :
Connect darker colored yarn ("d") in the marked stitch (red in my Image 54). Make 1Sc in the next stitch. Move the marker here (red in my Image 55). Then continue 1Sc, 2 Sl St at the base of second horn (see red dots in my Image 56), 2 Sl St, 2 FLO Sc, Sc in the marked stitch (red in my case).
Third horn (Body 1) - Row 2 :
4INVDEC
Third horn (Body 1) - Row 3 :
3Sc. Fasten off. Cut the yarn, hide the tail inside the horn using a needle.
Finishing the Body (Body 1) :
On the marked stitch on row 29 of the body, (orange marker in my Image 61) connect darker colored yarn ("d"). Sc in the next stitch (move the marker here, orange in my Image 62). Continue crocheting: 5Sc, Sc at the base of horn in the marked stitch (yellow in my Image 63), Sc on the other side at base of horn, 9Sc, Sc at the base of the other horn (green dot in my Image 66), 2Sc on the middle at the base of horn (red dots in my Image 66), Sc on the other side at the base of horn (blue dot in my Image 66), 4Sc, Sl St in the marked stitch (orange in my Image 68). Fasten off. Cut the yarn, leave a long end for sewing.
Info :
Stuff the body and the horns. Using a needle, guide the yarn tail to one of the extremities of the body, just at the base of one of the horns. Sew to unite the front part of the body to the back part. To do this seamlessly sew the back loops only on the front part with the back loops only on the back part. Hide the tail inside the body.
— Body 2 :
Info :
For the body you will use 2 colors of yarn, a darker color and a lighter color of your choosing. Start with the darker yarn.
First leg (Body 2) - Row 1 :
6Sc in magic circle (6)
First leg (Body 2) - Row 2 :
6INC (12)
First leg (Body 2) - Row 3 :
BLO 12Sc (12)
First leg (Body 2) - Row 4-5 :
Sc in each Sc around (12)
First leg (Body 2) - Row 6 :
2Sc (mark the front loops only on these 2 stitches with a colored pen/marker, red in my Image 79), 10Sc
Info :
Cut the yarn, leave a small tail and hide it inside the leg using a needle.
Second leg (Body 2) - Row 1 :
6Sc in magic circle (6)
Second leg (Body 2) - Row 2 :
6INC (12)
Second leg (Body 2) - Row 3 :
BLO 12Sc (12)
Second leg (Body 2) - Row 4-5 :
Sc in each Sc around (12)
Second leg (Body 2) - Row 6 :
2Sc, Sc (mark this stitch with a marker/pin, red in my Image 80), 9Sc (12)
Infos :
2Sc, Chain, Turn (2). Skip chain, 2Sc, Chain, Turn (2). Skip chain, 2Sc, Chain, Turn (2). Skip chain, 2Sc, Chain, Turn (2). Skip chain, 2Sc, Chain, Turn (2). Skip chain, 2Sc, Chain, Turn (2). Skip chain, 2Sc, Chain (mark this chain using a marker/pin, blue in my Image 82), Turn (2). Skip marked chain, take the first leg and connect it with the second leg by crocheting 2Sc. When crocheting these two stitches, take the back loops only on the second leg (green in my Image 83 & 84) and the front loops only on the first leg (the ones you marked with a colored pen, red in my Image 83 & 84).
Info :
Then continue crocheting the body.
Body 2 - Row 1 :
Sc on the first leg (mark this stitch with a marker/pin, purple in my Image 86), 4Sc, INC, 4Sc (you have now finished the stitches on the first leg), Sc on the marked chain in the last row of the middle part (blue in my case, you can now remove the marker/pin), continue crocheting along the margin of the middle part 3Sc, INC, 3Sc, continue crocheting on the second leg, Sc on the marked stitch on the second leg (red in my Image 87, you can now remove the marker/pin), continue crocheting on the second leg 4Sc, INC, 4Sc, continue crocheting on the margin of the middle part 2Sc, INC, 3Sc (38) Consider this the end of the first row.
Body 2 - Row 2 :
Sc in the marked stitch (purple in my case, you can remove the marker/pin), 4Sc, INC, 7Sc, INC, 4Sc, INC, 6Sc, INC, 3Sc, INC, Sc (44)
Info :
You will now start alternating the yarn colors. Follow my instructions on changing colors that you can find on the Body 1. Starting with the next row, crochet with darker colored yarn when you read "d" and with lighter colored yarn when you read "l".
Body 2 - Rows 3 to 29 :
Follow the exact same row-by-row color sequence and stitch counts as for Body 1 (rows 3 to 29), alternating "d" and "l" as indicated by your color plan. Mark the end of rows and the connection points exactly as described for Body 1. Markers referenced: Image 91-97 for guidance.
These tiny Leaf Spirits are small bundles of personality and color, perfect for gifting or display. Each one is easy to customize with different mask shapes and colors to create a whole forest of friends. Happy crocheting and enjoy creating your own whimsical companions! 🍃🧶