🧢 Beautiful ✨ Detailed πŸ’ Adorable

Lavender Pattern

Lavender Pattern
4.8β˜… Rating
2-3 Hours Time Needed
2.2K Made This
βœ‚οΈ

Beginner Friendly Level

Perfect for those just starting their crochet journey, with clear instructions and simple techniques

⏱️

Bite-Sized Project

Finishes in 2-4 hoursβ€”perfect for an afternoon of creative relaxation.

🏑

Cozy Accent

A warm touch for your space that transforms ordinary corners into inviting nooks filled with handmade charm.

About This Lavender Pattern

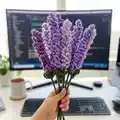
This pattern teaches you how to crochet realistic lavender stems using worsted weight yarn and basic stitches. You will make the lavender spike, an optional leaf, and learn a simple assembly method to attach the spike to a floral stem. The finished stems are perfect for bouquets, vases, or decorative arrangements and are easy to customize.

Lavender Pattern crochet pattern - detailed view of completed project

The instructions are beginner-friendly and written in US crochet terminology. Step-by-step assembly photos and tips are included to help you finish professional-looking stems.

Why You'll Love This Lavender Pattern

I absolutely love this pattern because it transforms simple yarn into delicate, lifelike lavender sprigs that brighten any room. I enjoy how quickly each stem comes together β€” it feels satisfying to make a whole bouquet in a short time. I also love the versatility: you can change colors, lengths, and textures to create different styles. This pattern is a gentle, creative project I always come back to when I want a relaxing, productive craft session.

Lavender Pattern step 1 - construction progress Lavender Pattern step 2 - assembly progress Lavender Pattern step 3 - details and accessories Lavender Pattern step 4 - final assembly and finishing

Switch Things Up

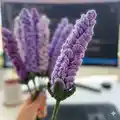
I love experimenting with different yarn colors β€” try pastel purples, lavenders, or deeper violets to create varied bouquets.

I often use variegated yarn for a natural, mottled look; it gives each spike unique shading without extra effort.

I sometimes change the chain length to make a range of sizes, mixing short and long spikes in one bouquet for visual interest.

I like to replace floral wire with wooden skewers for a budget-friendly alternative; just be sure to wrap them well with green yarn.

I recommend swapping worsted yarn for a finer sport weight if you want miniature lavender stems for keychains or small displays.

I sometimes glue tiny beads or French-knot style embroidery at the base of the spike to mimic buds for a different look.

I enjoy making matching sets β€” create several stems in a single session and tie them with ribbon for quick gifts or market bundles.

I customize leaf shapes by changing the number of leaves in the magic ring or making larger leaves for a more dramatic foliage base.

I also add a light linen or lavender-scented spray to finished bouquets if I want them to double as scented decor or gifts.

I encourage trying different stem coverings β€” floral tape, yarn winding, or twine each give a distinct finish and feel to your stems.

I sometimes mount finished stems in small bottles or bud vases for a modern display; grouping three stems often looks elegant and simple.

Common Mistakes & How to Fix Them

βœ— Not leaving the center hole of the magic ring large enough for the floral wire; ensure you leave the MR hole big enough before tightening so the wire can be inserted easily. βœ— Chaining the wrong length for the lavender spike which causes incorrect size; count your chains carefully and make a short test spike to decide the length you prefer. βœ— Not securing the yarn to the floral wire before wrapping which can cause slippage; apply hot glue and press the yarn down before twisting to hold it in place. βœ— Winding the lavender with the chain loops facing inwards making it look flat; make sure the chain loops face outwards as you wind for a natural, textured look. βœ— Forgetting to leave long tails when fastening off which makes finishing difficult; always leave a 6" tail on the lavender and a few inches on leaves for easy attachment.

Lavender Pattern

Make charming, handcrafted crochet lavender stems to decorate your home or give as thoughtful gifts. This pattern uses simple stitches and worsted weight yarn so you can make elegant lavender bouquets quickly. Follow step-by-step instructions for the lavender spike, optional leaf, and complete assembly with floral wire. Perfect for crafters who enjoy small, decorative projects and handmade floral arrangements.

Beginner Friendly 2-3 Hours

Materials Needed for Lavender Pattern

β€” Main Fabric

  • 01
    Yarn (Weight 4) - Purple + green
  • 02
    Suggested brands: Big Twist Value or Red Heart Super Saver (worsted/weight 4)

β€” Tools Required

  • 01
    Crochet hook (4.0mm)
  • 02
    Darning needle
  • 03
    Scissors
  • 04
    Hot glue + hot glue gun
  • 05
    Floral wire stems (2mm, 15" long) OR wooden skewers if you don't have wire stems
  • 06
    Ribbon
  • 07
    Decorative paper + mesh for bouquet wrapping

Progress Tracker

0% Complete

β€” Lavender Pattern :

Step 1 :

Ch 63*

Step 2 :

In the fourth chain from the hook, place 4 TR, ch 3, sl st to the same ch you started with.

Step 3 :

Sl st to the next ch. [Ch 7. Sl st back to the same ch you started with. Sl st to the next stitch.] Repeat [ _ ] down the entire length of your chain.

Step 4 :

FO once you reach the last ch. Leave a 6" tail. Using a darning needle, weave in the end.

Info :

* The length of your chain will alter the length of your lavender. If you want a shorter lavender, chain fewer stitches.

β€” Lavender Leaf :

Step 1 :

Place 5 HDC in a MR. After the fifth HDC, sl st to the top of your first HDC to form a ring. Pull the end of the MR tail tightly to close the circle. Make sure to leave the center hole large enough for your floral wire to fit through.

Step 2 :

Ch 6. Working down the chain, 4 sl st, 1 sc in the last chain. Sl st to the next stitch from the MR. Repeat this process until you have 5 leaves. FO and leave a tail of a few inches. Using a darning needle, weave in the ends.

Info :

Working down the chain: 4 sl st, 1 sc, sl st to the next st of the MR. Create 5 leaves.

β€” Lavender Assembly :

Step 1 :

Cut your floral wire to your desired length.

Step 2 :

Put a small amount of hot glue on one end of the floral wire. Before the glue dries, place your green yarn on the glue to attach it.

Step 3 :

Twist the floral wire to wind the green yarn around the entire length of the wire.

Step 4 :

Place a small amount of hot glue on the other end of the wire, cut your green yarn, and glue it down.

Step 5 :

Place a small amount of hot glue on the end of the lavender where you made the 4 treble crochet stitches. Attach the lavender to the end of the floral wire.

Step 6 :

Wind the lavender around the floral wire. Make sure the chain loops face outwards. Once you reach the end of the lavender, glue the end down to the floral to secure it.

Step 7 :

**OPTIONAL:** With the correct side of your work facing upwards, insert the stem through the center of the magic ring. Make sure the correct side faces upwards so the leaves curl upwards and inwards.

Step 8 :

**OPTIONAL:** Place a small amount of hot glue in a circle around the MR. Slide the leaf upwards to the bottom of the lavender stalk to glue it in place.

Info :

Steps 7 and 8 are optional for adding leaves; ensure correct orientation so leaves curl upward and inward. Secure hot glue carefully to avoid excess showing.

Assembly Instructions

  • Cut floral wire to desired stem length and secure the starting end with a small blob of hot glue, pressing the green yarn onto the glue so it adheres.
  • Wrap the green yarn around the floral wire by twisting the wire or winding the yarn, covering the full length of the stem and gluing the end down to secure it.
  • Attach the lavender spike by placing hot glue on the end where the 4 treble stitches were formed and pressing the spike to the wire until set.
  • Wind the lavender spike around the floral wire with the chain loops facing outwards; when you reach the end, glue the end down to hold it in place.
  • Optional: Insert the stem through the center of the magic ring with the correct side facing up so the leaves curl appropriately before gluing the leaf in place.
  • Optional leaf placement: add a dab of hot glue in a circle around the MR and slide the leaf up to the bottom of the lavender stalk to glue it neatly into position.

Important Notes

  • πŸ’‘Leave the magic ring center hole large enough for the floral wire before pulling the MR tight so the wire will fit through easily.
  • πŸ’‘The length of the starting chain determines the finished lavender length; chain fewer or more stitches to adjust size as desired.
  • πŸ’‘Work with the chain loops facing outwards when wrapping the lavender around the stem to keep the textured look and avoid flattening.
  • πŸ’‘Use caution with hot glue and apply small amounts to avoid visible glue spots; press parts until set and trim excess yarn tails.

This Lavender Pattern helps you create beautiful, everlasting floral stems to brighten any space with handmade charm. 🌸 Make bouquets, gifts, or home decor with simple worsted yarn and a few tools β€” perfect for gifting or decorating. 🧢 Enjoy the calming, creative process as you crochet each delicate spike and assemble a lovely bouquet to treasure.

You ask,

we answer.

FAQs

What size will the finished lavender be?

The finished lavender length depends on the starting chain; the pattern uses Ch 63 as an example, but you can chain more or fewer stitches to make longer or shorter spikes.

Can I use a different yarn weight or hook size?

Yes, you can use different yarn weights, but the final size and texture will change. Use an appropriate hook for your chosen yarn and expect differences in density and detail.

Do I need prior crochet experience for this pattern?

This pattern is beginner friendly, but you should know basic stitches like chain, slip stitch, single crochet, half double crochet, and treble to follow the instructions.

How long does it typically take to complete one lavender stalk?

Most crafters make each lavender spike in a short session; expect to finish a few stems in a couple of hours. The full bouquet time depends on how many stems you make.