🧢 Beautiful ✨ Detailed πŸ’ Adorable

Jack Skellington Amigurumi Pattern

Jack Skellington Amigurumi Pattern
4.4β˜… Rating
5-7 Hours Time Needed
2.9K Made This
βœ‚οΈ

Intermediate Level

Ideal for those with basic crochet experience, featuring slightly more advanced stitches and techniques to expand your skills.

⏱️

Weekend Treat

Takes 5-7 hours, making it an enjoyable project to finish over a couple of days.

🧸

Cute Companion

An adorable friend to cherish, handcrafted with love to bring comfort and joy for years to come.

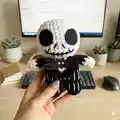
About This Jack Skellington Amigurumi Pattern

This pattern creates a plush Jack Skellington amigurumi using chenille and cotton/acrylic yarns. It features a rounded head, striped suit, tiny arms, and a felt papillon (bow). The instructions include color changes, back-loop details, and step-by-step sewing tips to finish the doll.

Jack Skellington Amigurumi Pattern crochet pattern - detailed view of completed project

Designed with photos and clear rounds to guide you through shaping and assembly. Ideal for crafters who enjoy character amigurumi with contrasting details.

Why You'll Love This Jack Skellington Amigurumi Pattern

I absolutely love this pattern because it brings a beloved character to life with simple, tactile materials. I enjoy how the chenille yarn gives the head and body a soft, plush texture that feels delightful to hold. The black-and-white contrast creates striking visual appeal and allows for creative finishing with felt and embroidery. Sewing the jacket and adding the little papillon is one of my favorite finishing steps that gives the doll personality.

Jack Skellington Amigurumi Pattern step 1 - construction progress Jack Skellington Amigurumi Pattern step 2 - assembly progress Jack Skellington Amigurumi Pattern step 3 - details and accessories Jack Skellington Amigurumi Pattern step 4 - final assembly and finishing

Switch Things Up

I love how this pattern adapts to different yarns: swap chenille for worsted acrylic to make a firmer, more defined doll.

I sometimes change colors for a fun twist; try grey or pastel shades instead of pure white for a softer look.

To make a mini keychain version, use fingering or sport weight yarn and a 2.5mm hook; youll get a tiny pocket pal.

If you want a bigger, cuddlier toy, use bulky yarn and a larger hook β€” the texture becomes extra plush and squishy.

I add embroidered eyebrows or different mouth shapes to change the expression and personality of each doll.

Try using safety eyes instead of felt for a more polished look, but felt keeps the soft theme and is safer for gifts for small children.

I often make a set with matching accessories β€” tiny hats, scarves, or a miniature pumpkin to go with the doll.

For a posable version, consider inserting craft wire into the arms or legs before stuffing for light posability.

I recommend experimenting with the papillon shape: cut felt templates and adjust sizes to create unique bowtie variations.

Don’t be afraid to combine yarns: a chenille head with cotton body can create a nice contrast of texture and stability.

Common Mistakes & How to Fix Them

βœ— Skipping stitch markers during round work leads to lost stitch counts; place a marker at the start of each round to maintain accuracy. βœ— Changing colors without securing joins will look messy at the surface; carry the yarn neatly or weave ends and use a small tail to stitch transitions invisibly. βœ— Not stuffing evenly makes the head and body lumpy and misshapen; stuff gradually and firmly, shaping as you add fiber to keep smooth, rounded forms. βœ— Cutting yarn too short when finishing leaves you without enough tail for sewing; leave a long tail as instructed to sew parts together securely. βœ— Forgetting to keep feet flat when stuffing causes imbalance; stuff feet first and flatten them while stuffing to ensure the doll stands or sits correctly.

Jack Skellington Amigurumi Pattern

Crochet your own Jack Skellington amigurumi with clear, photo-supported steps and simple shaping. This pattern uses chenille yarn for a plush, soft finish and contrasting black details for the classic suit. Youll learn head, body, arms, and jacket construction plus sewing and felt details. Perfect for gifting or seasonal decor, finished with felt eyes and embroidered mouth.

Intermediate 5-7 Hours

Materials Needed for Jack Skellington Amigurumi Pattern

β€” Main Fabric

  • 01
    Black chenille size 4 medium (chenille plush yarn, main suit color)
  • 02
    White chenille size 4 medium (chenille plush yarn for head and details)
  • 03
    Black cotton/acrylic yarn (contrast details, stripes and jacket)
  • 04
    White cotton/acrylic yarn (stripes and sewn details)
  • 05
    Black felt (for eyes and papillon/bow)
  • 06
    White felt (for small decorative details)
  • 07
    Polyester stuffing (fiber fill for head and body)

β€” Tools Required

  • 01
    Crochet hook size 5.0 mm (US H/8)
  • 02
    Tapestry needle for sewing and weaving ends
  • 03
    Stitch markers
  • 04
    Scissors
  • 05
    Hot glue or super glue (for felt eyes)
  • 06
    Pins for assembly (optional)

Progress Tracker

0% Complete

β€” Head :

Round 1 :

8sc in a mr (8)

Round 2 :

8inc (16)

Round 3 :

(sc, inc)x8 (24)

Round 4 :

(3sc, inc)x6 (30)

Round 5 :

(2sc, inc, 2sc)x6 (36)

Round 6-10 :

36sc (36) – 5 rounds

Round 11 :

(4sc, dec)x6 (30)

Round 12 :

(3sc, dec)x6 (24)

Round 13 :

(4sc, dec)x4 (20)

Info :

Cut yarn, FO with invisible join. Add fiber fill (stuff a lot to get rounded shape).

β€” Body :

Body pt.1 :

Start with black yarn R1: 5sc in a mr (5)

Round 2 :

5inc (10)

Round 3 :

BLO 10sc (10)

Round 4-5 :

10sc (10) – 2 rounds

Info :

Cut yarn and FO with an invisible join. Make another leg but this time don’t cut yarn and ch2 (pic 1).

Round 6 :

Insert the hook in any of the first leg st (pic 2) and make 10sc, 2sc in the 2ch, 10sc, 2sc in the 2ch (24)

Body pt.2 :

R7: (3sc, inc)x2, 6sc, inc, 3sc, inc, 5sc (28)

Round 8 :

BLO 28sc (28)

Round 9 :

28sc (28)

Round 10 :

13sc, cc to white 2sc. cc to black 13sc (28)

Round 11 :

12sc, cc to white 4sc, cc to black 12sc (28)

Round 12 :

(3sc, dec)x2, sc, cc to white 2sc, dec, 2sc, cc to black, sc, dec, 3sc, dec, 3sc (23)

Info :

Start stuffing as you go, when you stuff the feet remember to keep them flat.

Round 13 :

4sc, dec, 3sc, cc to white sc, dec, 2sc, cc to black 2sc, dec, 5sc (20)

Info :

Finish stuffing. Cut yarn leaving a long tail for sewing (pic 3).

β€” Arms :

Info :

Arms (x2)

Round 1 :

Start using white yarn R1: 4sc in a mr (4)

Round 2 :

4inc (8)

Round 3-5 :

cc to black 8sc (8) – 3 rounds

Round 6 :

fold the arm and close it making 4sc (4) Cut yarn leaving a long tail (pic 4).

β€” Jacket Front Hem :

Info :

Start using black yarn R1: slip knot, ch6, starting from the 2nd ch from the hook make: 1sc, 1hdc, ch 2, in the back of the 2nd ch from the hook make 1sc (pics 6-8), sc in the next 3sts. Cut yarn leaving a ling tail for sewing (pic 5).

β€” Jacket Back Hem :

Info :

Count 8 BLO sts (made in R8) in the back of the body (you can mark the first and last sts with a stitch marker).

Round 1 :

Insert hook in the BLO st of R8 and ch5 (the first ch doesn’t count as a st), sl st in the 2nd ch from the hook and make 2sc in the next 2sts.

Round 2 :

sl st in the next st, ch5, sl st in the 2nd ch from the hook and make 3sc in the next 3sts

Round 3 :

sl st in the next st, ch4, sl st in the 2nd ch from the hook and make 2sc in the next 2sts

Info :

Repeat R2 and R3 until you have 7 spikes (you should end with a short one of R3). Cut yarn and FO (pic 9).

β€” Sewing :

Info :

Sew the head to the body, add fiber fill while Sewing if needed.

Info :

Sew the arms to the body at R12-13.

Info :

Cut 2 black felt circles using pic 10 as reference and glue them on R7-9.

β€” Body details :

Info :

Sew the jacket’s front hem following the outline of the white Stitches. With white cotton/acrylic yarn sew the suit’s stripes: sew the legs’ part and the upper part separately. Cut black and white felt to make the papillon like pic.

Assembly Instructions

  • Sew the head to the body, add fiber fill while sewing if needed to shape the neck securely.
  • Attach the arms to the body at rounds R12-R13, positioning them symmetrically and sewing through both edges for a secure join.
  • Glue or sew two black felt circles as eyes on the head between rounds R7-R9 using 2.5cm diameter as reference, then embroider the mouth and nose with black yarn.
  • Sew the jacket’s front hem over the white stitches outline, aligning it with the body’s white stitch marks for a neat finish.
  • Sew the suit stripes with white cotton/acrylic yarn: add stripes to the legs and upper body separately, then attach them to the body.

Important Notes

  • πŸ’‘Use stitch markers to mark the beginning of rounds and the 8 BLO stitches used for the jacket’s back hem.
  • πŸ’‘Stuff firmly but not overstuffed for the best shape β€” stuff the head more to get a rounded appearance.
  • πŸ’‘Leave long yarn tails when finishing pieces to make sewing easier and more secure.
  • πŸ’‘When changing colors, carry yarn carefully or tuck ends to avoid visible loose ends on chenille yarn.

This Jack Skellington amigurumi pattern brings a spooky-cute classic to your hands with plush chenille and neat felt details. Create a cuddly collectible perfect for Halloween displays or year-round shelves. Share one as a unique handmade gift and enjoy the joy of crafting! πŸ§ΆπŸ–€

You ask,

we answer.

FAQs

What size will the finished piece be?

The finished amigurumi size will vary with yarn and hook, but using chenille size 4 and 5mm hook yields a handheld doll about 18-22 cm tall.

Can I use different yarn weights for this pattern?

Yes, you can substitute yarn weights but the final size and texture will change; adjust hook size accordingly and test a gauge swatch first.

Do I need prior crochet experience for this pattern?

This project is rated intermediate; you should be comfortable with basic amigurumi techniques, color changes, back loop work and sewing pieces together.

How long does this project typically take to complete?

Most crafters complete this pattern in about 5-7 hours depending on experience and time spent on finishing and felt details.