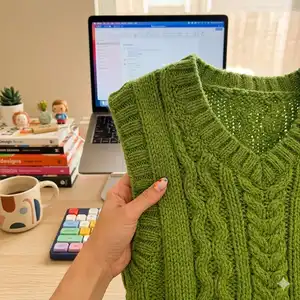
This chunky cable vest pattern gives you a cozy, modern layering piece with clear step-by-step knitting instructions and charts. You will work front and back flat then join shoulders, pick up around armholes and finish a neat ribbed edge. The design features bold cables and a flattering V-neck that works well over tees or shirts. Suitable for knitters comfortable with cables, decreases, and short-row shaping.
Progress Tracker
0% Complete
— Materials :
Info :
4 skeins of chunky wool 100g/110 yds approx. US 11/8mm needle. US 10/6mm circular needle. Cable needle. Stitch marker. Tapestry needle. Scissors.
Info :
MEASUREMENTS: Width: 17 inches (43 cm). Width stretched: 21 inches (53 cm). Front Length: 21 inches (59 cm). Back Length: 23 inches (59 cm). Armhole Circumference: 28 inches (72 cm). Neckline Height: 10 inches (26 cm).
Info :
Gauge: 4" x 4" (10 x 10 cm) = 12 sts x 13 rows.
— Stitches and Techniques Used :
Info :
1. Cast on. 2. Cast off in pattern. 3. Cast off stitches in the middle of a row. 4. Knit. 5. Purl. 6. Sew. 7. Decreases *. 8. Cables *. 9. Pick up stitches around the neck. 10. Pick up stitches around the armhole. *These techniques are explained in the references.
— References :
Info :
1. Front of work - the side you are seeing right now. 2. Back of work - the side you don't see right now. 3. RS - right side. 4. WS - wrong side. 5. *to* - do/repeat as indicated between the asterisks. 6. Stockinette stitch - *knit 1 row, purl 1 row*. Repeat from * to *.
— How to read this pattern :
Info :
You have to work this pattern Back and Forth and you must knit the front and back separately. When you work back and forth: Work all ODD rows on the WS and read the chart from left to right. Work all EVEN rows on the RS and read the chart from right to left. When you knit back and forth, once you have finished one row you must turn the work and continue knitting the next row on the opposite side. If you were knitting on the RS the next row will be on the WS and vice versa. Left and right in the instructions are given as if the vest is worn.
— Techniques & Cable Definitions :
Info :
Cast off in pattern (rib stitch) - Step 1: Work the first 2 stitches as they appear, this means knit the knits, and purl the purls. You will have 2 stitches on your right-hand needle. Step 2: Insert the left-hand needle through the first stitch worked on your right-hand needle and pass that first stitch over the second one. You will have 1 stitch on your right-hand needle. Step 3: Work 1 more stitch (knit the knits, and purl the purls) and repeat step 2. Repeat steps 2 and 3 until there are no more stitches on your left-hand needle.
Round 1 :
Left leaning decrease (RS) - Step 1: insert the right-hand needle into the next stitch on the left-hand needle as if you are going to knit it, then slip it off the left-hand needle. Step 2: slip the next stitch in the same way. Step 3: insert the left-hand needle into both of these slipped stitches, from back to front, crossed in front of the right-hand needle. Step 4: wrap the yarn around the right needle as for a regular knit stitch. Step 5: pull the right needle through the front and slip the stitches off the left needle as for one regular knit stitch.
Round 2 :
Right leaning decrease (RS) - knit 2 stitches together.
Round 3 :
Left leaning decrease (WS) - purl 2 stitches together.
Round 4 :
Right leaning decrease (WS) - Step 1: work 1 stitch as it appears. Step 2: insert the right-hand needle into the next stitch on the left-hand needle as if you are going to knit it, then slip it off the left-hand needle. Step 3: insert the left-hand needle into both of these stitches, from back to front, crossed in front of the right-hand needle, then slip it off the right-hand needle. Step 4: now pass the second stitch on the left-hand needle over the first one. Step 5: slip that stitch to the right-hand needle again.
Round 5 :
Cable 3 back (RS) - slip 1 stitch from the left-hand needle to a cable needle and leave that stitch on hold behind your work, knit the next 2 stitches from the left-hand needle, then knit 1 stitch from the cable needle.
Round 6 :
Cable 3 back (WS) - slip 2 stitches from the left-hand needle to a cable needle and leave them on hold behind your work, purl 1 stitch from the left-hand needle, then purl 2 stitches from the cable needle.
Round 7 :
Cable 3 front (RS) - slip 2 stitches from the left-hand needle to a cable needle and leave them on hold in front of your work, knit 1 stitch from the left-hand needle, then knit 2 stitches from the cable needle.
Round 8 :
Cable 3 front (WS) - slip 1 stitch from the left-hand needle to a cable needle and leave that stitch on hold in front of your work, purl 2 stitches from the left-hand needle, then purl 1 stitch from the cable needle.
Round 9 :
Cable 4 back (RS) - slip 2 stitches from the left-hand needle to a cable needle and leave them on hold behind your work, knit 2 stitches from the left-hand needle, then knit 2 stitches from the cable needle.
Round 10 :
Cable 4 front (RS) - slip 2 stitches from the left-hand needle to a cable needle and leave them on hold in front of your work, knit 2 stitches from the left-hand needle, then knit 2 stitches from the cable needle.
Round 11 :
Cable 6 back (RS) - slip 3 stitches from the left-hand needle to a cable needle and leave them on hold behind your work, knit 3 stitches from the left-hand needle, then knit 3 stitches from the cable needle.
Round 12 :
Cable 6 front (RS) - slip 3 stitches from the left-hand needle to a cable needle and leave them on hold in front of your work, knit 3 stitches from the left-hand needle, then knit 3 stitches from the cable needle.
— Start Knitting - Front :
Row 0 :
cast on 60 stitches on the needles and follow the chart.
Row 46 :
from now on you will only work with one shoulder at a time.
Row 87 :
cast off 10 stitches.
Info :
Once you have finished the right shoulder, take another yarn and continue with the left shoulder from RS of your work (row 46).
— Back :
Row 0 :
cast on 60 stitches on the needles and follow the chart.
Row 81 :
cast off 20 stitches in the middle of the row as indicated in the chart. You will have 13 stitches on each side.
Row 82 :
from now on you will only work with one shoulder at a time.
Row 91 :
cast off all 9 stitches.
Info :
Once you have finished the left shoulder, take another yarn and continue with the right shoulder from RS of your work (row 82).
— Join the Shoulders :
Info :
Place the front and back pieces facing each other; with a tapestry needle and a long enough piece of the same thread, sew the shoulders by picking up one stitch from the back and one from the front until you have no more stitches left.
— Armhole (Back and Forth - use the US 10/6mm needle) :
Row 0 :
starting from the front side, pick up 98 stitches around the armhole, that means: 49 from the front side and 49 from the back side.
Row 1 :
knit 2 *purl 2, knit 2*; repeat from *to* until the end.
Row 2-7 :
continue working in rib stitch. Work the stitches as they appear.
Row 8 :
cast off all stitches in pattern (rib stitch).
— Neck (US 10/6mm needle) :
Row 0 :
starting from the middle of the neck, pick up 40 stitches up to the shoulder seams; pick up 43 stitches from the back and 40 stitches from the other front side. You will have 123 stitches.
Info :
You must work Back and Forth so turn your work to start this row. You'll be working the WS. You must turn your work every time you start a new row.
Row 1 :
P2Tog, *k2, p2*. Repeat from * to * until you have 2 sts left. K2Tog.
Row 2 :
P2Tog, work the next sts as they appear until there are 2 sts left. K2Tog.
Row 3 to 7 :
Repeat row 2.
Row 8 :
P2Tog and place a stitch marker in that stitch (you'll have to sew the neckline later, this way it will be easier to identify the first stitch). Then cast off all sts in pattern until there are 2 sts left. You have now 1 st on the right-hand needle and 2 sts on the left-hand needle, k2Tog, cast off that st passing the st on the right needle over the st on the left needle.
— Join the Neck, Armhole & Sides :
Item Name (P1) :
1. With a tapestry needle and a long enough piece of the same thread, sew the armhole.
Item Name (P2) :
2. Sew the neckline hiding the edge stitch.
Item Name (P3) :
3. Sew the side seams, joining 20 stitches indicated in the chart with a red line.
Item Name (P4) :
4. Make a knot and weave in the tail end of yarn. Weave in any loose ends in the same way.
Item Name (P5) :
5. Tip: ¡Block your project to give it a better shape!* **Blocking is the process of wetting or steaming your final pieces of knitting to set the finished size and even out the stitches. You could use any flat surface to block your garments, just be sure that your knitted piece lies flat and fully dries so that its shape sets.
Info :
And that's it! I hope you enjoyed knitting this vest. Please send me pictures, I would love to see your finished project.
This chunky Guacamole Vest is a statement layering piece full of cozy texture and bold cables. Whether you make it for everyday wear or a special handmade gift, it will add handmade charm to your wardrobe. I hope you enjoy making and styling it—please share photos of your finished vest! 🧶💚