🧢 Beautiful ✨ Detailed πŸ’ Adorable

Hungry Hamsters Amigurumi Pattern

Hungry Hamsters Amigurumi Pattern
3.9β˜… Rating
5-7 Hours Time Needed
3.2K Made This
βœ‚οΈ

Intermediate Level

Ideal for those with basic crochet experience, featuring slightly more advanced stitches and techniques to expand your skills.

⏱️

Weekend Treat

Takes 5-7 hours, making it an enjoyable project to finish over a couple of days.

🧸

Cute Companion

An adorable friend to cherish, handcrafted with love to bring comfort and joy for years to come.

About This Hungry Hamsters Amigurumi Pattern

This pattern teaches you how to crochet tiny hamsters in two sizes: palm-sized and mini. You will also learn to make miniature snacks (cookies, pizza, watermelon, strawberry, acorn) for your hamsters to hold. The instructions are written in US crochet terminology and worked in continuous rounds for smooth shaping.

Hungry Hamsters Amigurumi Pattern crochet pattern - detailed view of completed project

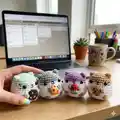
The pattern includes materials and tool suggestions, stitch abbreviations, and step-by-step assembly notes. Photos show examples and placement to help you finish each hamster neatly.

Why You'll Love This Hungry Hamsters Amigurumi Pattern

I absolutely love this pattern because it combines tiny, delightful details with simple shapes that are very satisfying to crochet. I enjoy making small amigurumi that are quick to finish but full of personality, and these hamsters are perfect for that. I also love designing tiny snacks β€” they add so much charm and let you practice micro-crochet techniques. Every finished hamster makes me smile and I hope you feel the same joy while stitching them.

Hungry Hamsters Amigurumi Pattern step 1 - construction progress Hungry Hamsters Amigurumi Pattern step 2 - assembly progress Hungry Hamsters Amigurumi Pattern step 3 - details and accessories Hungry Hamsters Amigurumi Pattern step 4 - final assembly and finishing

Switch Things Up

I love how easy it is to customize these hamsters by changing colors β€” try pastels for a soft nursery set or bright shades for playful characters.

You can make them larger by switching to worsted weight yarn and a bigger hook for a chunkier, cuddlier version.

For a keychain or bag charm, create a smaller version by using embroidery thread and a 0.75mm hook and attach a keyring through a sewn loop.

Change the snacks to seasonal items: a tiny heart for Valentines, a mini pumpkin for autumn, or a tiny wrapped present for holiday giftings.

I often add embroidered eyebrows or tiny blush spots with pink thread to change the hamster's expression and personality.

Try different eye types: safety eyes for stability, or French knots/stitched eyes for a softer, child-safe toy.

Add tiny accessories like scarves, bows, or felt hats to create a whole hamster wardrobe and tell a story with your set.

Mix and match yarn textures: a fuzzy yarn for a fluffy top or tail gives a different tactile result and makes each hamster unique.

If you want posable arms, insert a small piece of craft wire inside the limb before closing and wrap it with yarn for stability.

I recommend experimenting with thread thickness for the snacks β€” thinner thread makes finer details, while slightly thicker thread makes the snacks more visible on a small hamster.

Common Mistakes & How to Fix Them

βœ— Skipping the magic ring tightening can leave a hole at the top; pull the ring closed firmly and weave the tail in to secure the center. βœ— Using a hook that is too large for snack pieces will make them floppy and lose shape; use a hook 3-4 sizes smaller for snacks as suggested. βœ— Forgetting to place safety eyes between the correct rounds leads to misaligned faces; insert eyes between Rounds 8 & 9 about six stitches apart as instructed. βœ— Overstuffing the head or body changes the intended shape and stretches stitches; stuff gradually until semi-firm and adjust as you go. βœ— Not counting stitches after increases and decreases causes uneven shaping; count your stitches at the end of each round, especially after Rounds with changes.

Hungry Hamsters Amigurumi Pattern

Create a set of adorable Hungry Hamsters with this detailed amigurumi pattern. You'll make both palm-sized and mini versions, plus tiny snacks for them to hold. The pattern includes full round-by-round instructions, snack patterns, and clear assembly steps to finish your cuddly hamsters.

Intermediate 5-7 Hours

Materials Needed for Hungry Hamsters Amigurumi Pattern

β€” Main Fabric

  • 01
    Monaco Mercerized Cotton Thread - recommended for Mini Hamster (use with 1.10mm crochet hook)
  • 02
    Monaco Acrylic Yarn (3-ply) - recommended for Palm-sized Hamster (use with 2.25mm crochet hook)
  • 03
    DMC Embroidery Threads - for tiny snacks and details (split strands as needed for micro crochet)
  • 04
    Assorted small amounts of contrast colors for snack details (brown for chocolate chips, red/green for pizza/watermelon, pink/white/green for strawberry and leaf)

β€” Tools Required

  • 01
    Crochet hook size 2.25mm (for palm-sized hamster body)
  • 02
    Crochet hook size 1.10mm (for mini hamster body and some snacks)
  • 03
    Crochet hook size 0.75mm (recommended for very tiny snack details with DMC thread)
  • 04
    Safety eyes 6mm (2 pieces) for palm-sized hamster
  • 05
    Safety eyes 3mm (2 pieces) for mini hamster
  • 06
    Stitch marker
  • 07
    Black embroidery/sewing thread for mouth and whiskers
  • 08
    Tapestry/sewing needle
  • 09
    Toy stuffing (polyfill)
  • 10
    Scissors

Progress Tracker

0% Complete

β€” Head/Body :

Round 1 :

6sc in MR (6)

Round 2 :

inc x6 (12)

Round 3 :

(inc, sc) x6 (18)

Round 4 :

(inc, 2sc) x6 (24)

Round 5 :

(inc, 3sc) x6 (30)

Rounds 6-7 :

sc around [2 rounds] (30)

Rounds 8-9 :

s2white sc around [2 rounds] (30)

Info :

Insert eyes between Rounds 8 & 9 (about 6 stitches apart).

Round 10 :

(inc, 4sc) x6 (36)

Rounds 11-12 :

sc around [2 rounds] (36)

Round 13 :

(inc, 5sc) x6 (42)

Round 14 :

(dec, 5sc) x6 (36)

Round 15 :

(dec, 4sc) x6 (30)

Round 16 :

(dec, 3sc) x6 (24)

Info :

Start filling with polyfill until semi-firm.

Round 17 :

(dec, 2sc) x6 (18)

Round 18 :

(dec, sc) x6 (12)

Round 19 :

dec x6 (6)

Info :

Finish off and add more stuffing until body is well-shaped. Sew close.

β€” Legs :

Item Name (Leg) :

Using 2.25mm hook. Make 4 in beige. Leave some allowance before you start your chain. Ch 2 and hdc in 2nd ch from hook. Finish off and leave long tail for sewing.

β€” Ears :

Round 1 :

Ch2, 4sc in 2nd ch from hook (4)

Round 2 :

(inc, sc) x2 (6)

Info :

Cut thread and leave long tail for sewing

β€” Tail :

Round 1 :

Ch2, 4sc in 2nd ch from hook (4)

Info :

Cut thread and leave long tail for sewing

β€” Cookie A (using 2.25mm hook) :

Round 1 :

In MR, ch2 then 8 hdc around (8)

Round 2 :

Sl st in each st around (8)

Info :

Leave long yarn tail for sewing. With brown yarn, sew on small chocolate chips

β€” Cookie 2 (using smaller hook and yarn as hamster) :

Round 1 :

6sc in MR (6)

Round 2 :

inc x6 (12)

Round 3 :

(inc, sc) x6 (18)

Round 4 :

sc around BLO (18)

Round 5 :

(dec, sc) x6 (12)

Round 6 :

dec x6 (6)

Info :

Finish off and leave long tail for sewing. With dark brown thread/yarn, sew small triangles to make choco chips. Sew close.

β€” Mini Watermelon/ Pizza :

Round 1 :

4sc in MR (4)

Round 2 :

(inc, sc) x2 (6)

Round 3 :

(inc, 2sc) x2 (8)

Round 4 :

(inc, 3sc) x2 (10)

Round 5 :

(inc, 4sc) x2 (12)

Round 6 :

(inc, 5sc) x2 (14)

Info :

Finish off and leave long tail for sewing. Flatten triangle, making sure that the yarn tail is situated on the side. For the watermelon slice, sew on some black thread to put watermelon seeds (this part is optional). For the pizza slice, embroider 3-4 pepperoni slices with red thread. Sew 4-5 times over the same stitch (careful not to make them overlap). Embroider peppers by sewing green thread 2-3 times diagonally randomly on the pizza. Sew close the pizza/watermelon slice close by threading the yarn tail through the back loops of the last round.

β€” Mini Strawberry (using 1.10mm hook) :

Round 1 :

6sc in MR (6)

Round 2 :

sc around (6)

Round 3 :

inc x6 (12)

Round 4 :

(inc, 2sc) x4 (16)

Round 5 :

sc around (16)

Round 6 :

(dec, sc) x4 (12)

Round 7 :

dec x6 (6)

Info :

Stuff lightly and finish off with long tail for sewing. Embroider strawberry seeds with white yarn and sew close. Do not cut off yarn tail so you can use it to sew on to the hamster.

β€” Strawberry leaf - Make in green :

Info :

In a magic ring, *ch 2 then sl st in the 2nd ch from hook. Sl st again into the magic ring*. Repeat ** 4 more times. Leave long tail for sewing and sew on top of strawberry.

β€” Mini Acorn (using 1.10mm hook) :

Round 1 :

6sc in MR (6)

Round 2 :

(inc, sc) x3 (9)

Round 3 :

(inc, 2sc) x3 (12)

Round 4 :

sc around (12)

Round 5 :

(inc, 3sc) x3 (15)

Round 6 :

sc around BLO (15)

Info :

Finish off. Do not sew close.

β€” Acorn cap - Make in dark brown :

Round 1 :

6sc in MR (6)

Round 2 :

inc x6 (12)

Round 3 :

(inc, sc) x6 (18)

Round 4 :

sl st around (18)

Info :

Finish off with long thread for sewing and sew the front loops of the acorn cap to the edge of the acorn. Embroider a French knot to the top as the nub.

β€” Assembly :

Info :

Note: Attach the individual parts to the body with sewing pins first to make sure you're happy with the placement.

Item 1 (Mouth) :

With black sewing thread or yarn, sew a small dash (-) between the eyes between R7&8. Sew a vertical line (|) from the center of the nose down. Sew on 2 diagonal lines (v) to give him a tiny smile.

Item 2 (Whiskers) :

Sew two diagonal lines beside the eyes to make the whiskers.

Item 3 (Ears) :

Sew the ears to the top of the head about 6 stitches apart.

Item 4 (Snack) :

Sew on the snack of choice on the center of the belly.

Item 5 (Hands) :

Sew the hands as if they are holding the snack. Use sewing thread in a similar shade to keep it secure and unnoticeable.

Item 6 (Leg placement) :

Count 2 rounds down from the hands and sew the legs horizontally facing towards the belly. They should align with the eyes.

Item 7 (Tail) :

Sew the tail on the back of the hamster around R15.

Assembly Instructions

  • Attach the individual parts (ears, hands, legs, tail) to the body with sewing pins first to check placement before sewing permanently.
  • With black sewing thread or yarn, sew a small dash (-) between the eyes between R7 & R8, then a vertical line (|) from nose center down and two small diagonal lines (v) to form a tiny smile.
  • Sew two diagonal whisker lines beside each eye using black thread, keeping stitches short and even.
  • Sew the ears to the top of the head about 6 stitches apart, positioning symmetrically and securing with hidden stitches.
  • Sew the snack of choice to the center of the belly and then attach the hands as if holding the snack; use thread similar in color to keep attachments discreet.
  • Count two rounds down from the hands and sew the legs horizontally facing the belly so they align with the eyes for a balanced look.
  • Sew the tail on the back of the hamster around R15 and secure all loose ends by weaving them into the body.

Important Notes

  • πŸ’‘Use stitch markers to keep track of your rounds, especially during color changes and shaping sections.
  • πŸ’‘For snacks, use a hook 3-4 sizes smaller than the one used for the hamster body to achieve firm, tiny pieces.
  • πŸ’‘Start stuffing gradually and stop when the body is semi-firm to maintain correct shape; add more stuffing before closing completely.
  • πŸ’‘Insert safety eyes between Rounds 8 and 9 about six stitches apart to match the photographed placement.
  • πŸ’‘When using DMC embroidery thread for micro crochet, split the strands as needed (for example, use 3 strands) to avoid overly thick details.

These charming Hungry Hamsters are quick, addictive makes that make perfect gifts or collectibles. Each tiny hamster is packed with personality thanks to miniature snacks and sweet facial details. Make a family of hamsters in different colors and enjoy every tiny stitch! 🧢✨

You ask,

we answer.

FAQs

What size will the finished piece be?

The palm-sized hamster measures approximately 6 cm tall and the mini hamster measures approximately 3 cm tall when using the recommended yarn and hook sizes.

Can I use different yarn weights for this pattern?

Yes, you can use different yarn weights but this will affect the final size; adjust your hook accordingly and remember the snacks require a much smaller hook for firmness.

Do I need prior crochet experience for this pattern?

This pattern is rated intermediate, so basic knowledge of magic ring, single crochet, increases, invisible decreases, and continuous round working is recommended.

How long does this project typically take to complete?

Most makers complete a single palm-sized hamster with snacks in around 5-7 hours; minis are quicker, and time varies by experience and how many accessories you add.

What hook sizes do I need for snacks and details?

Use a hook 3-4 sizes smaller for snack patterns (for example 1.10mm or 0.75mm depending on thread) than the hook used for the hamster body to achieve tiny, firm snacks.