🧢 Beautiful ✨ Detailed πŸ’ Adorable

Duck and Goose Trinket Tray Amigurumi Pattern

Duck and Goose Trinket Tray Amigurumi Pattern
3.9β˜… Rating
2-4 Hours Time Needed
1.3K Made This
βœ‚οΈ

Intermediate Level

Ideal for those with basic crochet experience, featuring slightly more advanced stitches and techniques to expand your skills.

⏱️

Bite-Sized Project

Finishes in 2-4 hoursβ€”perfect for an afternoon of creative relaxation.

🧸

Cute Companion

An adorable friend to cherish, handcrafted with love to bring comfort and joy for years to come.

About This Duck and Goose Trinket Tray Amigurumi Pattern

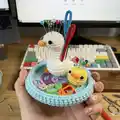
This pattern creates a small trinket tray with a goose pin cushion and a mini ducky, perfect for keeping pins and small treasures handy. It uses continuous rounds and simple amigurumi shaping to build charming, sturdy pieces. You will learn small-scale increases, decreases, and how to attach features like beaks and safety eyes.

Duck and Goose Trinket Tray Amigurumi Pattern crochet pattern - detailed view of completed project

The finished set is compact and decorative, ideal for gifting or keeping at your craft table. Materials are minimal and the project uses worsted weight yarn with a 3.0mm hook.

Why You'll Love This Duck and Goose Trinket Tray Amigurumi Pattern

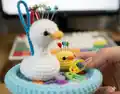
I absolutely love this pattern because it combines functionality with cutenessβ€”your pins stay organized on the tray while looking delightful. I enjoy the simple shaping that turns into a characterful goose with a bendable neck and a tiny ducky companion. The pattern is compact enough to finish quickly but satisfying because of the charming details. I also appreciate how easy it is to customize colors to match your craft room or give as a thoughtful handmade gift. This design brings joy to both the maker and the recipient.

Duck and Goose Trinket Tray Amigurumi Pattern step 1 - construction progress Duck and Goose Trinket Tray Amigurumi Pattern step 2 - assembly progress Duck and Goose Trinket Tray Amigurumi Pattern step 3 - details and accessories Duck and Goose Trinket Tray Amigurumi Pattern step 4 - final assembly and finishing

Switch Things Up

I love customizing color palettes for this pattern, and you can easily swap Color A for a neutral or pastel to match your decor.

I sometimes use a slightly larger hook and bulky yarn to make a chunkier, more decorative tray for display.

I often replace safety eyes with embroidered eyes for a softer, child-friendly finish.

I add tiny crocheted flowers or felt appliques to the tray base to make it seasonal or themed.

I like to make a set of multiple mini duckies in different colors to create a playful cluster on the tray.

I sometimes stitch a small felt lining into the tray for extra structure and a neater interior surface.

I recommend experimenting with eyelid placement or mouth embroidery to give each bird a different expression.

I also try adding a little wire to the goose's neck when I want a poseable decoration that holds light curves.

I often change the beak color or make a tiny bow tie for the ducky to personalize gifts.

I enjoy gifting these as sewing room accessories and sometimes include a matching pair of scissors or a small needlebook to complete the set.

Common Mistakes & How to Fix Them

βœ— Skipping the BLO round for the tray rim can cause the edges not to curve properly; work the BLO round exactly as written to shape the rim inward. βœ— Forgetting to place safety eyes at the recommended rounds will misplace facial features; insert the safety eyes between the specified rounds before closing the head. βœ— Stuffing too early or too much will make shaping difficult; begin stuffing gradually and continue stuffing as you decrease to keep the shape smooth. βœ— Not weaving in and securing long tails can cause parts to come loose after assembly; leave long tails and sew pieces firmly, then weave in ends neatly.

Duck and Goose Trinket Tray Amigurumi Pattern

Create a charming duck and goose trinket tray that doubles as a pin cushion with this intermediate amigurumi pattern. You will make a neat base tray, a sweet goose with a bendable neck, and a tiny ducky β€” perfect for gifts or sewing room decor. Clear round-by-round instructions and useful assembly details help you finish a polished, functional piece. Enjoy a playful, compact project that showcases simple shaping and adorable details.

Intermediate 2-4 Hours

Materials Needed for Duck and Goose Trinket Tray Amigurumi Pattern

β€” Main Fabric

  • 01
    Type 4 yarn (worsted weight) - Color A: base trinket color (blue)
  • 02
    Type 4 yarn (worsted weight) - Color B: goose color (white)
  • 03
    Type 4 yarn (worsted weight) - Color C: ducky color (yellow)
  • 04
    Type 4 yarn (worsted weight) - Color D: color of beak (orange)
  • 05
    Polyfill / stuffing for bodies and cushion

β€” Tools Required

  • 01
    Crochet hook size 3.0mm
  • 02
    Type 4 yarn (worsted)
  • 03
    Polyfill for stuffing
  • 04
    Darning needle
  • 05
    Scissors
  • 06
    4.0mm safety eyes OR black felt and fabric glue

Progress Tracker

0% Complete

β€” Base Trinket Tray :

Round 1 :

8 sc into mr (8)

Round 2 :

incr into every st (16)

Round 3 :

(1 sc, 1 incr) x8 (24)

Round 4 :

(2 sc, 1 incr) x8 (32)

Round 5 :

(3 sc, 1 incr) x8 (40)

Round 6 :

(4 sc, 1 incr) x8 (48)

Round 7 :

(5 sc, 1 incr) x8 (56)

Round 8 :

(6 sc, 1 incr) x8 (64)

Round 9 :

BLO sc into every st (64)

Rounds 10-12 :

sc into every st (64)

Info :

Slip stitch and fasten off, weave in the tail.

Info :

The 'neater' side of the trinket should be facing the inside, so that the rims of the tray would naturally curve inwards.

Info :

The base of your trinket dish is now complete.

β€” Goose Body :

Round 1 :

6 sc into mr (6)

Round 2 :

incr into every st (12)

Round 3 :

(1 sc, 1 incr) x6 (18)

Rounds 4-5 :

sc into every st (18)

Infos :

You may now insert the safety eyes between rounds 4-5. The safety eyes should be placed along the side of the goose's head.

Info :

Begin to stuff the goose's body. Continue stuffing as you decrease.

Round 6 :

3 sc, 6 decr, 3 sc (12)

Round 7 :

2 sc, 4 decr, 2 sc (8)

Rounds 8-10 :

sc into every st (8)

Round 11 :

2 incr, 4 sc, 2 incr (12)

Round 12 :

3 incr, 6 sc, 3 incr (18)

Round 13 :

4 incr, 11 sc, 3 incr (25)

Round 14 :

6 incr, 14 sc, 5 incr (36)

Round 15 :

sc into every st (36)

Round 16 :

12 sc, 6 decr, 12 sc (30)

Round 17 :

9 sc, 6 decr, 9 sc (24)

Round 18 :

6 sc, 6 decr, 6 sc (18)

Round 19 :

3 sc, 6 decr, 3 sc (12)

Info :

Fasten off, leaving a long tail for sewing.

Info :

You may need to bend the neck of the goose to create a "2" shape.

β€” Goose beak :

Using color D :

Row 1: ch 4 (4)

Row 2 :

sc in the second st from hook. Sc in the last two st (3)

Info :

Fasten off, leaving a tail for sewing.

β€” Mini Ducky :

Using color C :

Round 1: 6 sc into mr (6)

Round 2 :

incr into every st (12)

Round 3 :

(3 sc, 1 incr) x3 (15)

Rounds 4-6 :

sc into every st (15)

Infos :

You may now insert the safety eyes between rounds 3-4.

Info :

Begin to stuff the duck's body. Continue stuffing as you decrease.

Round 7 :

1 sc, 7 dec (8)

Info :

Fasten off, leaving a long tail for sewing

β€” Assembly :

Info :

Sew the goose's beak between rounds 4-5 of the goose's head.

Info :

Using the long tail of the goose body, sew the goose onto the base trinket dish at the position you'd like.

Info :

Using yarn color D, sew on a beak between rounds 3-4 of the ducky.

Info :

Using the long tail of the duck's body, sew it onto the base trinket dish at the position you'd like.

Info :

Congrats !! Your duck and goose trinket tray is now complete :" )

Assembly Instructions

  • Sew the goose's beak between rounds 4-5 of the goose's head so it sits centered on the face.
  • Using the long tail of the goose body, sew the goose onto the base trinket dish at the position you'd like and secure firmly with backstitches.
  • Using yarn color D, sew on a beak between rounds 3-4 of the ducky, centering it on the duck's face before securing.
  • Using the long tail of the duck's body, sew the mini ducky onto the base trinket dish at the desired position and weave in the tail to finish.

Important Notes

  • πŸ’‘This pattern is written in US terminology.
  • πŸ’‘This pattern is worked in continuous rounds; there is no need to sl st and ch 1 at the end of every row.
  • πŸ’‘The number written in parenthesis at the end of each row indicates the total number of stitches for that row.
  • πŸ’‘Place safety eyes at the rounds indicated before closing the head to ensure correct placement.

Finish a delightful duck and goose trinket tray that brightens your craft corner and keeps pins tidy. Make it in cheerful colors for a fun gift or a sweet desktop companion. Share your finished piece with friends and enjoy the smiles it brings. 🧢🧡

You ask,

we answer.

FAQs

What size will the finished piece be?

The finished trinket tray measures approximately 10-12 cm in diameter with the goose and ducky sized to fit comfortably on the tray, using worsted weight yarn and a 3.0mm hook.

Can I use different yarn weights for this pattern?

Yes, you can use different yarn weights but the final size and proportions will change; adjust your hook size accordingly and test with a small swatch before proceeding.

Do I need prior crochet experience for this pattern?

This pattern is rated intermediate, so familiarity with continuous rounds, increases, decreases and basic amigurumi assembly is recommended.

How long does this project typically take to complete?

Most crocheters complete this project in about 2-4 hours, depending on experience and how much time you spend on assembly and finishing touches.

Are safety eyes necessary?

Safety eyes (4.0mm) are recommended for a secure finish, but you can also use black felt with fabric glue if making the piece for a child or if you prefer no hard parts.