🧢 Beautiful ✨ Detailed πŸ’ Adorable

Houses of Wizardry Amigurumi Pattern

Houses of Wizardry Amigurumi Pattern
4.4β˜… Rating
5-7 Hours Time Needed
2.0K Made This
βœ‚οΈ

Intermediate Level

Ideal for those with basic crochet experience, featuring slightly more advanced stitches and techniques to expand your skills.

⏱️

Weekend Treat

Takes 5-7 hours, making it an enjoyable project to finish over a couple of days.

🧸

Cute Companion

An adorable friend to cherish, handcrafted with love to bring comfort and joy for years to come.

About This Houses of Wizardry Amigurumi Pattern

This pattern pack teaches you how to crochet four house-themed appliques: Lion, Badger, Raven and Snake, along with matching crests. Each applique is designed to layer onto a charcoal-outlined crest and can be made in the colorways provided or customized to your taste. The instructions include stitch counts, small parts (eyes, nose, feet), and optional scarf details for added character.

Houses of Wizardry Amigurumi Pattern crochet pattern - detailed view of completed project

Patterns are written in English Standard terms and use a 3.75mm (F) hook with Caron One Pound yarn. The projects are small (approx 6-7in tall) and perfect for gifts, badges, or decorative appliques.

Why You'll Love This Houses of Wizardry Amigurumi Pattern

I absolutely love this pattern because it combines characterful details with compact, satisfying makes that finish quickly. I enjoy designing little layered appliques that let you play with color and texture without committing to a large project. The pack lets you make matching sets with consistent sizing and a unified charcoal outline for a professional finish. I also love how easy it is to customize each house with different scarf or stripe colors to make each applique uniquely yours.

Houses of Wizardry Amigurumi Pattern step 1 - construction progress Houses of Wizardry Amigurumi Pattern step 2 - assembly progress Houses of Wizardry Amigurumi Pattern step 3 - details and accessories Houses of Wizardry Amigurumi Pattern step 4 - final assembly and finishing

Switch Things Up

I love how easy it is to customize these appliques by changing yarn colors β€” try pastel shades or bold jewel tones to change the whole mood of the piece.

To make a mini keychain version, swap to fingering/sock weight yarn and a smaller hook; the pattern scales down nicely for portable badges.

If youd like a chunkier, cuddlier applique, use bulky yarn with a larger hook for an oversized, tactile result that looks great on a tote bag.

I often add embroidered details like whiskers, eyebrows or tiny stars to give each character more personality and expression.

Swap the charcoal outline for a bright contrasting border to make the crest pop on a darker background.

Try combining felt and crochet: cut a felt backing to glue behind the crest for extra stability, or add felt eyes for a different look.

If you want durable pieces for jackets or bags, stitch the appliques onto a backing patch before attaching them to the item for stronger wear resistance.

I sometimes add small buttons, beads or tiny crocheted accessories (like a book or wand) to tell a little story with each house applique.

Experiment with carried stripes versus reattaching colors for the scarf: carrying yarn keeps edges neater while reattaching gives a crisp color change.

For a cohesive set, use the same charcoal outline and vary only the accent colors; its a simple change that unifies the whole collection.

Common Mistakes & How to Fix Them

βœ— Skipping stitch counts during increases and decreases; always count after each shaping row to maintain the correct stitch total. βœ— Not making a clear charcoal outline for the crest; attach the outline chain evenly around the crest so stripes and appliques sit flat. βœ— Pulling yarn tails too tight when making magic circles; leave a tail you can tighten gradually so the center closes neatly without puckering. βœ— Forgetting to tie off and weave ends between color changes; tie off or carry yarn securely to avoid loose ends showing on the finished surface.

Houses of Wizardry Amigurumi Pattern

Create four charming house appliques inspired by classic wizarding houses with this detailed crochet pattern pack. Youll make a lion, badger, raven and snake applique plus matching crests β€” each designed to layer together for a polished finished piece. The instructions include stitch-by-stitch directions, color suggestions, and assembly tips so you can customize and display your creations proudly.

Intermediate 5-7 Hours

Materials Needed for Houses of Wizardry Amigurumi Pattern

β€” Main Fabric

  • 01
    Caron One Pound (worsted/#4) - primary yarn used for all appliques and crests
  • 02
    Raven colors: Navy, Light Blue, Light Grey, Charcoal, Gold
  • 03
    Badger colors: Gold, Light Grey, Charcoal, White, Black
  • 04
    Snake colors: Hunter Green, Light Green, Light Grey, Red (for tongue), Charcoal
  • 05
    Lion colors: Gold, Light Yellow, White, Burgundy, Charcoal, Black
  • 06
    Additional accent scraps as needed for scarves and stripes (small amounts)

β€” Tools Required

  • 01
    Crochet hook size F (3.75mm)
  • 02
    Scissors
  • 03
    Yarn needle for sewing and weaving ends
  • 04
    Shank buttons (optional) - 13mm for larger animals, 6mm for smaller details
  • 05
    Safety eyes (optional) - small sizes to suit appliques
  • 06
    Stitch markers (optional)
  • 07
    Glue gun and regular glue sticks (optional for assembly)
  • 08
    Pins for positioning pieces during assembly

Progress Tracker

0% Complete

β€” Crests :

Info :

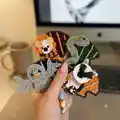
Note: Use this same pattern for all 4. Just change the colors up to what you want them to be. All of them have the charcoal outline. Raven is Navy/Light Blue. Lion is Burgundy/Gold. Badger is Gold/Light Grey. Snake is Hunter Green/Light Green.

Round 1 :

CH 18. DC in 3rd from hook and across (16). CH 2, turn.

Round 2 :

DC2TG. DC in next 12. DC2TG. (14). CH 2, turn.

Round 3 :

DC2TG. DC in next 10. DC2TG. (12). CH 2, turn.

Round 4 :

DC2TG. DC in next 8. DC2TG. (10). CH 2, turn.

Round 5 :

DC2TG. DC in next 6. DC2TG. (8). CH 2, turn.

Round 6 :

DC2TG. DC in next 4. DC2TG. (6). CH 2, turn.

Round 7 :

DC2TG. DC in next 2. DC2TG. (4). CH 2, turn.

Round 8 :

DC2TG twice. (2). Tie off.

Info :

Reattach yarn at bottom of original chain as shown here, skipping 3 stitches in.

Round 9 :

DC in 10. CH 2, turn.

Round 10 :

2DC in first. DC in next 12. 2DC in last. (16). CH 1, turn.

Round 11 :

SC in first 2. HDC in next 2. DC in next 3. TC in next 2.

Round 12 :

DC in next 3. HDC in next 2. SC in last 2. SS in same stitch. Tie off.

Info :

Using Charcoal, make a chain of 85. Tie off. Attach it all the way around the crest as shown.

Info :

Using whatever color stripes you'll be making, make the following chains and tie off. CH 15. Tie off. (Use these to create diagonal stripe pieces for the crest as desired.)

β€” Badger :

Eyes - Make 2 :

Using charcoal, CH 5. HDC in 2nd from hook and across (4). CH 1, turn.

Row 2 :

HDC2TG twice. (2). CH 1, turn.

Row 3 :

HDC across (2). CH 1, turn.

Row 4 :

HDC across (2). Tie off.

Nose :

Using black, make a magic circle. CH 1, and SC 4. SS to join. Tie off.

Nose Outline :

Using charcoal, make a CH of 10. This is the outline on the bottom of the nose.

Head :

Using white, make a magic circle. CH 2, and then DC 12. SS to join. CH 2, do not turn.

Round 2 :

2DC in each stitch around. SS to join. CH 2, do not turn.

Round 3 :

*2HDC in first. 1HDC in next. Repeat from * all the way around. SS to join. Tie off.

Arms - Make 2 :

Using charcoal, CH 12. DC in 3rd from hook and in next 3. 2DC in next. DC in remaining 5. Tie off.

Scarf :

This will be the same pattern for all 4 animals. Just change the colors to what you want. Note: You can choose to tie off after each color and reattach each color as you're making stripes, OR you can carry the yarn up the back of the scarf since it will be unseen when assembled. Your choice.

Scarf Row 1 :

Using Color #1, CH 4. HDC in 2nd from hook and across (3).

Scarf Row 2 :

*Attach Color 2. HDC across. (3). Switch to Color 1. HDC across (3). Repeat from * 3 more times, or until you have 7 rows total. Tie off. This is the piece that goes under the neck.

Scarf Panel :

Now for the piece that falls down from the neck with the fringe, repeat those instructions above, but only until you have 5 rows total. Then tie off.

Fringe :

To make the fringe, make 6 cuts of yarn, about 4 in long. Using 2 pieces at a time, tie them around the bottom of the scarf, and then cut to desired length.

Ears - Make 2 :

Using white, CH 5. SC in 2nd from hook. HDC in next. DC in next. TC in last. Tie off.

Ears - Inner :

Using light grey, CH 3. SC in 2nd from hook, and HDC in last. Tie off.

Feet - Make 2 :

Using charcoal, make a magic circle. CH 2 and DC 12. SS to join. Tie off.

Foot Pad :

Using white, CH 2. SC 3 times in last CH from hook and pull tight. Tie off.

β€” Lion :

Head :

Using gold, make a magic circle. CH 2 and DC 14. SS to join. CH 2, do not turn.

Round 2 :

2DC in each stitch around. SS to join. CH 1, do not turn.

Mane :

*4HDC in next stitch. SS in next. Skip next. Repeat from * 7 more times. The last 2 stitches will be skipped. SS to join. Tie off.

Using light yellow :

Using light yellow, make a magic circle. CH 2 and DC 12. SS to join. CH 2, do not turn.

Round :

2DC in each stitch around. SS to join. Tie off.

Eyes/Nose/Details :

Make small pads and nose similar to Badger instructions: magic circle SC 4 for nose, small pads for eyes and paw pads as shown in photos.

Feet - Make 2 :

Using gold, make a magic circle. CH 2 and DC 12. SS to join. Tie off.

β€” Raven :

Head :

Using light grey, make a magic circle. CH 2 and DC 16. SS to join. CH 2, do not turn.

Round 2 :

2DC in each stitch around. SS to join. Tie off.

Wings :

Using light grey, CH 35. SS in 2nd from hook. SC in next. HDC in next. DC in the next 28. HDC in next. SC in next. SS in last. Tie off.

Beak :

Using gold, CH 3. SS in 2nd from hook. SC in last. Tie off.

Feet :

Using gold, CH 3. In last CH from hook *DC, SS, CH 2, and repeat from * 2 more times, but do not CH 2 on the last one. Just SS and tie off.

Tail - Make 4 :

Using light grey, CH 9. SS in 2nd from hook. SC in next. HDC the rest of the way down. Tie off.

Scarf :

Scarf - Optional. Follow directions on page 6 for the scarf striping technique. Use burgundy and gold for lion, or navy and light blue for raven as desired.

β€” Raven Body & Wing Attachment :

Body :

Using light grey, CH 8. DC in 3rd from hook and across (6). CH 2, turn.

Row :

2DC in first. DC in next 4. 2DC in last. CH 2, turn.

Row :

2DC in first. DC in next 6. 2DC in last. CH 2, turn.

Row :

DC across. CH 2, turn.

Row :

DC2TG. DC in next 6. DC2TG. CH 2, turn.

Row :

DC2TG. DC in next 4. DC2TG. Tie off.

β€” Snake :

Body :

Using light grey, CH 40.

Row 1 :

SS in the 2nd from hook and in next 2. SC in next 3. HDC in next 3. 3DC in next. DC in next 5. SKIP next. DC in next 5. 3DC in next.

Row 2 :

DC in next 5. TC in next 4. HDC in next. SS in last. Tie off.

Attach :

Attach light green yarn to the end where you started with the SS (skinniest end of snake). SS in the first 4. SC in the next 2. HDC in next. DC in next 10. SKIP next. DC in next 12. SKIP next. DC in next 5.

Edge :

TC in next 4. HDC in next. SS in last. Tie off.

Info :

You can see how the snake has some natural wave to it, but when you assemble it on the crest, you can manually twist it and bend it to make the shape that you want. Using red, cut a small piece of string and attach it to the back of the head so it sticks out like a tongue.

β€” General Assembly :

Item Arrangement :

Arrange animal applique on crest as shown in pictures. Position body and limbs so they overlap the crest edges neatly before attaching.

Attach :

Attach pieces using a glue gun and regular glue sticks (author preference) or stitch pieces in place using a yarn needle; your choice. The pattern photos show glued assembly.

Detail Attachment :

Sew or glue eyes, nose and small pads (paw pads) into place. For safety, use small shank buttons or safety eyes if desired. Ensure placement is symmetrical.

Outline :

When adding the charcoal outline chain, attach it evenly around the crest and secure ends neatly so stripes and appliques sit flat.

Info :

Weave in all yarn tails and trim fringe to desired length. Pin pieces before final glue/sew to check placement and balance.

Assembly Instructions

  • Arrange the applique pieces on the charcoal-outlined crest as shown in the photos, spacing the head, body and limbs so they overlap naturally.
  • Attach the crest outline by sewing or gluing the charcoal chain all the way around the crest edge, making sure the joins are neat and consistent.
  • Glue or stitch the applique to the crest: use a glue gun for fast assembly or whipstitch with matching yarn for a secure sewn finish.
  • Sew on eyes, nose and paw pads using a yarn needle; if using safety eyes, insert them before closing the head pieces and secure with the back fasteners.
  • Add scarf pieces and fringe by tying and stitching them into place, trimming fringe to desired length and tucking any carried yarn to the back.

Important Notes

  • πŸ’‘Use stitch markers or a scrap piece of yarn to mark the first stitch of each round to keep track of where you started.
  • πŸ’‘You can assemble appliques using a glue gun as shown in photos, but you may choose to stitch pieces together for added durability.
  • πŸ’‘Weave in ends and trim excess yarn as you go to avoid bulky seams and loose tails showing on the finished applique.
  • πŸ’‘Place safety eyes or buttons before closing head pieces so you can secure them properly from the inside.

This Houses of Wizardry applique pack brings four magical characters to life in a compact, delightful crochet format. Make the full set for display, gifts, or to sew onto bags and jackets for a charming, handmade touch. Try mixing colors and textures to create your own house variations β€” the options are endless! 🧢✨

You ask,

we answer.

FAQs

What size will the finished piece be?

Each finished applique measures approximately 6-7 inches tall when using Caron One Pound yarn and a 3.75mm (F) hook as recommended.

Can I use different yarn weights for this pattern?

Yes, you can substitute yarn weights but this will change the finished size; if you use a different weight, choose an appropriate hook and expect the applique to be larger or smaller.

Do I need prior crochet experience for this pattern?

This pack is rated intermediate; familiarity with basic stitches (SC, HDC, DC), increases, decreases and working in rounds is recommended.

How long does this project typically take to complete?

Most crocheters complete an individual applique in about 1-2 hours each, while making the full set and assembling them will take approximately 5-7 hours total.

Can I assemble the appliques by stitching instead of gluing?

Yes, the designer uses a glue gun for speed, but you can stitch the pieces together securely with a yarn needle for a sewn finish that may hold up better in laundering.