🧢 Beautiful ✨ Detailed πŸ’ Adorable

Hoppy Spring Wreath Crochet Pattern

Hoppy Spring Wreath Crochet Pattern
4.1β˜… Rating
5-7 Hours Time Needed
2.1K Made This
βœ‚οΈ

Intermediate Level

Ideal for those with basic crochet experience, featuring slightly more advanced stitches and techniques to expand your skills.

⏱️

Weekend Treat

Takes 5-7 hours, making it an enjoyable project to finish over a couple of days.

🏑

Cozy Accent

A warm touch for your space that transforms ordinary corners into inviting nooks filled with handmade charm.

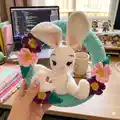
About This Hoppy Spring Wreath Crochet Pattern

Create a minty green spring wreath covered in textured crochet with pretty flowers, leaves, and an optional bunny to sit inside. The pattern includes step-by-step instructions for the wreath cover, five flowers, five leaves, and finishing details. Designed to be a fun home decor project, it is ideal for giving as a handmade gift or brightening your own entryway.

Hoppy Spring Wreath Crochet Pattern crochet pattern - detailed view of completed project

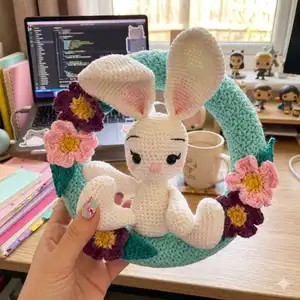
You will work mostly in simple stitches with a repeating row pattern for the wreath and quick motifs for flowers and leaves. Photos and notes guide assembly and finishing touches like hand-painted cheeks and ear shading.

Why You'll Love This Hoppy Spring Wreath Crochet Pattern

I absolutely love this pattern because it brings together simple stitches to create a polished, decorative piece that feels special. I enjoy how the repeating textured strip wraps the foam wreath so quickly, yet yields a professional finish. The small motifs β€” flowers and leaves β€” are fast to make and add so much charm with minimal time investment. I also love that you can use leftover yarn for the flowers, making this a scrappy, satisfying project that uses bits of stash yarn.

Hoppy Spring Wreath Crochet Pattern step 1 - construction progress Hoppy Spring Wreath Crochet Pattern step 2 - assembly progress Hoppy Spring Wreath Crochet Pattern step 3 - details and accessories Hoppy Spring Wreath Crochet Pattern step 4 - final assembly and finishing

Switch Things Up

I love changing the yarn color to create ombre effects on the wreath strip; try fading from teal to mint for a gradient look.

I often swap the flower colors for a seasonal paletteβ€”pastels for spring, warm tones for autumnβ€”to match decor or gifting themes.

If you want a fuller wreath, I make more flowers and cluster them tightly together, then add extra leaves for dimension.

To make a mini version, I use a smaller foam ring and lighter fingering yarn with a smaller hook to scale everything down proportionally.

I sometimes embroider contrasting centers for the flowers instead of crocheting them to add texture and tiny color pops.

You can add a ribbon loop or burlap hanger at the top for a rustic finish, or a braided yarn hanger for a softer look.

I like to swap the bunny for other small amigurumi charactersβ€”a chick or a small bird both work wonderfully with the flowers.

For an elegant touch, I use a metallic or shimmer thread as an accent in some flower petals or leaf veins to catch light.

I recommend trying slightly larger hooks and bulkier yarn for a chunky, quick version that looks very cozy on a large door wreath.

I often add wired stems behind the flower clusters to position them at different angles; this helps keep placement flexible during assembly.

Common Mistakes & How to Fix Them

βœ— Not checking your wrap length for the wreath cover can make the strip too short or too long; wrap the piece around the foam early and adjust stitch count before continuing. βœ— Changing colors without finishing the previous stitch neatly will leave messy joins; finish the previous stitch into the new color and weave ends as you go to minimize weaving at the end. βœ— Sewing the cover to the wreath without matching up rows can create uneven joins; pin or match rows carefully and sew along row lines so seams are smooth and aligned. βœ— Overstuffing the bunny or motifs will distort shapes and make sewing difficult; stuff lightly and evenly, adding small amounts until you reach the desired firmness.

Hoppy Spring Wreath Crochet Pattern

Brighten your doorway with this cheerful Hoppy Spring Wreath you can make at home. This pattern guides you through creating a minty covered foam wreath, sweet flowers, leaves, and an optional scrappy bunny to nestle inside. You'll enjoy the textured stitches and simple assembly as you create a handmade spring accent to hang or gift.

Intermediate 5-7 Hours

Materials Needed for Hoppy Spring Wreath Crochet Pattern

β€” Main Fabric

  • 01
    Size 4 worsted weight yarn (#4) in light green for wreath cover
  • 02
    Size 4 worsted weight yarn (#4) in bright yellow for flower centers
  • 03
    Size 4 worsted weight yarn (#4) in light yellow for flower transition
  • 04
    Size 4 worsted weight yarn (#4) in light pink for flower pedals
  • 05
    Size 4 worsted weight yarn (#4) in purple for flower accents
  • 06
    Size 4 worsted weight yarn (#4) in teal green for leaves
  • 07
    Red Heart Minty yarn (used for minty green) and Big Twist yarn for other colors
  • 08
    Fiber fill stuffing for bunny and motifs
  • 09
    Pink acrylic paint for hand painting ears and cheeks

β€” Tools Required

  • 01
    Crochet hook size 4.0 mm
  • 02
    Needle and scissors
  • 03
    Foam 11.75 inch wreath
  • 04
    Polyester fiberfill stuffing
  • 05
    Small paintbrush or dry brush for acrylic paint
  • 06
    Pink acrylic paint for cheeks and ears
  • 07
    Yarn needle for sewing pieces and weaving ends

Progress Tracker

0% Complete

β€” Materials :

Infos :

Size 4 worsted weight yarn in light green, bright yellow, light yellow, light pink, purple and teal green. I used Red Heart Minty, and big twist in the other colors. Fiber fill Stuffing. 4.0 mm hook. Needle/Scissors. Foam 11.75 inch wreath. *Bunny Materials seen on combined additional pattern. Pink Acrylic Paint and dry brush.

β€” Terms :

Infos :

Yarn Over – YO. Stitch – ST. Chain - CH. Single Crochet – SC. Double Crochet - DC. Slip Stitch – SL ST. Half Double Crochet – HDC. Triple Crochet - TR. Magic Circle – MC. Great tutorial for MC: https://www.youtube.com/watch?v=p298HxgsO1s. Half Double Crochet Foundation Stitch - HDCFS. Great Tutorial if this is unfamiliar: https://www.youtube.com/watch?v=I9Og5cd2L0o. Bubble Stitch – BS (explained in beard section). Between * * repeat this many additional times 'x'. End of row (Parenthesis) total number of stitches in row. Note: when changing colors work ends into stitches as you go along. This allows for less end weaving at the end of project. Also, when changing colors, always finish previous stitch with new color; this makes for a smoother color change. Big Note: I’m left-handed; all pictures are shown with left handed progress unless otherwise stated. Pattern works for both left and right-handed crafters.

β€” Minty Green Wreath :

Round 1 :

With Color A - Chain 23, sc into 2nd chain from the hook and dc in next *sc, dc* repeated until the end. Ch 1, Turn (22)

Round 2 :

*sc, dc* repeat to the end, ch 1, turn (22)

Info :

This is a good time to wrap this piece around your wreath, it should wrap just right around. If not, start over and add 2 stitches, if it’s too loose, do 2 less. (Pattern made in multiples of 2)

Info :

Every row is crochet exactly as row 2. 22 stitches in each row. This pattern is repeated in every row 97 more rows. (99 total rows)

Info :

Bring ends right sides together. Put hook into each 1st st, in row 99 and row 1. SL ST across joining ends together and making a circle. Tie off. Leave long length (45ish inches for sewing together.) Slide onto foam wreath right side out. Sew sides together around the wreath. Be sure to match up rows as you sew along. Weave end ends.

β€” Flower :

Info :

Make 5. With Bright Yellow 4mm hook

Round 1 :

Sc 10 in MC, Pull tight, sl st in first sc. (10)

Round 2 :

Change color to light yellow. *Sc, ch 1* repeat 9x, sl st in first st (10)

Round 3 :

Change color to pedal color. *Sl St in first sc, ch 3, Tr in same st, Tr in same st, DC in ch 1 space, Tr next st, Tr same st, ch 3, sl st in same st* repeat around making 5 pedals total. Tie off, leave length for sewing to wreath. Weave in ends.

β€” Leaf :

Info :

Make 5. With teal green, 4mm hook

Round 1 :

Ch 9, sl st 2nd chain from the hook, sc, sc, hdc, dc, dc, tr, tr last, ch 3, sl st in same st.

Round 2 :

Rotate now working on the other side. Ch 3, Tr in same st, tr, dc, dc, hdc, sc, sc, sl st. tie off. Weave in ends.

β€” Finishing :

Info :

HDCFS 20, fold in half and sew ends to back/top of wreath. (Hook) Sew flowers on either side of wreath. And one on the bottom. Sew leaves to either side of flower bunches. Use Scrappy bunny pattern (attached) to make Bunny. Sew Bunny at his bum to the bottom edge of the wreath. It helps to omit the tail. Sew an ear to top of wreath. Hand paint ears and cheeks with dry brush and pink acrylic paint (optional). Hang and Celebrate.

Assembly Instructions

  • Slide the crocheted wreath cover onto the foam wreath right side out and align rows, then sew the seam closed along the edge using the long tail left from joining.
  • Position and sew five flowers to the wreath: three in a small cluster on one side and two on the opposite/bottom edge as shown in photos, leaving tails to secure with whipstitch.
  • Fold each leaf and sew them to either side of the flower bunches so they frame the flowers naturally and securely.
  • Follow the scrappy bunny pattern to create the bunny, then sew the bunny to the wreath by attaching at the bunny's bum to the bottom edge of the wreath for stability.
  • Optional: hand paint the bunny ears and cheeks with pink acrylic paint using a dry brush; let paint dry before hanging the wreath.

Important Notes

  • πŸ’‘When changing colors, finish the previous stitch with the new color to create smoother color joins and reduce visible seams.
  • πŸ’‘Wrap your crocheted strip around the foam wreath before completing all rows to check fit and adjust stitch count as needed.
  • πŸ’‘Match up row lines when sewing the wreath cover together to keep the seam straight and avoid mismatched texture.
  • πŸ’‘Weave in ends as you go to avoid a large finishing session and to keep the back of the wreath neat for hanging.

This Hoppy Spring Wreath is a cheerful handmade accent that brightens any door or wall with flowers and a cuddly bunny. It combines a simple repeating textured strip with quick floral motifs for a polished finished look. Make one as a gift or for seasonal decorβ€”small details bring big smiles. 🧢🌸🐰

You ask,

we answer.

FAQs

What size will the finished wreath be?

The finished wreath fits an 11.75 inch foam wreath when using the recommended size 4 worsted yarn and 4.0 mm hook.

Can I use different yarn weights for this pattern?

Yes, you can substitute yarn weights, but the finished size will change; choose an appropriate hook so the cover fits your foam wreath.

Do I need prior crochet experience for this pattern?

This pattern is rated intermediate and assumes familiarity with basic stitches plus HDC foundation stitch and color changes.

How long does this project typically take to complete?

Most crocheters complete the project in 5-7 hours, depending on experience and whether you make the scrappy bunny as well.