🧢 Beautiful ✨ Detailed πŸ’ Adorable

Hermione Granger Amigurumi Pattern

Hermione Granger Amigurumi Pattern
4.6β˜… Rating
5-7 Hours Time Needed
4.1K Made This
βœ‚οΈ

Intermediate Level

Ideal for those with basic crochet experience, featuring slightly more advanced stitches and techniques to expand your skills.

⏱️

Weekend Treat

Takes 5-7 hours, making it an enjoyable project to finish over a couple of days.

🧸

Cute Companion

An adorable friend to cherish, handcrafted with love to bring comfort and joy for years to come.

About This Hermione Granger Amigurumi Pattern

This pattern creates a small Hermione Granger amigurumi complete with hair, school uniform, scarf and tiny book. It includes instructions for all parts: arms, legs, body, head, hair, jacket, skirt, scarf, and accessories. The pattern uses cotton thread and works mostly in spiral rounds for smooth shaping. You will learn techniques for attaching parts and creating hair strands.

Hermione Granger Amigurumi Pattern crochet pattern - detailed view of completed project

Suitable for crocheters with some experience, this pattern includes clear rounds and finishing steps. The finished doll is perfect as a collectible or handmade gift.

Why You'll Love This Hermione Granger Amigurumi Pattern

I absolutely love this pattern because it captures a lot of character in a small, handmade doll; the hair strands and tiny book give so much personality. I enjoy the way the removable jacket and scarf let you style the tiny outfit differently for display or play. I also love teaching intermediate techniques like working in the FLO/BLO and attaching tiny pieces cleanly. Making this doll has become one of my favorite weekend projects because it feels special to recreate a beloved character by hand.

Hermione Granger Amigurumi Pattern step 1 - construction progress Hermione Granger Amigurumi Pattern step 2 - assembly progress Hermione Granger Amigurumi Pattern step 3 - details and accessories Hermione Granger Amigurumi Pattern step 4 - final assembly and finishing

Switch Things Up

I love customizing this pattern by changing hair color or style to create new characters from the same base.

I often experiment with different yarn weights and hooks; using thicker yarn makes a chunkier, cuddlier doll while thinner thread creates a delicate mini version.

I sometimes embroider different facial expressions or add freckles to personalize each doll.

I enjoy swapping the scarf colors to represent different houses or create seasonal variations for holidays.

I recommend adding felt accessories, tiny glasses, or different tiny buttons to change the doll's personality.

I sometimes replace the safety eyes with embroidered eyes for a softer, child-safe toy option.

I like to make matching sets by altering clothing colors and adding small props like wands, books, or backpacks.

I also try adding wire in the limbs for posability if I want the doll to hold accessories or sit in a specific pose.

I often play with stitch textures for the jacket or skirt to create a more detailed, textured garment.

I encourage you to mix embroidery, felt, and small crochet elements to truly make the design your own and have fun with the process.

Common Mistakes & How to Fix Them

βœ— Skipping stitch markers during rounds with increases can cause miscounted stitches; place a marker at the first stitch of each round to keep track. βœ— Not stuffing gradually leads to lumpy or misshapen limbs and head; stuff lightly in small increments, shaping as you go for a smooth finish. βœ— Changing colors without securing ends can cause unraveling later; weave in or carry yarn neatly and secure color joins with a few slip stitches. βœ— Forgetting to place safety eyes between the correct rounds results in incorrect placement; follow the instruction to place safety eyes between rounds 8 and 9 with proper spacing. βœ— Pulling yarn too tightly when doing hair strands makes the head collapse; maintain even tension and test placement before sewing strands down.

Hermione Granger Amigurumi Pattern

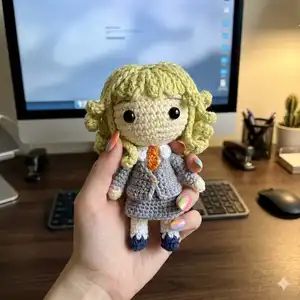
Make your own Hermione Granger amigurumi with a detailed, step-by-step crochet pattern. This pattern guides you through body, head, hair, clothing and accessories so you can create a charming, pocket-sized wizard. Perfect for gifting or displaying, the doll features a removable jacket, scarf and tiny book. Follow the full instructions and materials list to bring Hermione to life.

Intermediate 5-7 Hours

Materials Needed for Hermione Granger Amigurumi Pattern

β€” Main Fabric

  • 01
    Cotton thread - peach (skin tone)
  • 02
    Cotton thread - black (clothes and shoes)
  • 03
    Cotton thread - yellow (scarf)
  • 04
    Cotton thread - red (scarf and tie)
  • 05
    Cotton thread - dark gray (jacket and hat)
  • 06
    Cotton thread - gray (skirt and details)
  • 07
    Cotton thread - white (neck, shirt)
  • 08
    Cotton thread - brown (hair)
  • 09
    Embroidery threads - red and yellow (tie details)
  • 10
    Fiberfill - polyester stuffing (for stuffing body and limbs)

β€” Tools Required

  • 01
    Crochet hook 1.10 mm
  • 02
    Safety eyes (size according to preference)
  • 03
    Tapestry needle for sewing and weaving ends
  • 04
    A small button (for book or detail)
  • 05
    Embroidery threads red and yellow
  • 06
    Fiberfill for stuffing

Progress Tracker

0% Complete

β€” Materials :

Info :

Cotton thread (colour peach, black, yellow, red, dark gray, gray, white and brown). Crochet hook (1,10 mm). Fiberfill for stuff. Safety eyes. Tapestry needle, a button, embroider threads red and yellow.

β€” Abbreviations :

Infos :

mr - magic ring. ch - chain. Sl st - slip stitch. sc - single crochet. hdc - half double crochet. dc: double crochet. dec - decrease. inc - increase. FLO - front loop only. BLO - back loop only. [ ] repeat work. ( ) number of stitches of the round. dec3 - decrease 3 stitches together. inc3 - increase 3 stitches in the same place.

Info :

All the pieces are worked in a spiral, otherwise is indicated.

β€” Arms x 2 :

Round 1 :

Start with peach color: 5 sc in a MR (5)

Round 2 :

5 sc (5)

Info :

Change to gray color

Round 3-8 :

5 sc (5)

Info :

Do not stuff.

Info :

Close with 2 sc.

β€” Legs x 2 :

Round 1 :

With black color: 6 sc in a MR (6)

Round 2 :

6 sc (6)

Info :

Change to gray color.

Round 3-4 :

6 sc (6)

Info :

Change to peach color.

Round 5-6 :

6 sc (6)

Info :

Stuff lightly.

Info :

Make 2. Do no cut the thread of second leg.

Info :

Continue with the body

β€” Body :

Round 1 :

Continue with peach color: Ch 4, 6 sc (first leg), 4 sc over the ch, 6 sc (second leg) (20)

Round 2 :

20 sc (20)

Round 3 :

7 sc, 1 dec, 8 sc, 1 dec, 1 sc (18)

Info :

Change to gray color.

Round 4 :

6 sc, 1 dec, 8 sc, 1 dec (16)

Round 5 :

BLO; 6 sc (6)

Round 6-7 :

6 sc (6)

Round 8 :

Attaching the arms: 1 sc (body and arm), 5 sc in body only, 2 sc (body and arm), 7 sc in body only, 1 sc (body and arm) (16). Stuff.

Round 9 :

2 sc, 1 dec, [1 dec, 2 sc] x 3 (12)

Info :

Change to peach color.

β€” Cabeza :

Round 1 :

Continue from the body: 2 sc, 1 dec (8)

Round 2 :

Inc x 9 (18)

Round 3 :

1 sc, 1 inc (27)

Round 4 :

2 sc, 1 inc (36)

Round 5 :

3 sc, 1 inc (45)

Round 6-10 :

45 sc (45)

Info :

SAFETY EYES: between rounds 8 and 9, separated by 6 or 7 stitches.

Round 11 :

7 sc, 1 dec (40)

Round 12 :

8 sc, 1 dec (36)

Round 13 :

4 sc, 1 dec (30)

Round 14 :

3 sc, 1 dec (24)

Round 15 :

2 sc, 1 dec (18)

Round 16 :

1 sc, 1 dec (12)

Round 17 :

6 dec (6)

Info :

Embroider the eyebrows.

β€” Ears :

Round 1 :

3 sc in a MR (3). Sew them between rounds 7 and 9.

β€” Hair :

Round 1 :

With brown color: 6 sc in a MR (6)

Round 2 :

6 inc (12)

Round 3 :

BLO: 1 sc, 1 inc (18)

Info :

Now we are working each strand over the stitches of round 3. When you finish each strand move to the next stitch of the round 3 with a slst.

Round 1-5 :

Ch 6: from the thir ch: 4 hdc (4)

Round 6-18 :

Ch 18: from the second ch:: inc of sc x 4, 8 sc, 5 hdc (21)

Info :

Work now in FLO of round 2, the same way:

Round 1-12 :

Ch 12: 12 sc (12)

Info :

Strands 1-5 go on the forehead. The others, covering the head.

β€” Jacket :

Info :

BACK PART x 1: With black color, working in turning rounds, ch1 at the beginning.

Round 1 :

Ch 9: from the second ch, 8 sc (8)

Round 2-10 :

8 sc (8)

Info :

FRONT PART x 2: With black color, working in turning rounds, ch1 at the beginning.

Round 1 :

Ch 4: from the second ch, 3 sc (3)

Round 2-10 :

3 sc (3)

Info :

Sew the shoulders of the back and the front part. (only 3 stitches on each shoulder)

Info :

Sew the side part only 6 stitches (the rest of stitches are the armhole)

Info :

Make and edge with sc.

β€” Sleeves :

Info :

Working on the armhole:

Round 1 :

[2 sc, 1 inc] x 3, 1 sc (13)

Round 2-3 :

13 sc (13). Cut.

β€” Book :

Info :

Brown part x 2: in turning rounds with ch 1 at the beginning:

Round 1 :

Ch 5: 4 sc (4)

Round 2-5 :

4 sc (4). Cut.

Info :

White part: in turning rounds with ch 1 at the beginning:

Round 1 :

Ch 5: 4 sc (4)

Round 2-10 :

4 sc (4). Cut.

Info :

Fold in half the white part, put it between both brown parts, sew them finishing the book.

β€” Scarf :

Info :

Start with red color and then change to yellow every other 2 rounds. Working in turning rounds, ch1 at the beginning.

Round 1 :

Ch 3: from the second ch, 2 sc (2)

Round 2 :

2 sc (2). Change to yellow color.

Round 3-4 :

2 sc (2). Change to red color.

Info :

Continue to round 42 (finishing with red color).

β€” White neck :

Round 1 :

With white color: Ch 18: from the third ch: 1 inc of hdc, 14 sc, 1 inc of hdc (18).

β€” Tie :

Info :

Work with two strands of embroidery threads yellow and 2 red, together.

Round 1 :

Ch 5: from the second ch, 3 sc, inc of 5 hdc, 3 sc on the other side of the ch. Cut.

β€” Skirt :

Info :

Join dark gray color in FLO of round 4 of the body:

Round 1 :

[3 sc, inc] x 4 (20)

Round 2 :

[4 sc, inc] x 4 (24)

Round 3-4 :

24 sc (24). Cut.

β€” Final details :

Info :

Sew or glue the White neck around the neck of the amigurumi. Put her the tie.

Assembly Instructions

  • Place and secure safety eyes between rounds 8 and 9 of the head, separated by 6 or 7 stitches, before stuffing the head.
  • Attach ears between rounds 7 and 9 of the head and sew them flat to match the head curvature.
  • Sew the shoulders of the jacket back and the front parts aligning only 3 stitches on each shoulder and sew side seams leaving armholes.
  • Fold the white book part in half, sandwich it between the two brown book covers and sew around the edges to finish the tiny book.
  • Sew or glue the white neck piece around the doll's neck and attach the embroidered tie in front.

Important Notes

  • πŸ’‘Use stitch markers to mark the beginning of each round to prevent losing track when working in spirals.
  • πŸ’‘Place safety eyes before stuffing the head to ensure secure placement and correct spacing as indicated.
  • πŸ’‘Stuff the limbs and body gradually and evenly to maintain a smooth shape and avoid lumps when closing.
  • πŸ’‘When changing colors, carry the yarn neatly or weave in ends to prevent loose tails and ensure a clean finish.

Create a magical Hermione Granger amigurumi with this detailed pattern, complete with hair, scarf, and tiny book. This charming doll makes a perfect handmade gift or collector's item. Enjoy the process and cherish the result of your handmade creativity. 🧢✨

You ask,

we answer.

FAQs

What size will the finished piece be?

The finished amigurumi measures approximately 12-15 cm tall depending on your tension and yarn thickness when using the recommended thread and 1.10 mm hook.

Can I use different yarn weights for this pattern?

Yes, you can use different yarn weights but this will change the final size; choose an appropriate hook and adjust stitch counts if needed for proportion.

Do I need prior crochet experience for this pattern?

This pattern is rated intermediate, so basic knowledge of single crochet, increases, decreases, BLO/FLO and working in spiral rounds is recommended.

How long does this project typically take to complete?

Most crocheters complete this project over a weekend, approximately 5-7 hours depending on experience, detailing, and finishing work.

When should I attach the hair strands?

Work the hair strands over the stitches of round 3 as instructed; place strands 1-5 on the forehead and the rest covering the head before final sewing.