🧢 Beautiful ✨ Detailed πŸ’ Adorable

Hammerhead Shark Friend Amigurumi Pattern

Hammerhead Shark Friend Amigurumi Pattern
4.3β˜… Rating
2-4 Hours Time Needed
2.5K Made This
βœ‚οΈ

Intermediate Level

Ideal for those with basic crochet experience, featuring slightly more advanced stitches and techniques to expand your skills.

⏱️

Bite-Sized Project

Finishes in 2-4 hoursβ€”perfect for an afternoon of creative relaxation.

🧸

Cute Companion

An adorable friend to cherish, handcrafted with love to bring comfort and joy for years to come.

About This Hammerhead Shark Friend Amigurumi Pattern

This pattern creates a small, happy hammerhead shark amigurumi with a distinctive head and simple fins. The design uses DK weight cotton yarn with clear shaping instructions to build the head, body and fins. Photos and stitch-by-stitch rounds guide you from start to finish for a neat, collectible finished toy.

Hammerhead Shark Friend Amigurumi Pattern crochet pattern - detailed view of completed project

Worked in both rounds and short rows, this shark is stuffed as you go for smooth shaping. Optional yarn and hook size notes are included to help you adjust the final size.

Why You'll Love This Hammerhead Shark Friend Amigurumi Pattern

I absolutely love this pattern because it captures the funny, lovable shape of a hammerhead in a simple, approachable way. I enjoy how the head shaping creates personality with just a few careful increases and decreases. The pattern is compact yet satisfying to make, so I often reach for it when I want a quick handmade gift. I also love seeing how makers customise colours and fin placement to give each shark its own character.
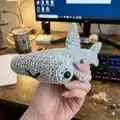
Hammerhead Shark Friend Amigurumi Pattern step 1 - construction progress Hammerhead Shark Friend Amigurumi Pattern step 2 - assembly progress Hammerhead Shark Friend Amigurumi Pattern step 3 - details and accessories Hammerhead Shark Friend Amigurumi Pattern step 4 - final assembly and finishing

Switch Things Up

I love how easy it is to customise this shark: change the yarn color to create reef-inspired shades or pastel friends for a softer look.

Want a mini keychain? Use thinner yarn and a smaller hook to make tiny hammerheads perfect for bags or gifts.

I sometimes make a jumbo version by using bulky yarn and a larger hook for a cuddly desk pal β€” try a 5mm or larger hook for that squishy result.

I often add embroidered freckles, spots, or a tiny fin flag for personality; embroidery and little felt accessories make each shark unique.

If you want more realistic anatomy, add extra small fins along the sides or a longer tail β€” placement and number are up to you.

I like to experiment with eye sizes: smaller safety eyes or embroidered eyes change the expression dramatically.

Try adding a tiny bell or stuffing with scented sachets to make a lavender sleep buddy version.

I sometimes stuff firmly at the nose and a bit softer at the body for a more tapered look β€” adjust stuffing to change posture and weight distribution.

For a washable toy, use washable toy stuffing and securely fasten safety eyes or embroider eyes instead for small children.

I recommend practicing the head shaping on scrap yarn first if you want to tweak increases and decreases for a squatter or longer head profile.

Common Mistakes & How to Fix Them

βœ— Skipping the stitch count at the end of each round can lead to mistakes; always check the number in brackets and count your stitches after each round. βœ— Not stuffing as you go causes odd lumps or flattened areas; stuff gradually and shape while you crochet to maintain smooth curvature. βœ— Using a hook that's too large will make stitches loose and eyes may not sit firmly; size down 0.5-1.0mm from recommended to keep stitches tight and neat. βœ— Forgetting to place or mark the first stitch in rows causes misaligned decreases; use a stitch marker to mark starting points and turning edges when working rows. βœ— Placing decreases in the wrong stitches will distort the edge shape; follow the photo guidance and move decreases to edge stitches if needed to keep tidy shaping.

Hammerhead Shark Friend Amigurumi Pattern

Make a sweet, pocket-sized hammerhead shark to brighten your day. This pattern guides you through shaping the distinctive hammerhead head, body, and fins using DK yarn and simple stitches. Clear step-by-step rounds and photos help you assemble a cute, squeezable pal you can finish in an afternoon. Perfect as a handmade gift or a charming desk companion.

Intermediate 2-4 Hours

Materials Needed for Hammerhead Shark Friend Amigurumi Pattern

β€” Main Fabric

  • 01
    Grey DK weight cotton yarn (main color), approximately 50g-100g depending on size desired
  • 02
    Chunky yarn (optional) for a larger, squishier shark (use with a larger hook)
  • 03
    Small amount black yarn for embroidered smile/detailing
  • 04
    Contrast yarn for any additional decorative details (optional)
  • 05
    2 x safety eyes (size suitable for chosen yarn)
  • 06
    Polyester stuffing (fibre fill)

β€” Tools Required

  • 01
    Crochet hook 4.0mm (recommended)
  • 02
    Crochet hook 3.0mm (optional for smaller shark)
  • 03
    Crochet hook 5.0mm (optional for larger/chunky shark)
  • 04
    2 x safety eyes
  • 05
    Scissors
  • 06
    Yarn needle for sewing and weaving in ends
  • 07
    Stitch markers (recommended when working rows and rounds)
  • 08
    Polyester stuffing
  • 09
    Small dab of craft glue (optional to secure embroidered smile)

Progress Tracker

0% Complete

β€” Pattern notes :

Infos :

The number in brackets at the end of each round indicates the total number of stitches. You can use whatever method you like to start your amigurumi, I prefer to chain 2 and work into the first stitch but if you like a magic circle you go right ahead. I used cotton DK yarn and a 4mm hook for this shark, but I've also made them using chunky yarn for an extra squishy pal. You can use whatever yarn you have to hand, I'd suggest sizing down your hook 0.5mm - 1.0mm from the recommended size to ensure your stitches are tight. DK yarn and a 3mm hook will result in a smaller item and chunky yarn and a 5mm hook will obviously be larger. I sometimes use a little dollop of craft glue to keep the smile in place. This guy is quite little so I think less is more with fins, but make as many as you like if you prefer.

β€” Head :

Instruction :

Chain 2, 6sc into second chain from hook.

Round 1 :

*inc* x 6 (12)

Round 2 :

*BLO sc* (12)

Round 3-5 :

*sc* (12)

Info :

Begin working in rows

Instruction :

Ch1 & turn

Round 6-14 :

sc x 10, ch1, turn

Round 15 :

sc x 10, ch 2, do not turn, continue working in first st of row 15

Round 16 :

sc x 10 and in both ch spaces (12)

Round 17-18 :

*sc* (12)

Round 19 :

*BLO dec* x 6 (6)

Info :

FO.

Info :

Insert safety eyes in beginning/ end spaces.

Info :

This is how your head should look after fastening off.

β€” Body :

Info :

Join in fifth st from corner as shown in the photo.

Round 1 :

Sc in each row edge, corner and ch sp around (28)

Round 2 :

*sc*

Round 3 :

8sc, dec, 12sc, dec, 4sc (26)

Round 4 :

8sc, dec, 11sc, dec, 3sc (24)

Round 5 :

7sc, dec, 10sc, dec, 3sc (22)

Round 6 :

7sc, dec, 9sc, dec, 2sc (20)

Round 7 :

7sc, dec, 8sc, dec, 1sc (18)

Info :

Start stuffing as you go

Round 8 :

*sc* (18)

Round 9 :

6sc, dec, 8sc, dec (16)

Round 10 :

*sc* (16)

Round 11 :

6sc, dec, 6sc, dec (14)

Round 12-15 :

*sc* (14)

Round 16 :

Dec, 5sc, dec, 5sc (12)

Round 17-18 :

*sc* (12)

Round 19 :

Dec, 4sc, dec, 4sc (10)

Round 20 :

*sc* (10)

Info :

Stuff firmly

Round 21 :

Sc closed (5)

Round 22 :

Ch1, turn (Sc, hdc, dc, dc, tr, tr) in next st. Ch4, sc in next 2 stitches. (Sc, hdc, dc dc) in next st, ch 2, sc in last st.

β€” Big fin :

Info :

Make 1

Instruction :

Chain 2, 6 sc in second chain from hook.

Round 1-2 :

*sc* (6)

Round 3 :

*sc, inc* x 3 (9)

Round 4 :

*sc* (9)

Round 5 :

*2 x sc, inc* x 3 (12)

Round 6 :

*sc* (12)

Info :

Sc closed and fasten off.

β€” Small fin :

Info :

Make 2 - 5

Instruction :

Chain 2, 6 sc in second chain from hook.

Round 1-2 :

*sc* (6)

Round 3 :

*sc, inc* x 3 (9)

Round 4-5 :

*sc* (9)

Info :

Sc closed and fasten off.

β€” Assembly :

Item Name (P1) :

Attach fins to the body using the photo as a guide.

Item Name (P2) :

Use black yarn to sew on a smile and secure it; a dab of craft glue can help keep the smile in place.

Item Name (P3) :

Join head to body by aligning and sewing into the fifth stitch from the corner as shown in the photo for a neat connection.

Item Name (P4) :

Insert safety eyes into the beginning/end spaces of the head before final assembly and ensure they are firmly secured.

Info :

Feel free to sell your finished items but please credit the designer and tag @manatee_squares on social media. Please do not recreate this pattern in any way.

Assembly Instructions

  • Join head to body by aligning the head opening and sewing into the fifth stitch from the corner for a secure, neat join.
  • Insert the 2 safety eyes into the beginning/end spaces of the head before final assembly and ensure washers are tightened for safety.
  • Attach the big fin and small fins to the body using the provided photos as a guide; position them symmetrically and sew firmly through the base of each fin.
  • Use black yarn to embroider or sew on a smile; a small dab of craft glue can be used to secure the ends of the smile if desired.
  • Stuff the body firmly but not overstuffed; add stuffing gradually and shape as you go to keep smooth curves.

Important Notes

  • πŸ’‘The number in brackets at the end of each round indicates the total stitch countβ€”check this every round to avoid mistakes.
  • πŸ’‘Stuff gradually while crocheting so shaping remains smoothβ€”overstuffing can distort the finished shape.
  • πŸ’‘Use photos as a placement guide before sewing parts down and pin parts in place to check symmetry.
  • πŸ’‘Consider sizing down your hook by 0.5-1.0mm from the recommended size if you want tighter stitches and a firmer finish.

This little hammerhead was designed to bring a playful smile to your day and make a perfect tiny handmade gift. Make one in different shades for a whole pod of friends to brighten a shelf or a desk. Share your makes and tag @manatee_squares so I can see your lovely creations! 🧢🦈

You ask,

we answer.

FAQs

What size will the finished piece be?

The finished amigurumi is a small, palm-sized hammerhead when made with DK yarn and a 4mm hook; exact size will vary by yarn and hook choice.

Can I use a different yarn weight or hook size?

Yes, you can use different yarn weights but this will affect final size; a 3mm hook with DK yarn yields a smaller shark and a 5mm hook with chunky yarn makes a larger, squishier toy.

Do I need to know special stitches for this pattern?

This pattern uses basic stitches (single crochet, increases and decreases, half double crochet and simple clusters) and is suitable for crocheters comfortable with working in rounds and short rows.

How long does this project typically take?

This pattern is a bite-sized project and typically finishes in 2-4 hours depending on your speed and how many fins or custom details you add.