🧢 Beautiful ✨ Detailed πŸ’ Adorable

Grumpy Mini Octopus Amigurumi Pattern

Grumpy Mini Octopus Amigurumi Pattern
4.0β˜… Rating
2-4 Hours Time Needed
2.9K Made This
βœ‚οΈ

Intermediate Level

Ideal for those with basic crochet experience, featuring slightly more advanced stitches and techniques to expand your skills.

⏱️

Bite-Sized Project

Finishes in 2-4 hoursβ€”perfect for an afternoon of creative relaxation.

🧸

Cute Companion

An adorable friend to cherish, handcrafted with love to bring comfort and joy for years to come.

About This Grumpy Mini Octopus Amigurumi Pattern

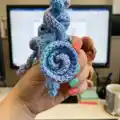
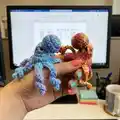
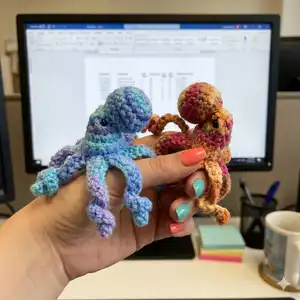
This pattern creates a tiny, grumpy-styled octopus perfect for ornaments, advent calendars, or small toys. It features a round nose, a slightly flattened body, and eight curled arms worked from chains into textured spirals. The design works beautifully with variegated yarns to create colorful, unique characters every time.

Grumpy Mini Octopus Amigurumi Pattern crochet pattern - detailed view of completed project

You will work in rounds for the nose and body, then create four unique arm shapes and repeat them to make eight arms total. Simple finishing instructions are included to assemble the nose, add eyes, and close the body neatly.

Why You'll Love This Grumpy Mini Octopus Amigurumi Pattern

I absolutely love this pattern because it turns small amounts of yarn into a wonderfully characterful little creature. I enjoy how the curled arms give each octopus unique movement and personality. The pattern is forgiving and fun to experiment with different yarns and colors. Sewing the nose on and adding the eyelids is a satisfying finishing touch that brings out the grumpy expression I adore.

Grumpy Mini Octopus Amigurumi Pattern step 1 - construction progress Grumpy Mini Octopus Amigurumi Pattern step 2 - assembly progress Grumpy Mini Octopus Amigurumi Pattern step 3 - details and accessories Grumpy Mini Octopus Amigurumi Pattern step 4 - final assembly and finishing

Switch Things Up

I love how easy it is to customize this octopus by simply changing yarn colorways; a speckled variegated yarn gives a playful, mottled look.

Want it bigger or smaller? Swap yarn weight and hook size β€” bulky yarn with a larger hook makes a cuddly chunky version, while fingering yarn and a smaller hook creates a tiny keychain friend.

I often change the eye size to alter personality; try 4mm eyes for a shy look or 8mm for a bolder expression.

Experiment with eyelid shapes: a sharp 'V' makes a grumpy face, while rounded lids make a sleepy expression.

Try embroidering tiny freckles or a smile under the nose to convert grumpy to cheeky in minutes.

If you want posable arms add a short length of floral wire inside the chains before stuffing and closing for bendable tentacles.

Make a set of octopuses in graduated sizes for a decorative display or mobile.

Use felt or tiny crocheted clothes to create seasonal characters β€” think Santa hat or tiny scarf for holiday charm.

Change arm patterns or lengths to make some arms straight and others curly for variety in a single octopus.

I like adding a small loop at the top to hang the octopus as an ornament; a single chain loop closed into the top works well.

For durable toys, secure all safety eyes with washers and weave in tails multiple times for extra strength.

Use metallic or sparkly yarn for festival versions and add tiny beads on arm tips for a decorative, tactile finish.

Common Mistakes & How to Fix Them

βœ— Skipping placement of the safety eyes often makes the face look off-center; mark the positions before fastening to ensure symmetry. βœ— Overstuffing the body will make it too round and prevent the flattened, grumpy look; stuff gently and check shape as you go. βœ— Ignoring BLO and FLO instructions will mix inside and outside stitches and change the texture; follow the BLO/FLO steps exactly. βœ— Not leaving a long tail when finishing the nose prevents neat sewing; leave a long tail to sew the nose on securely. βœ— Rushing the arm closure can leave holes between arms; after slip stitching into the first chain, use the tail and a needle to close the remaining gap carefully.

Grumpy Mini Octopus Amigurumi Pattern

Make a tiny, grumpy mini octopus you can use as an ornament or a little toy. This pattern walks you through the nose, body, and eight curling arms with clear round-by-round instructions. Perfect for stash-busting variegated yarn and creating a charming, small handmade gift. You'll enjoy the simple shaping and playful curled arms that wrap around branches or little fingers.

Intermediate 2-4 Hours

Materials Needed for Grumpy Mini Octopus Amigurumi Pattern

β€” Main Fabric

  • 01
    Red Heart Super Saver (variegated colorways such as Ocean, Marrakesh, Stillwater Pooling) - 2 oz (approximate) for one mini octopus
  • 02
    Worsted weight yarn (#4) - variegated or solid, small amount (about 2 oz total) for body and arms

β€” Tools Required

  • 01
    Crochet hook size 3.5 mm (or what you like to use with the yarn choice)
  • 02
    6mm safety eyes (2 pieces)
  • 03
    Polyester stuffing
  • 04
    Embroidery needle for sewing the nose and finishing
  • 05
    Yarn needle for weaving in ends
  • 06
    Scissors
  • 07
    Stitch markers (recommended)

Progress Tracker

0% Complete

β€” Materials :

Infos :

3.5 hook (or what you like to use with the yarn choice). 2 oz Red Heart Super Saver (Ocean, Marrakesh, Stillwater Pooling, or any color you like! I like using this yarn that changes colors with the octopus since they come in a variety of colors.). 6mm Safety Eyes.

β€” Size :

Info :

2 inches from top of nose to bottom of body. 4-5 inches from nose to end of arms. 4-5 inches across from arm to arm.

β€” Abbreviations :

Infos :

RND: Round. RW: Row. SC: Single crochet. MC: Magic Circle. INC: 2 sc in the next stitch. CH: Chain. DC: Double crochet. DEC: sc the next 2 stitches together. FO: Fasten off. HDC: Half double crochet. BLO: Back Loop Only (inside of body). FLO: Front Loop Only (Outside of body). SLST: Slip stitch. SC3TOG: Single crochet 3 stitches together. HDC3TOG: Half double crochet 3 stitches together. ST: Stitch/es.

β€” Nose :

Round 1 :

6 sc in a mc (6)

Round 2 :

(inc) 6 times (12)

Round 3 :

(1 sc, inc) 6 times (18)

Round 4-5 :

1 sc in each st around (18)

Round 6 :

(1 sc, dec) 6 times (12)

Round 7 :

(2 sc, dec) 3 times (9)

Info :

TO but do not close, leave long tail for sewing. Stuff the nose at this time. Set aside.

β€” Body :

Round 1 :

Ch 9 slst into first chain to close

Round 2-3 :

1 sc in each st around (9)

Round 4 :

(2 sc, inc) 3 times (12)

Round 5 :

(2 sc, inc) 4 times (16)

Round 6 :

BLO 1 sc in each st around (16)

Info :

Add eyes between rows 2 and 3 about 4 to 5 stitches apart (See Picture A). At this time you can add the eye lids in a 'V' shape to make it appear a bit grumpy (See Picture B). Stuff the body but not too much as it should be some what flat.

Round 7 :

(dec) 8 times (8)

Info :

Close then reattach to FLO from round 6

Round 6 :

FLO 1 sc in each st around (16)

Round 7-8 :

1 sc in each st around (16)

Info :

We will begin making the Octopuses arms now.

β€” Arms :

Info :

Arms can be done in any number of ways. If you work the arms Clockwise they will curl up, if you work the arms counterclockwise they will curl down (See pictures C and D). Either way is fine and gives you a unique look! I prefer working counter clockwise so they curl down, if I can figure out how to alternate to get them curling in both directions I will update the pattern!! Here are 4 arm patterns. Once you complete Arm 4 go back and repeat all arms again to get 8 arms.

Arm 1 :

Ch 20 turn, slst into 2nd chain from hook, 5 sc, sc3tog, 2 sc, 5 hdc, 3dc (should be at base of chain), skip st, sc into next st.

Arm 2 :

Ch 15 turn, slst into 2nd chain from hook, 7 sc, 6 hdc, skip st, sc into next st.

Arm 3 :

Ch 18 turn, slst into 2nd chain from hook, 3 sc, hdc3tog, 7 hdc, 3 dc, skip st, sc into next st.

Arm 4 :

Ch 20 turn, slst into 2nd chain from hook, 4 sc, 3 hdc, hdc3tog, 5 hdc, 3 dc, skip st, sc into next st.

Info :

Once you have 8 arms slst into 1st chain of 1st arm. TO leave tail. Using a needle and the tail go around and close hole left from skipping a stitch (See picture E). Weave in ends.

β€” Assembling :

Info :

Using the tail from the nose and an embroidery needle, sew the nose on. I start at the top of the head sewing the opening closed and tucking in any extra starting tail from the first chain. Try to center it between the eyes with the eyelids positioned so it is looking towards the nose. Weave in any loose ends.

Info :

Enjoy your Grumpy Octopus!

Assembly Instructions

  • Attach safety eyes between rounds 2 and 3 of the body, spacing them about 4 to 5 stitches apart and add small 'V' eyelids to create the grumpy expression.
  • Sew the nose onto the center front of the head using the long tail left on the nose; start at the top of the head, close the opening and tuck any extra starting tail into the seam.
  • After working all arms (repeat arms 1-4 again to make 8), slip stitch into the first chain of the first arm, then use the tail and a needle to close the remaining gap left by the skipped stitch and weave in ends.
  • Stuff the nose and body lightly β€” the body should be somewhat flat rather than overstuffed β€” check shaping before completing the final closures.
  • Position and anchor each arm around the base of the body as you join them so they sit evenly; weave in all ends securely to prevent unraveling.

Important Notes

  • πŸ’‘Place safety eyes before closing the body and add eyelids to secure them in the desired grumpy position.
  • πŸ’‘Work BLO and FLO sections carefully to create the flattened inside and rounded outside texture as shown.
  • πŸ’‘Leave long tails on pieces that need sewing (nose and arm closure) to make assembly neat and secure.
  • πŸ’‘Stuff moderately; overstuffing will remove the flattened grumpy shape while understuffing may make finishing difficult.

This little Grumpy Mini Octopus is a delightful, tiny companion full of charm and personality. It works up quickly and is perfect for gifts, ornaments, or a pocket-sized friend. Use variegated yarns to make every octopus uniquely colorful and full of character. 🧢✨

You ask,

we answer.

FAQs

What size will the finished piece be?

The finished amigurumi measures approximately 2 inches from the top of the nose to the bottom of the body and about 4-5 inches across including the arms when using the recommended yarn and a 3.5 mm hook.

Can I use different yarn weights for this pattern?

Yes, you can use different yarn weights, but this will affect the final size. Use an appropriate hook for your chosen yarn and expect the octopus to be larger with bulkier yarn or smaller with thinner yarn.

Do I need prior crochet experience for this pattern?

This pattern is rated intermediate because it uses BLO/FLO techniques and joins multiple small pieces; basic experience with amigurumi methods and the ability to follow rounds is recommended.

How long does this project typically take to complete?

Most crocheters complete this project in 2-4 hours depending on experience and whether you make adjustments to arm styles or decorations.