Make a relaxed, beach-ready tote with textured stitches and an integrated strap. This versatile pattern uses bulky yarn for a sturdy, stylish bag you can carry everywhere. You'll enjoy the simple shaping and clear assembly steps to create a polished handmade accessory. Perfect for gifting or everyday use, this tote pairs well with a large button closure for a finished look.
Progress Tracker
0% Complete
— Front/Back Panels (make 2): With 7mm hook (or larger hook) :
Row 1 :
Ch 30, 2dc in 3rd ch from hook, dc across until 1 ch remains, 2dc in last ch. (30)
Row 2 :
Ch 2, turn, 2dc in 1st st, *ch 1, sk 1, dc 1* across until 1 st remains, 2dc in last st. (32)
Row 3 :
Ch 2, turn, 2dc in 1st st, dc across, placing a dc in every st and ch sp until 1 st remains, 2dc in last st. (34)
Row 4 :
Ch 2, turn, 2dc in 1st st, *sk 1 st, dc 1, dc in sk st* across until 1 st remains, 2dc in last st. (36)
Row 5 :
Ch 2, turn, 2dc in 1st st, dc across until 1 st remains, 2dc in last st. (38)
Row 6 :
Ch 2, turn, dc in 1st st, *ch 1, sk 1, dc 1* across until 1 st remains, dc in last st. (38)
Row 7 :
Ch 2, turn, dc in every st and ch sp across. (38)
Row 8 :
Ch 2, turn, dc in 1st st, *sk 1, dc 1, dc in sk st* across until 1 st remains, dc in last st. (38)
Row 9 :
Ch 2, turn, dc across. (38)
Info :
Repeat rows 6-9 two more times.
Row 18 (Front Panel) :
ch 1, turn, sc across. Do not fasten off.
Row 18 (Back Panel includes button loop) :
ch 1, turn, sc 19, ch 18, sc 19. (38 sc, 18 ch) Do not fasten off. (If you'd prefer a bag with no button, make two of the front panel!)
Info :
Continue sc around the outside edges of the panel, placing 1sc in the end of the sc rows, 2 sc in the end of each dc row, and 1 sc in each st of the foundation chain. Fasten off.
Info :
Place a stitch marker in each of the two center stitches at the bottom of each panel.
— Side/Bottom/Strap Panel: Switch to 6mm hook (or smaller hook) :
Row 1 :
Ch 11, sc in 2nd ch from hook, sc across. (10)
Row 2 :
Ch 1, turn, sc across. (10)
Rows 3-50 :
Repeat row 2. Place stitch markers at both ends of row 50.
Row 51 :
Ch 1, turn, sc2tog, sc in next 6 sts, sc2tog. (8)
Row 52 :
Ch 1, turn, sc across (8)
Rows 53-149 :
repeat row 52.
Row 150 :
Ch 1, turn, 2sc in 1st st, sc across until 1 st remains, 2sc in last st. (10) Place stitch markers at both ends of row 150.
Row 151 :
Ch 1, turn, sc across. (10)
Rows 152-200 :
repeat row 151.
Info :
**For longer or shorter strap, add or subtract rows between rows 53 and 149.**
— Assembly :
Step 1 :
With right sides facing - Using the st markers placed at row 50 and 150 of strap, attach the strap panel to the top corners of one of the bag panels.
Step 2 :
Using the stitch markers at the bottom center of the bag panel, attach the ends of the strap to the bag panel.
Step 3 :
Starting at the bottom center, sc the panel and strap together, continuing around the edge of the strap and down the other side of the panel. Sl st into 1st st to join. Fasten off.
Info :
Repeat for the other side panel.
Info :
Using tail, sew the bottom of the bag closed. I used a mattress stitch, but any seaming method will work.
Finishing :
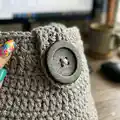
Weave in all ends. Sew a large button onto the top center of the front panel.
Info :
Enjoy your new tote!!!
Assembly Instructions
- With right sides facing - using the stitch markers placed at row 50 and row 150 of the strap, align and attach the strap panel to the top corners of one bag panel and secure with locking stitch markers before sewing.
- Using the stitch markers placed at the bottom center of each bag panel, align the strap ends to the bottom center markers and sew the strap ends securely to the panel using a yarn needle and matching yarn.
- Starting at the bottom center, single crochet the panel and strap together by working around the edge of the strap and down the other side of the panel; slip stitch into the first stitch to join and fasten off when complete.
- Repeat the same attachment and single crochet join for the other side panel so the strap is attached and the bag forms a continuous shape.
- Using the yarn tail, sew the bottom of the bag closed using a mattress stitch (or any preferred seaming method) to create a neat, sturdy base.
Important Notes
- 💡Bag is made with two nearly identical front/back panels, and the strap and side/bottom panels are worked as one piece.
- 💡Ch 2 at the beginning of the row does NOT count as a stitch when working the front/back panels.
- 💡Rows 4, 8, and repeats use a crossed double crochet stitch: skip one stitch, double crochet in the next stitch, then work a second double crochet into the skipped stitch, crossing in front of the previous stitch.
- 💡Switch to a hook 1mm smaller for the side/bottom/strap panel to give the strap and sides firmer structure compared to the front/back panels.
- 💡Place stitch markers at both ends of row 50 and row 150 of the strap and at the two center stitches at the bottom of each panel for accurate assembly alignment.
This Grindstone Tote was designed to be both functional and stylish—perfect for the beach or everyday use. Make it with bulky yarn for a sturdy tote, or experiment with different yarns for varied sizes and textures. Share your finished bag with the designer and tag your photos so others can admire your handmade work! 🧶👜